Show the code
python==3.12.8
streamlit==1.41.1
I recently embarked on a journey to rapidly prototype a personal LLM application. Like many developers, I was drawn to Streamlit for its simplicity and Python-first approach. The ability to quickly design interactive UIs without wrestling with HTML or CSS made it the perfect fit. However, the road to deploying that Streamlit app on AWS turned out to be much more challenging than I initially anticipated. I naively thought that containerizing my app with Docker would be the golden ticket, and I’d be up and running in no time. I was wrong! This post will take you through my learning experience, detailing the various approaches I tried to host the Streamlit application on the AWS cloud, and share what I learned through the process. From serverless lambda functions to dedicated virtual machines, I’ll describe what worked, what didn’t, and most importantly, why. By the end of the post, I hope that my experience helps you avoid the pitfalls and saves you from many days of frustration. Let’s begin!
python==3.12.8
streamlit==1.41.1All the code examples used in this post can be found on the GitHub repo 2025-01-21-streamlit-deployment-aws
With my Streamlit application working perfectly on my local machine, I confidently assumed the next step would be straightforward. “Dockerize it, and deploy it to the cloud,” I thought. After all, Docker simplifies application packaging, and cloud platforms like AWS are built for containerized apps, right? My understanding was that the cloud provided a wide array of services to host containerized apps, automatically managing network configurations, and quickly exposing my app through a public URL. I naively believed it would be a seamless and fast process.
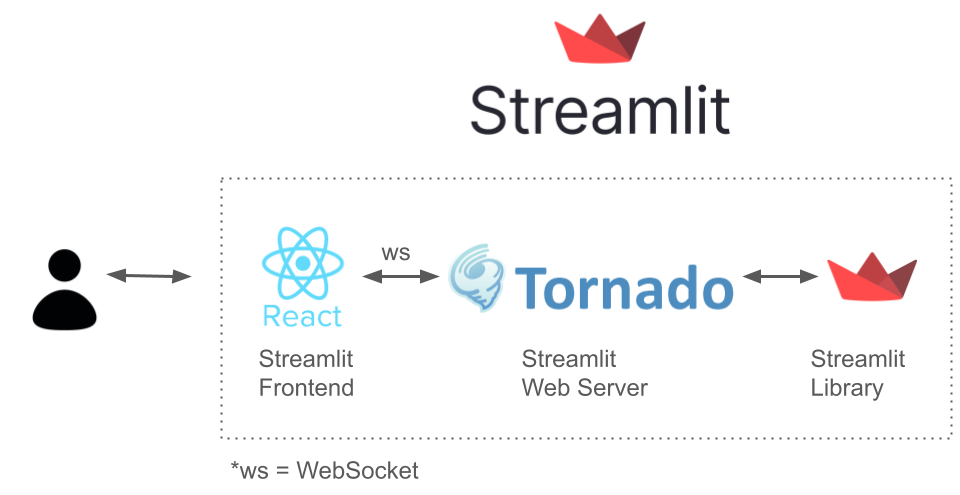
To understand where I went wrong, it’s helpful to understand the internal architecture of Streamlit. As shown in the diagram below (inspired by the post: Streamlit vs HTMX), a Streamlit application consists of three main parts:
The React frontend is responsible for rendering the user interface, while the Tornado web server manages the application’s logic and communication with the frontend. What’s crucial is that the frontend and the Tornado web server communicate through the WebSocket protocol, enabling real-time, bi-directional communication. This is a key detail which is easy to overlook when starting out.
To truly grasp the importance of WebSockets for Streamlit, let’s take a look at what’s happening under the hood during its network communication. I have used Wireshark to capture the network communication that happens when a simple Streamlit app (shown below) is loaded in a browser.
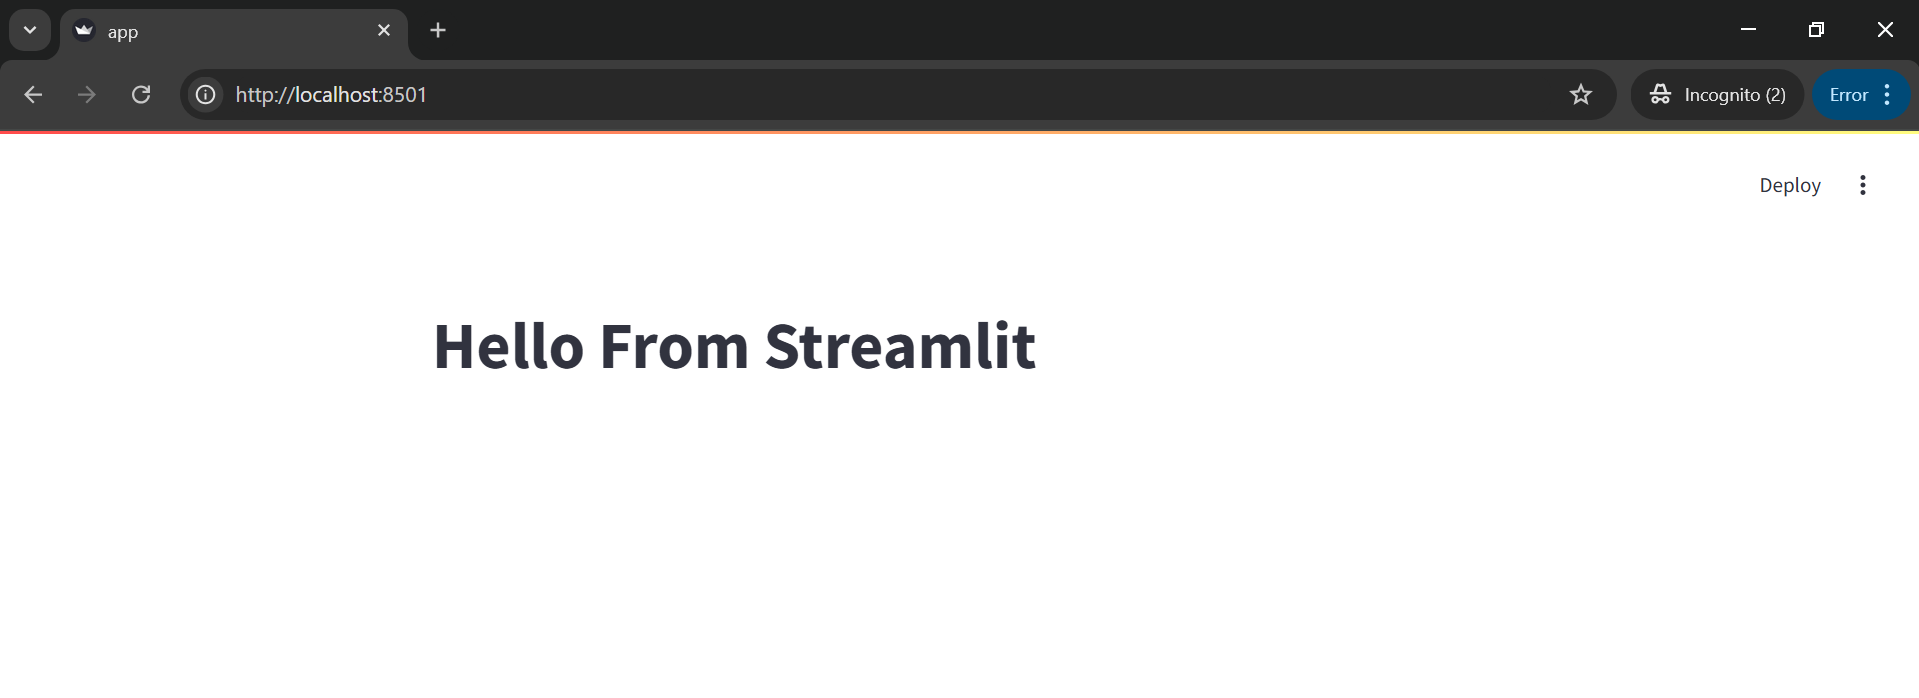
As you can see, the app simply displays “Hello From Streamlit” and is running on localhost:8501.
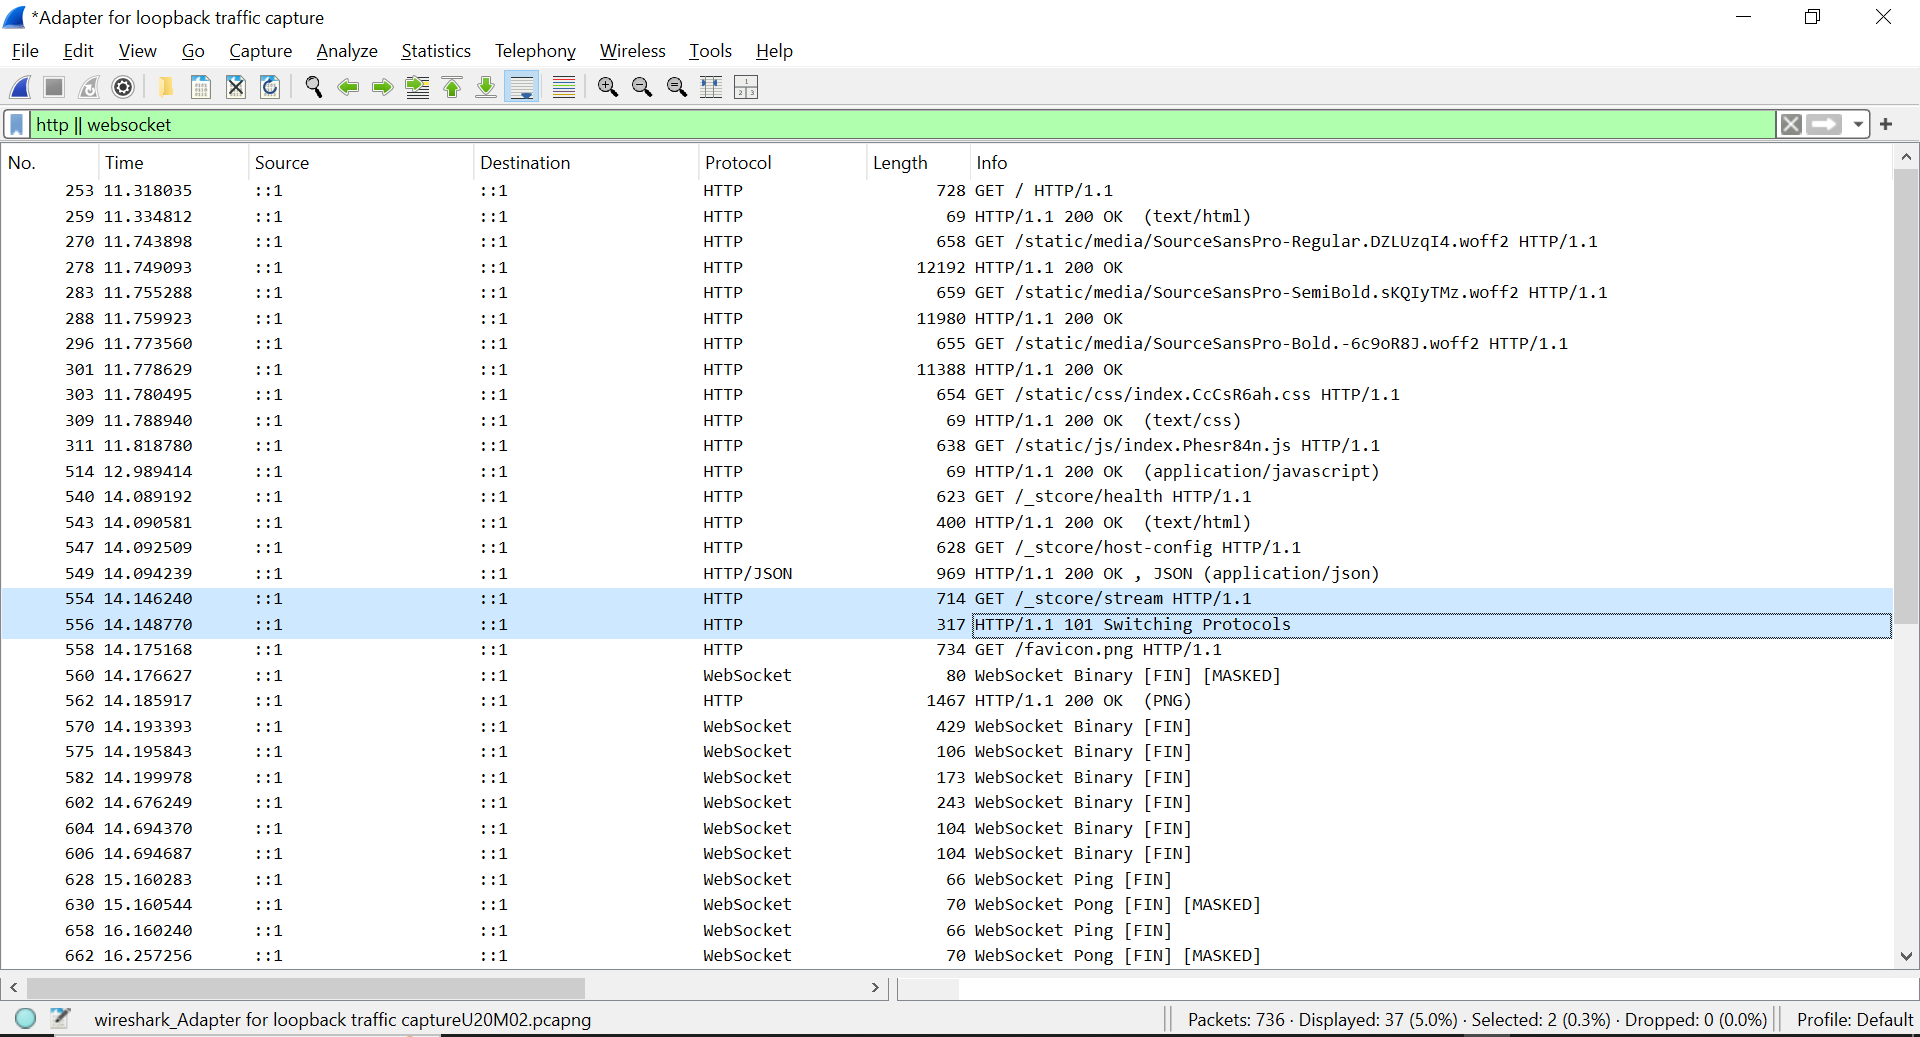
The screenshot below shows the Wireshark capture of the complete network communication trace.

Initially, the communication starts with the standard HTTP protocol, and it can be seen by the green lines. The browser sends GET requests to fetch resources like JavaScript and CSS files. Then, after initial handshakes, the protocol switches to WebSockets which can be seen in the blue lines. The communication over WebSockets is for the actual application logic. This screenshot highlights the critical role WebSockets play in Streamlit’s operation.
Let’s take a closer look.
Stage 1: First Contact with Server
The first request from the browser is a simple GET request for the main page. The server then sends back an HTML document. This is shown in the below image.
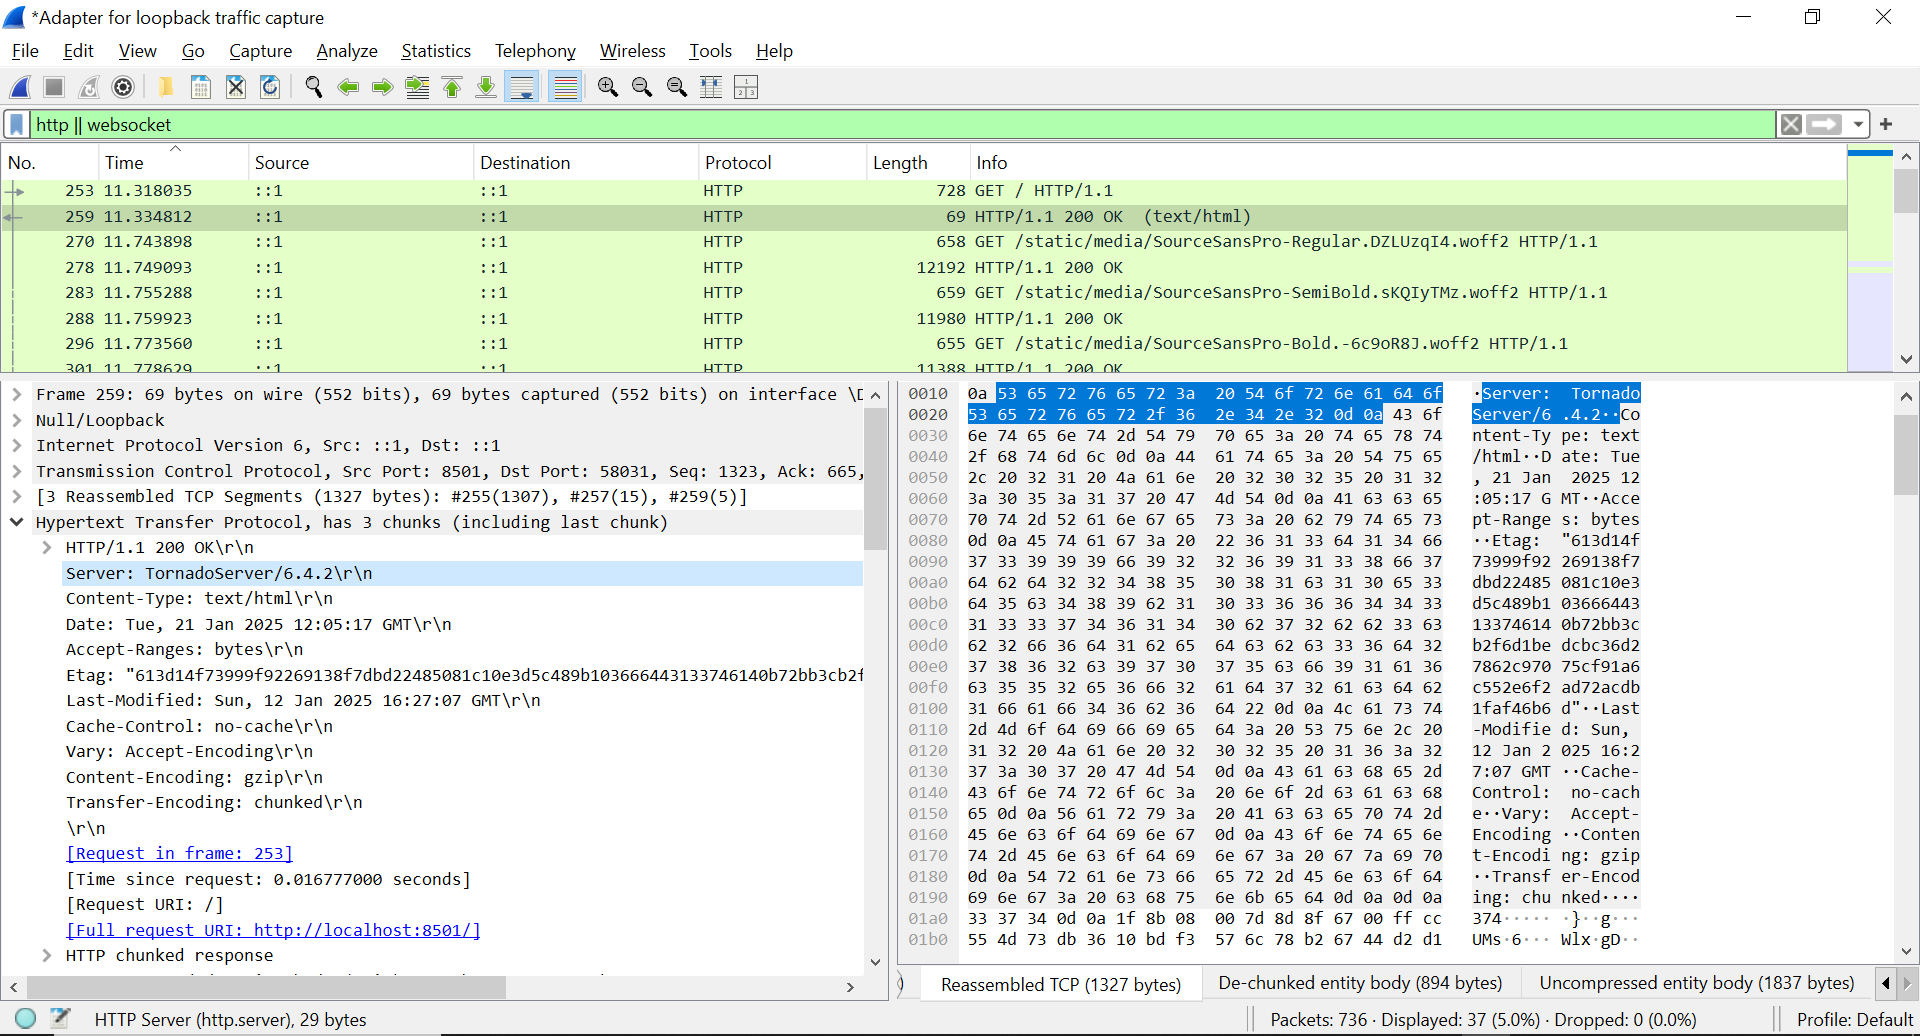
Here, we can see that the server identifies itself as a “TornadoServer” and the content type is text/html. This confirms that the underlying web server in Streamlit is indeed Tornado.
Stage 2: Initial HTML Payload from Server
The response body contains the HTML page that needs to be rendered, and the browser then parses it and starts loading the associated CSS and JS files.
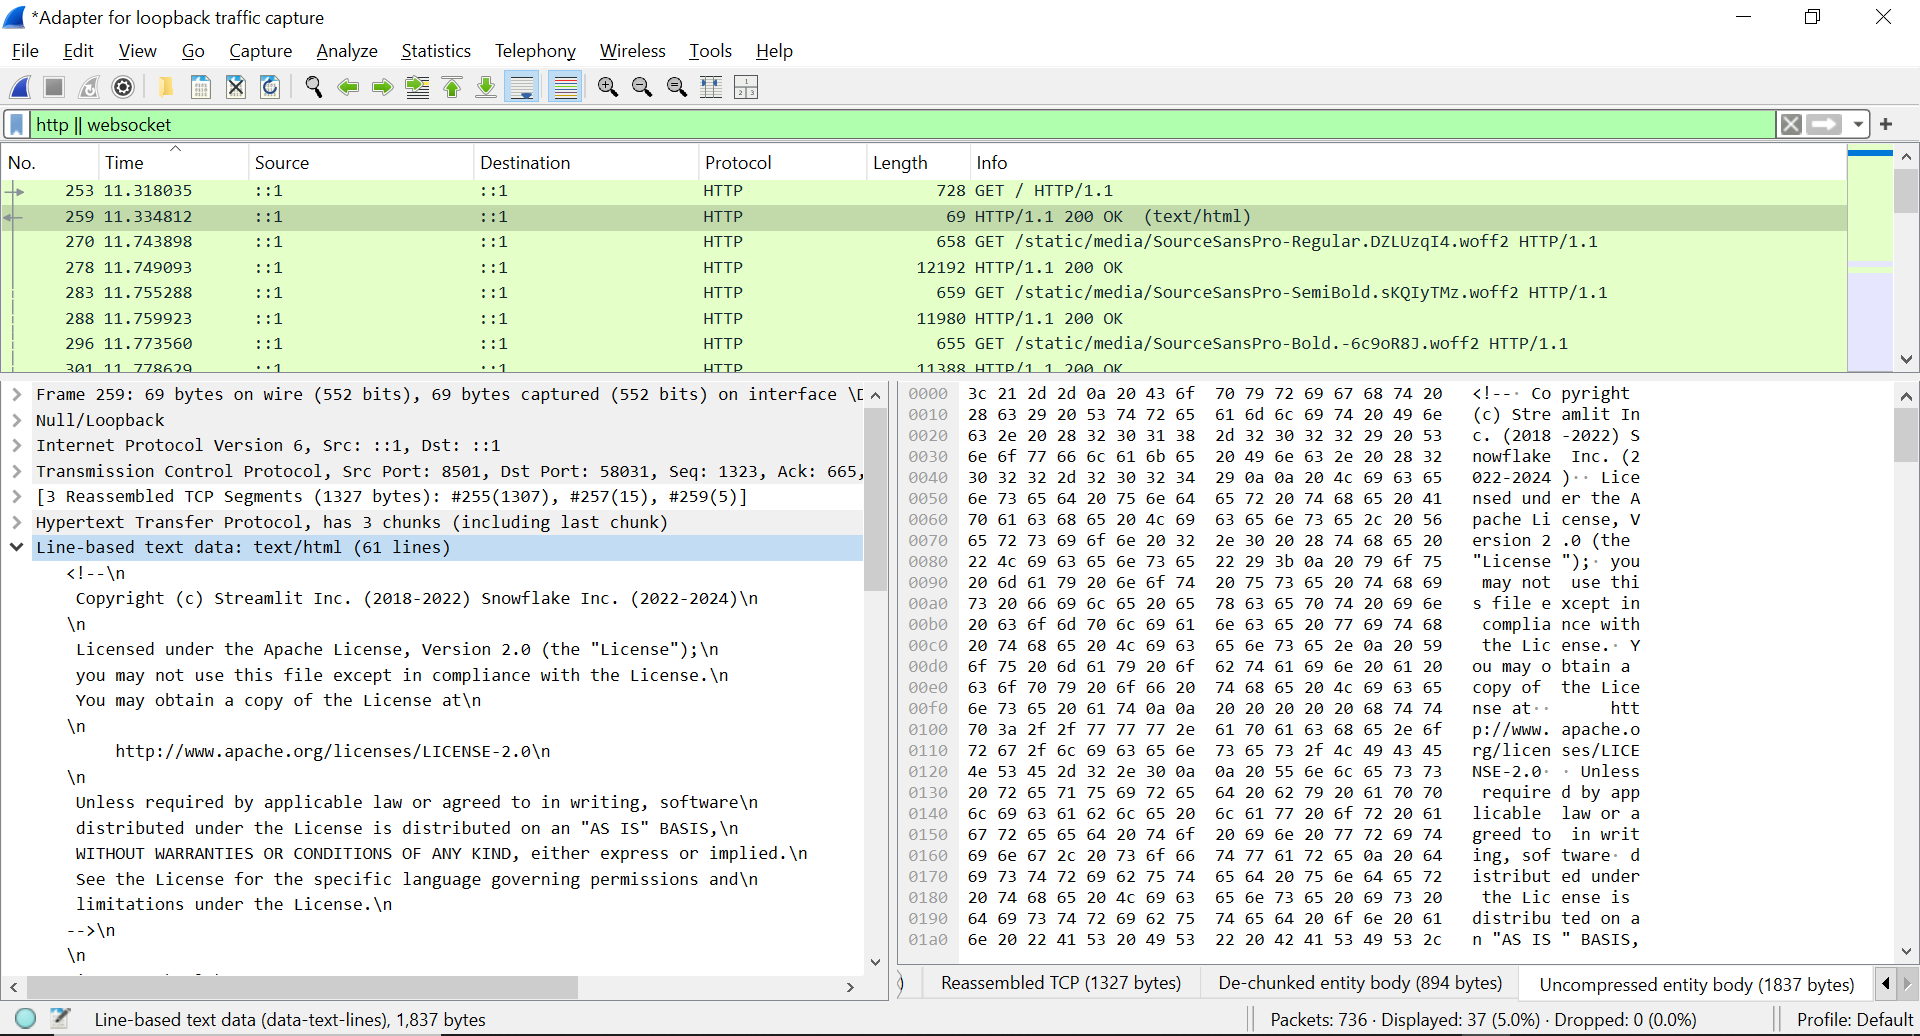
The following code block is the HTML page that is returned by the server.
<!--
 Copyright (c) Streamlit Inc. (2018-2022) Snowflake Inc. (2022-2024)

 Licensed under the Apache License, Version 2.0 (the "License");
 you may not use this file except in compliance with the License.
 You may obtain a copy of the License at

     http://www.apache.org/licenses/LICENSE-2.0

 Unless required by applicable law or agreed to in writing, software
 distributed under the License is distributed on an "AS IS" BASIS,
 WITHOUT WARRANTIES OR CONDITIONS OF ANY KIND, either express or implied.
 See the License for the specific language governing permissions and
 limitations under the License.
-->

<!DOCTYPE html>
<html lang="en">

<head>
   <meta charset="UTF-8" />
   <meta name="viewport" content="width=device-width, initial-scale=1, shrink-to-fit=no" />
   <link rel="shortcut icon" href="./favicon.png" />
   <link rel="preload" href="./static/media/SourceSansPro-Regular.DZLUzqI4.woff2" as="font" type="font/woff2"
       crossorigin />
   <link rel="preload" href="./static/media/SourceSansPro-SemiBold.sKQIyTMz.woff2" as="font" type="font/woff2"
       crossorigin />
   <link rel="preload" href="./static/media/SourceSansPro-Bold.-6c9oR8J.woff2" as="font" type="font/woff2"
       crossorigin />

   <title>Streamlit</title>

   <!-- initialize window.prerenderReady to false and then set to true in React app when app is ready for indexing -->
   <script>
       window.prerenderReady = false
   </script>
   <script type="module" crossorigin src="./static/js/index.Phesr84n.js"></script>
   <link rel="stylesheet" crossorigin href="./static/css/index.CcCsR6ah.css">
</head>

<body>
   <noscript>You need to enable JavaScript to run this app.</noscript>
   <div id="root"></div>
</body>

</html>
After loading the HTML page, the embedded preload links starts making subsequent HTTP requests for fetching CSS and JavaScript files. Once these files are loaded, the client is ready to switch to the WebSocket protocol.
Stage 3: Switching of Protocols
The next image shows that the browser requests the server to switch from HTTP to WebSocket using the 101 Switching Protocols message.
After this handshake, the communication from client and server happens using the WebSocket protocol. The image below shows how the application data is sent from the server to the client using WebSockets.
Stage 4: Application Logic
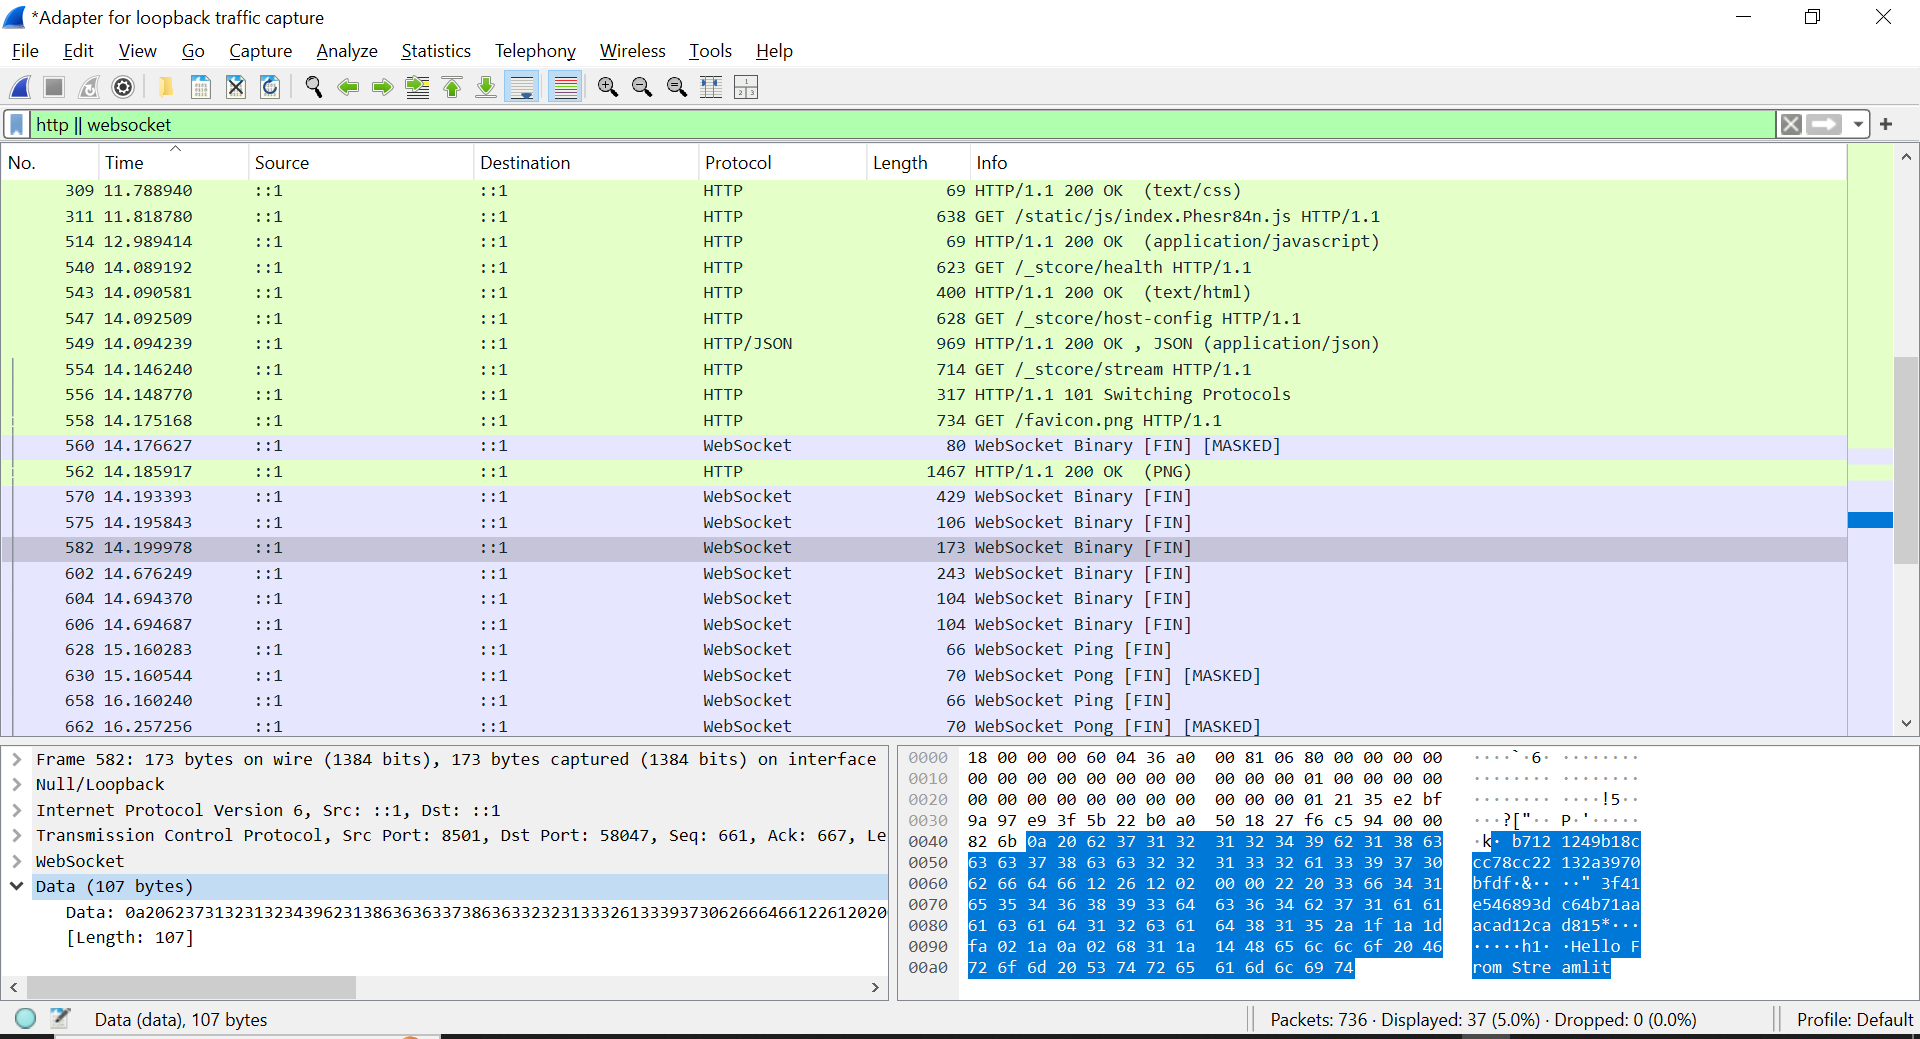
This shows how the data containing the message “Hello From Streamlit” is exchanged through WebSockets. After that, most of the communication between the client and server consists of ping/pong messages, which indicates that the connection is active. This pattern of sending data using WebSockets is what makes Streamlit apps interactive.
Given my initial goal of quick prototyping and a preference for serverless architectures, AWS Lambda seemed like the ideal first choice. It promised a cost-effective and low-maintenance solution where I could just upload my code and let AWS handle the infrastructure. I envisioned deploying the Streamlit app as a Lambda function and then expose it to the public internet through an endpoint. My understanding was that this would be the easiest, cheapest, and fastest way to make my app accessible to others.
To make this happen, I used the Lambda Web Adapter, which is designed to allow Lambda functions to respond to HTTP requests like a typical web server. As illustrated in the diagram below, the client browser would send requests to the Lambda Function URL.
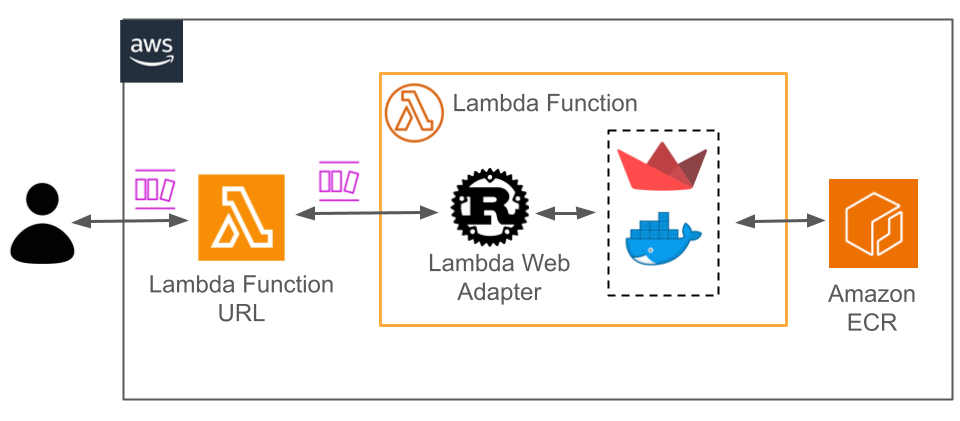
The Lambda function, through the Lambda Web Adapter, would then pass these requests to the Docker container running my Streamlit app, which was pushed to Amazon ECR. Following is the Dockerfile I used to build the app container.
Dockerfile
# Use the AWS Lambda Python base image
FROM public.ecr.aws/docker/library/python:3.12.1-slim

# Add the AWS Lambda Web Adapter
COPY --from=public.ecr.aws/awsguru/aws-lambda-adapter:0.8.4 /lambda-adapter /opt/extensions/lambda-adapter

# Set the working directory
WORKDIR /var/task

# Copy app code and dependencies
COPY app.py requirements.txt ./

# Install dependencies
RUN pip install --no-cache-dir -r requirements.txt

# Command to start Streamlit
CMD ["streamlit", "run", "app.py", "--server.port=8080"]
When I deployed my app and loaded the page, to my utter frustration, it was just an empty page. No errors, just a blank screen! I refreshed the page, checked my code, and looked at the logs, and everything seemed to be fine. I was able to get a response from the server, indicating that my request was reaching the Lambda function and that my Streamlit app was running inside a container. My browser was connecting to the server, and the server was responding to HTTP requests. However, I was still unable to see my Streamlit app!
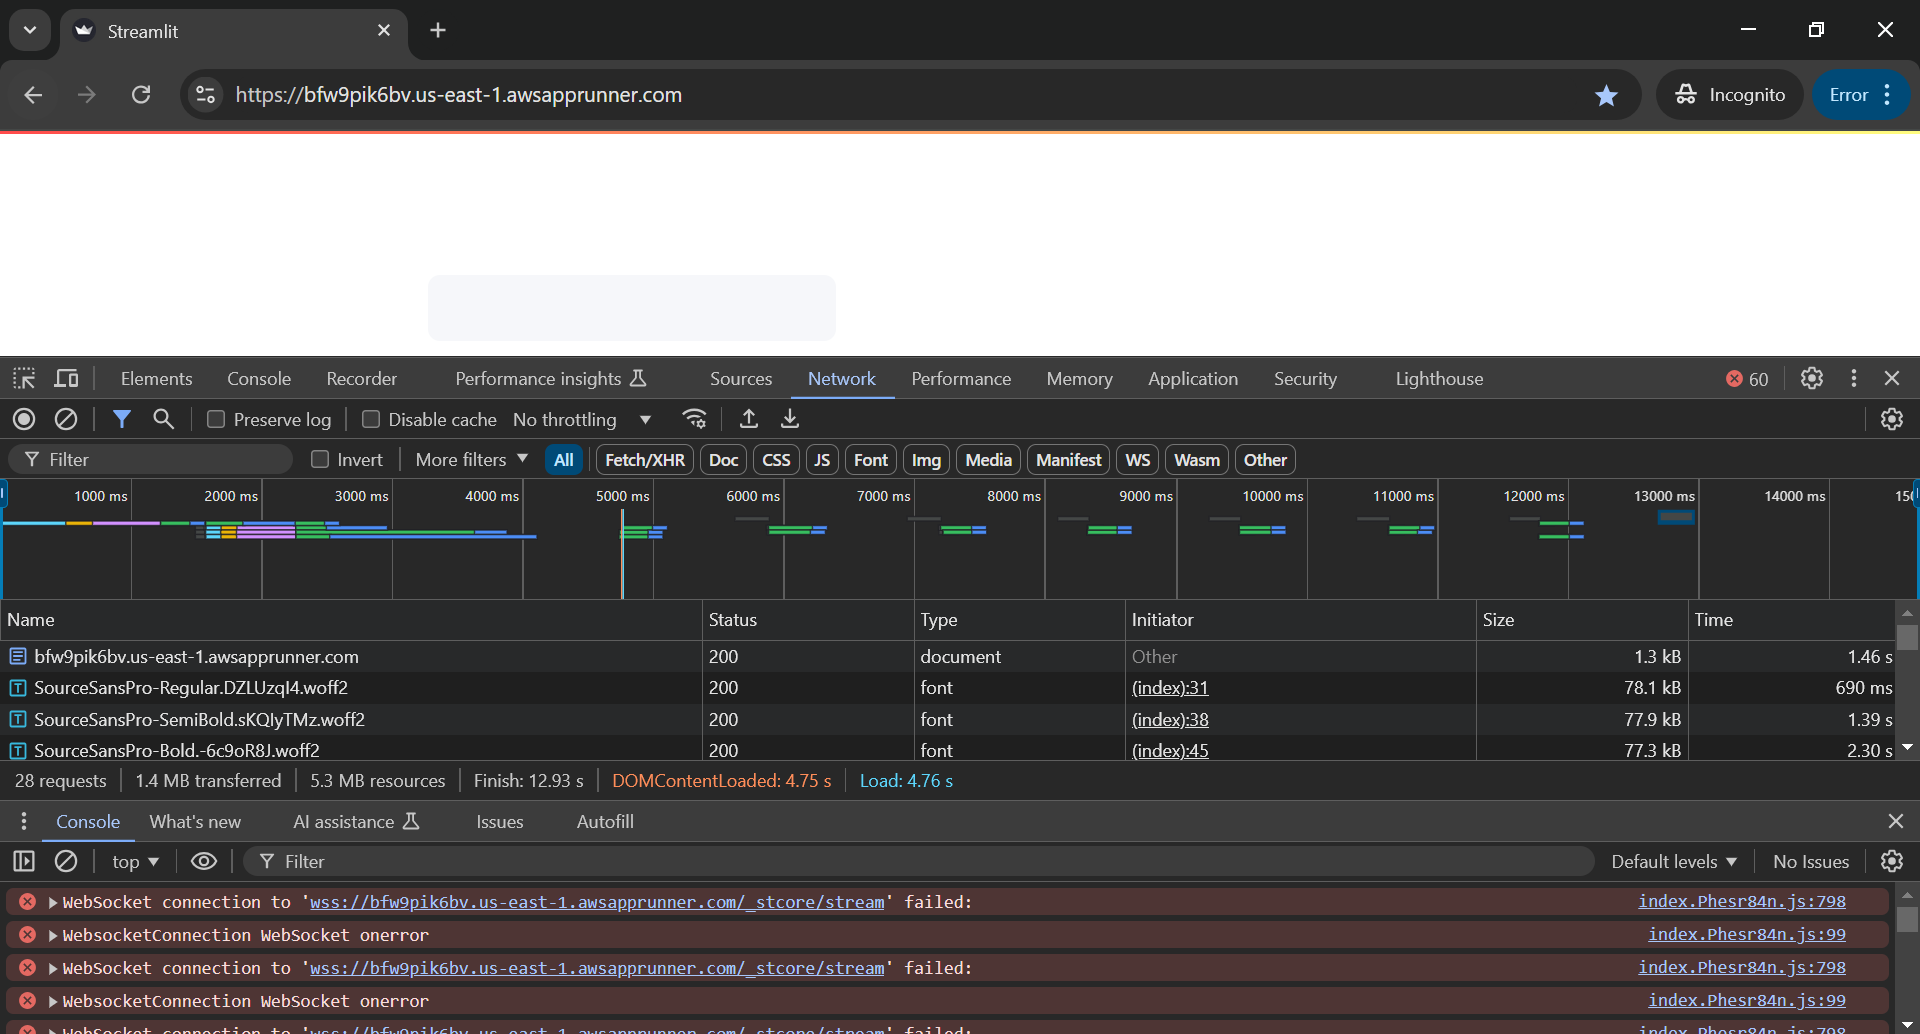
This is when I discovered the critical limitation: Lambda functions and the Lambda Web Adapter, by design, operate using a request-response pattern with the HTTP protocol. While the Web Adapter does support HTTP request streaming, it does not support WebSockets. My Streamlit app was loading till the point where the page receives HTTP responses for loading the basic HTML page, JS and CSS files. The application was working as far as HTTP communication was concerned. However, as we discussed before, Streamlit relies heavily on WebSockets for its real-time interactivity. This is evident from the browser’s developer tools screenshot:
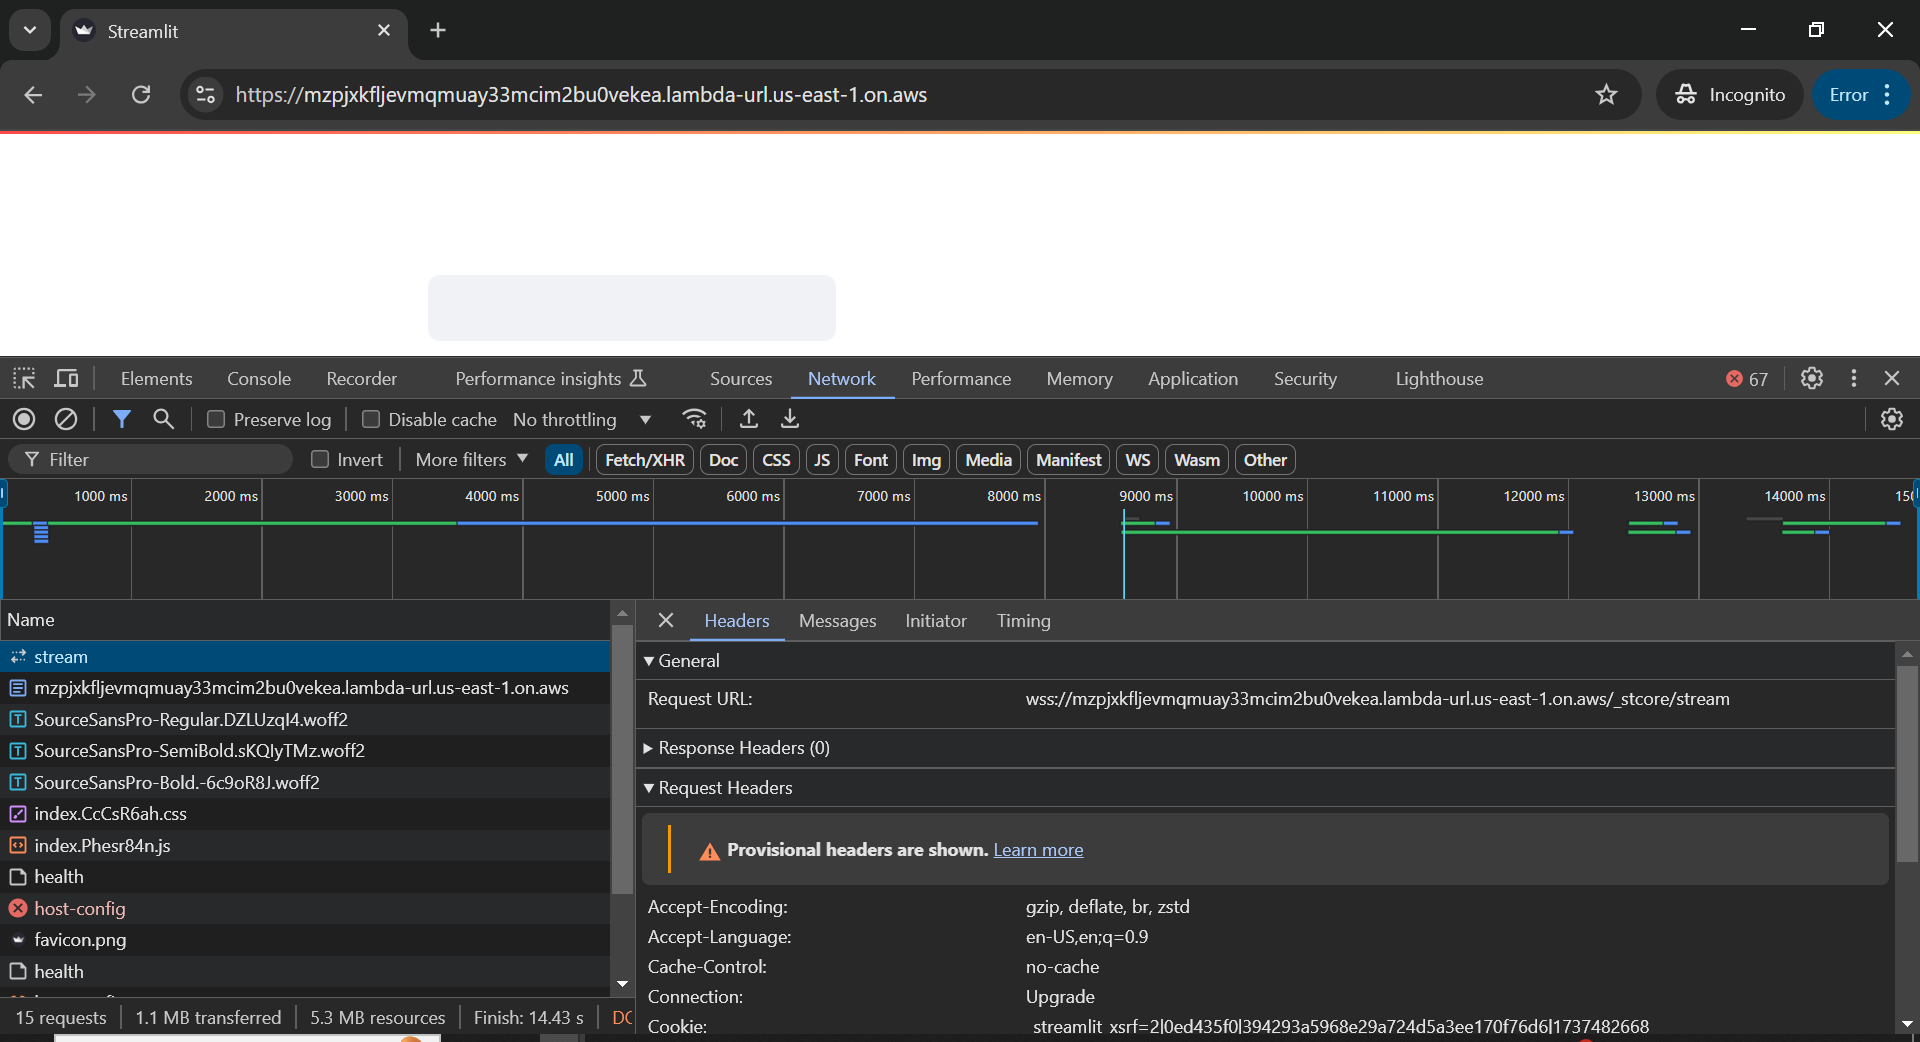
You can see that while the initial HTTP requests for resources like HTML, JS, and CSS files are successful, the crucial “stream” connection using WebSocket fails, hence the empty page. The frontend was trying to establish a WebSocket connection with the Lambda, but since the Lambda Function URL + Web Adapter only support HTTP/s requests and does not support WebSocket, the connection attempt failed, and the page was stuck.
This realization was a learning moment and made it clear to me that I needed a completely different approach.
AWS Lambda Function URL and Lambda Web Adapter enable HTTP(S) access to Lambda functions:
Both support only HTTP(S) traffic, not protocols like WebSocket or raw TCP/UDP, making them suited for RESTful APIs, webhooks, and serverless web apps requiring HTTP communication.
After my unsuccessful attempt with AWS Lambda, I knew I needed a solution that handled persistent WebSockets. AWS App Runner seemed like a promising next step, as a managed container platform that would supposedly handle the underlying infrastructure for me. Since my Docker image was already on ECR, I thought switching to App Runner would be easy. With just a few clicks, I could run my containerized app, automatically managing the networking configurations, and access it through a public URL.
I configured an App Runner service, pointing it to my container image and specifying the necessary port configurations. The service deployed successfully and provided a public URL. However, just like before, my browser showed a blank page!
The issue, as with Lambda, was the lack of WebSocket support. AWS App Runner, as highlighted in its documentation below, is designed for HTTP 1.0 and HTTP 1.1 applications and does not provide support for persistent WebSockets connections, and it can be seen in the screenshot below as well. Link to docs here.

The screenshot from my browser’s developer tools shows the same issue that I observed with Lambda, highlighting the fact that the initial resources were loading using HTTP protocol, but the websocket connection attempt fails:
This was another learning moment for me and helped me realize that a containerized service alone doesn’t guarantee compatibility with applications like Streamlit, which require WebSockets. It highlighted the importance of understanding the specific requirements of my application before choosing a deployment service.
AWS App Runner provides support for HTTP 1.0 and HTTP 1.1 to handle web requests directed to container instances.
After hitting roadblocks with serverless and managed container solutions, I decided to explore AWS Lightsail, and I was drawn to Lightsail for its simplicity and intuitive interface. With a few clicks, you can provision a virtual server, and also it has predictable and budget-friendly pricing, making it an attractive option for various projects. Moreover, unlike App Runner, Lightsail’s container service provides a dedicated virtual server to run your container. And not only that it also gives a public URL to access your web app. Lightsail basically offers an alternative and simplified version of services such as instances, containers, databases, storage, and more to get your web application up and running in just a few clicks. This makes it an excellent choice for rapid prototyping, proof-of-concept projects, and developers seeking a hassle-free experience.
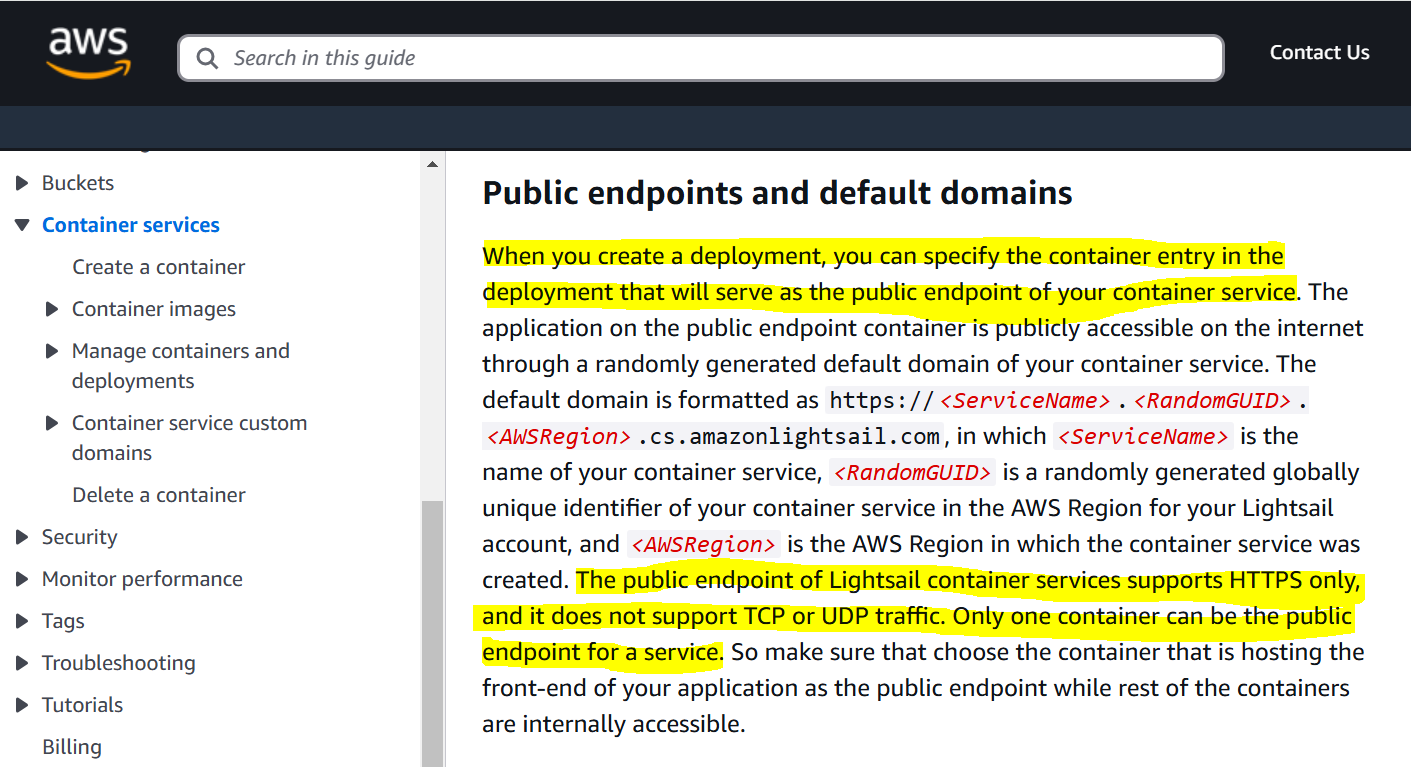
I was initially skeptical because the official Lightsail documentation clearly states that its public endpoints only support HTTPS traffic and do not support TCP or UDP, which also meant it does not provide WebSockets. Here is the image of the documentation. Link to docs here
However, I had also come across blog posts where others had successfully deployed WebSocket applications on Lightsail. I decided to give it a try. I’ll also link one such post here Link to the blog post. Since my container image was already in ECR, deploying it to Lightsail was straightforward.
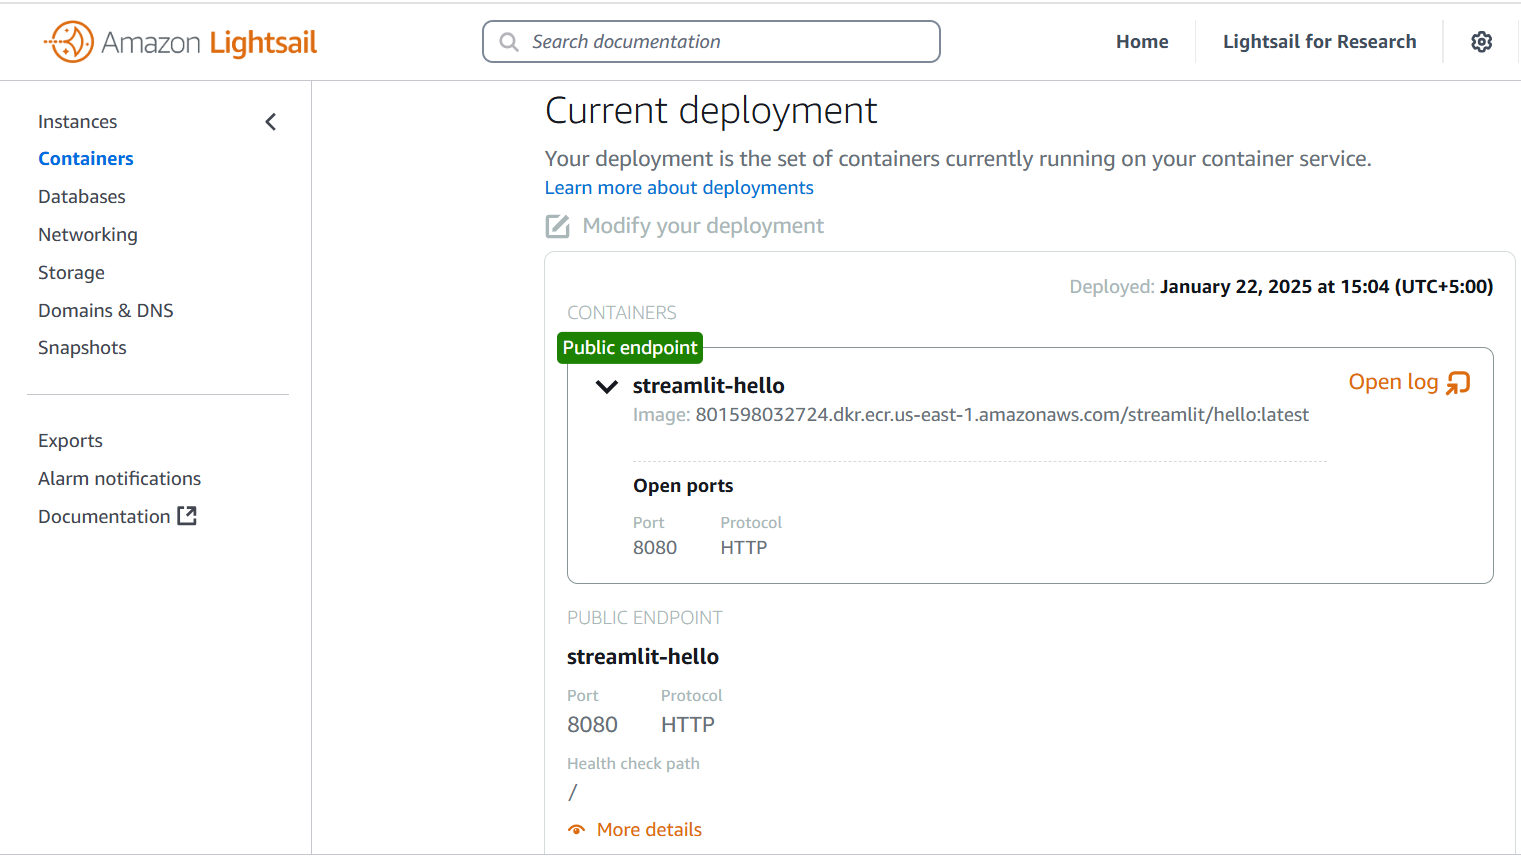
I configured my Lightsail container service, provided my ECR image URI, and set up the correct port mappings. You may use the linked post to find all the required steps Link to the blog post. The entire process was remarkably simple and I was very hopeful, this time.

When I checked the public URL, my Streamlit app was working! The app was not showing a blank page anymore, and the “Hello From Streamlit” message was properly rendered. I was surprised to see that it was working, and also curious to see how it worked since Lightsail does not directly provide WebSockets support. I looked at the browser’s developer tools and confirmed that the WebSocket connection was indeed established successfully!
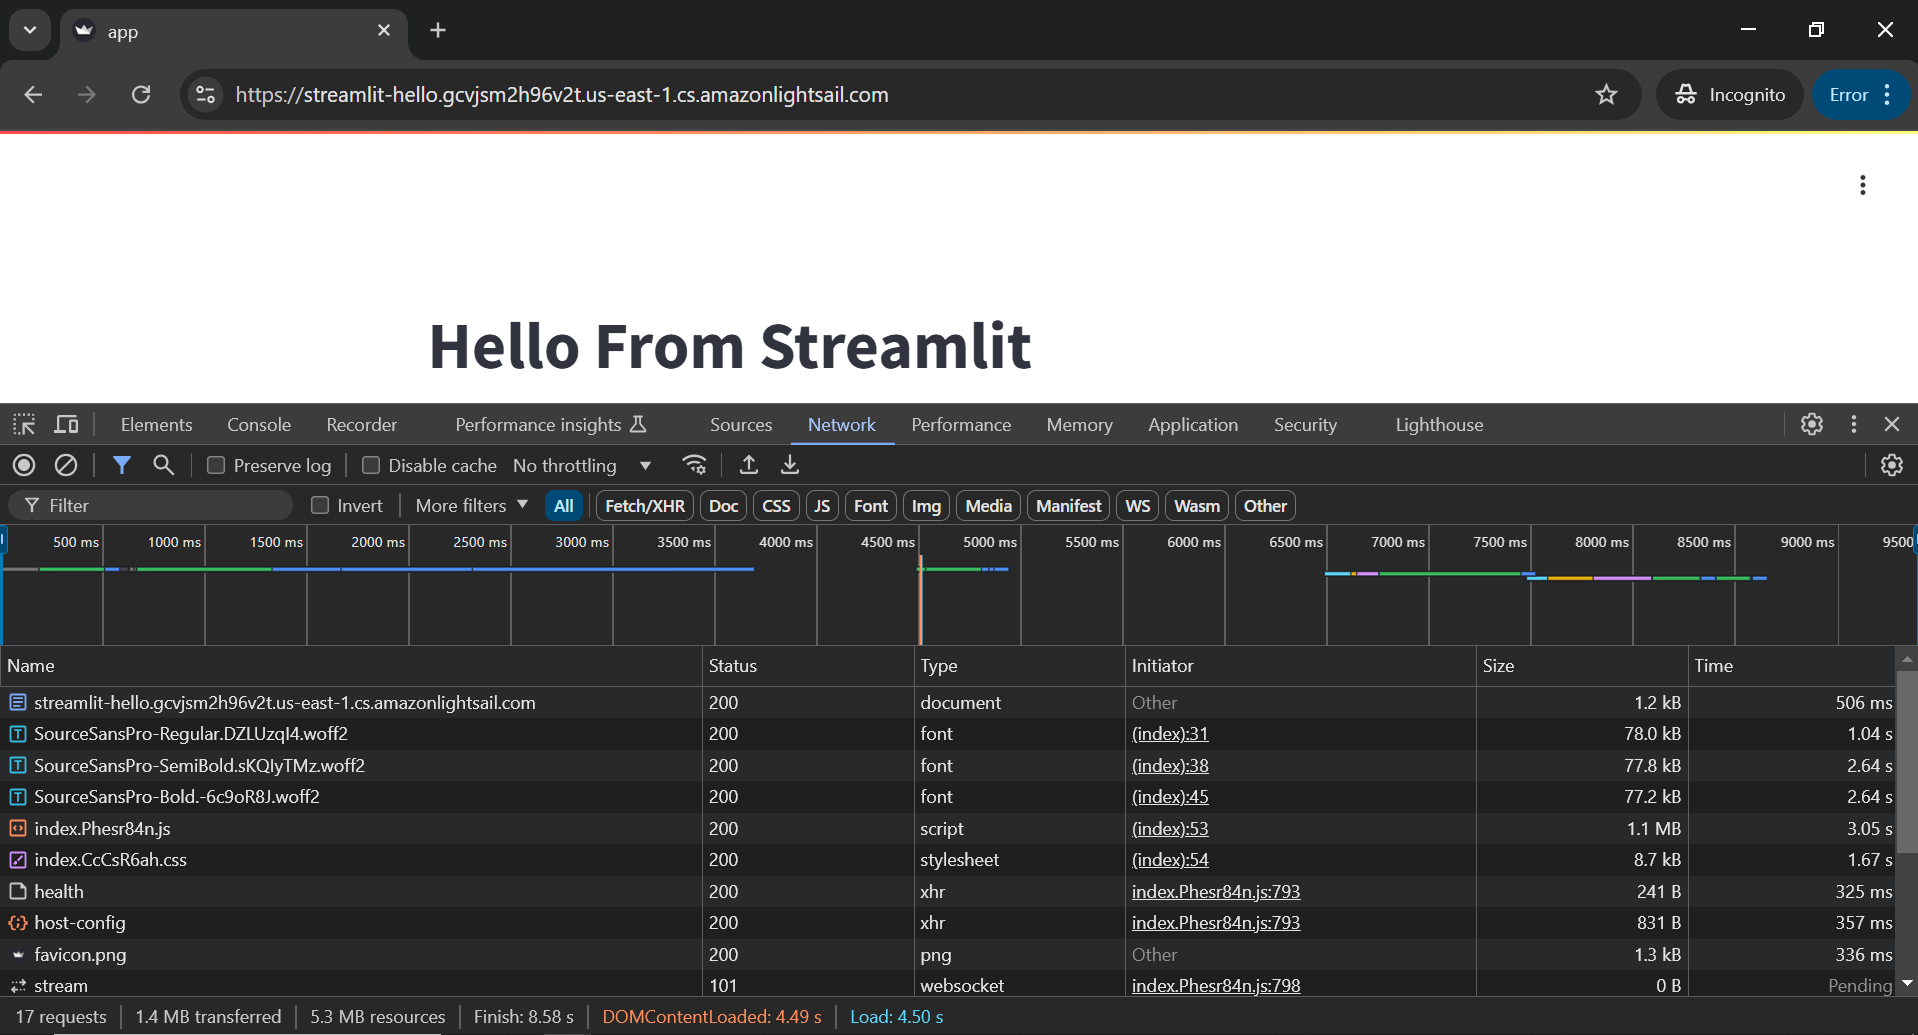
You can see from the image above that the initial HTTP requests are completed to load the basic html and javascripts and then the application was able to successfully establish a stream connection using websockets.
It turned out that even though Lightsail’s public endpoint is HTTP based, it somehow transparently handles WebSocket connections for containerized applications. This experience was a clear indication that sometimes documentation might not capture the entire picture, and it is important to try things out.
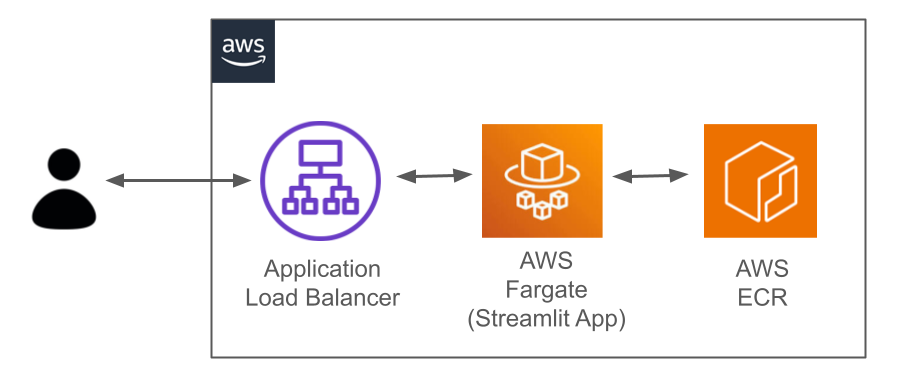
While the success with Lightsail was encouraging, I still felt the need for a solution that gave me greater transparency and control over my infrastructure. Lightsail is fantastic for quick deployments and prototypes, but it still abstracts away certain complexities that I wanted to manage myself. I started researching alternative approaches, keeping my desire for rapid setup and customization in mind. This led me to a solution based on AWS Fargate, fronted by an Application Load Balancer, and using the AWS CDK for infrastructure as code.
As illustrated in the architectural diagram below, the client browser connects to an Application Load Balancer, which then routes the traffic to the Fargate container running the Streamlit application.
At first, the thought of setting up a full-fledged ECS cluster with Fargate and a load balancer seemed like an overwhelming task. The process involves provisioning various resources like VPC, security groups, load balancers, and more. However, I then discovered the aws_ecs_patterns module within AWS CDK, which provides a convenient way to create common application patterns using a single line of code. One such pre-built pattern is ApplicationLoadBalancedFargateService, which creates all the necessary resources and then deploys your container on it.
The beauty of this approach is that while it takes care of setting up all the underlying infrastructure, it also gives you complete control. Everything is defined and deployed through code using CDK. You can version control your infrastructure, enabling easy management and scalability. This combination of control, simplicity, and automation made this the ideal choice. My experience with the previous three AWS services gave me confidence in my understanding of the problem. Thus, armed with this knowledge and the power of AWS CDK, I decided to build the custom stack to deploy my application.
I have used this small piece of code to create the entire stack.
streamlit_fargate_stack.py
vpc = ec2.Vpc(
    self,
    "StreamlitFargateVpc",
    max_azs=2,  # Min=2. Default is all AZs in the region
)

# Create an ECS Cluster
cluster = ecs.Cluster(self, "StreamlitFargateCluster", vpc=vpc)

# Define a Fargate Task Definition and Service
fargate_service = ecs_patterns.ApplicationLoadBalancedFargateService(
    self,
    "StreamlitFargateService",
    cluster=cluster,
    task_image_options={
        "image": image,
        "container_port": 8501,  # Streamlit default port=8501. Should be adjusted based on Dockerfile
    },
    public_load_balancer=True,
)
While the code looks quite simple, a lot is happening behind the scenes. If you check the CloudFormation console, you will see the resources created.
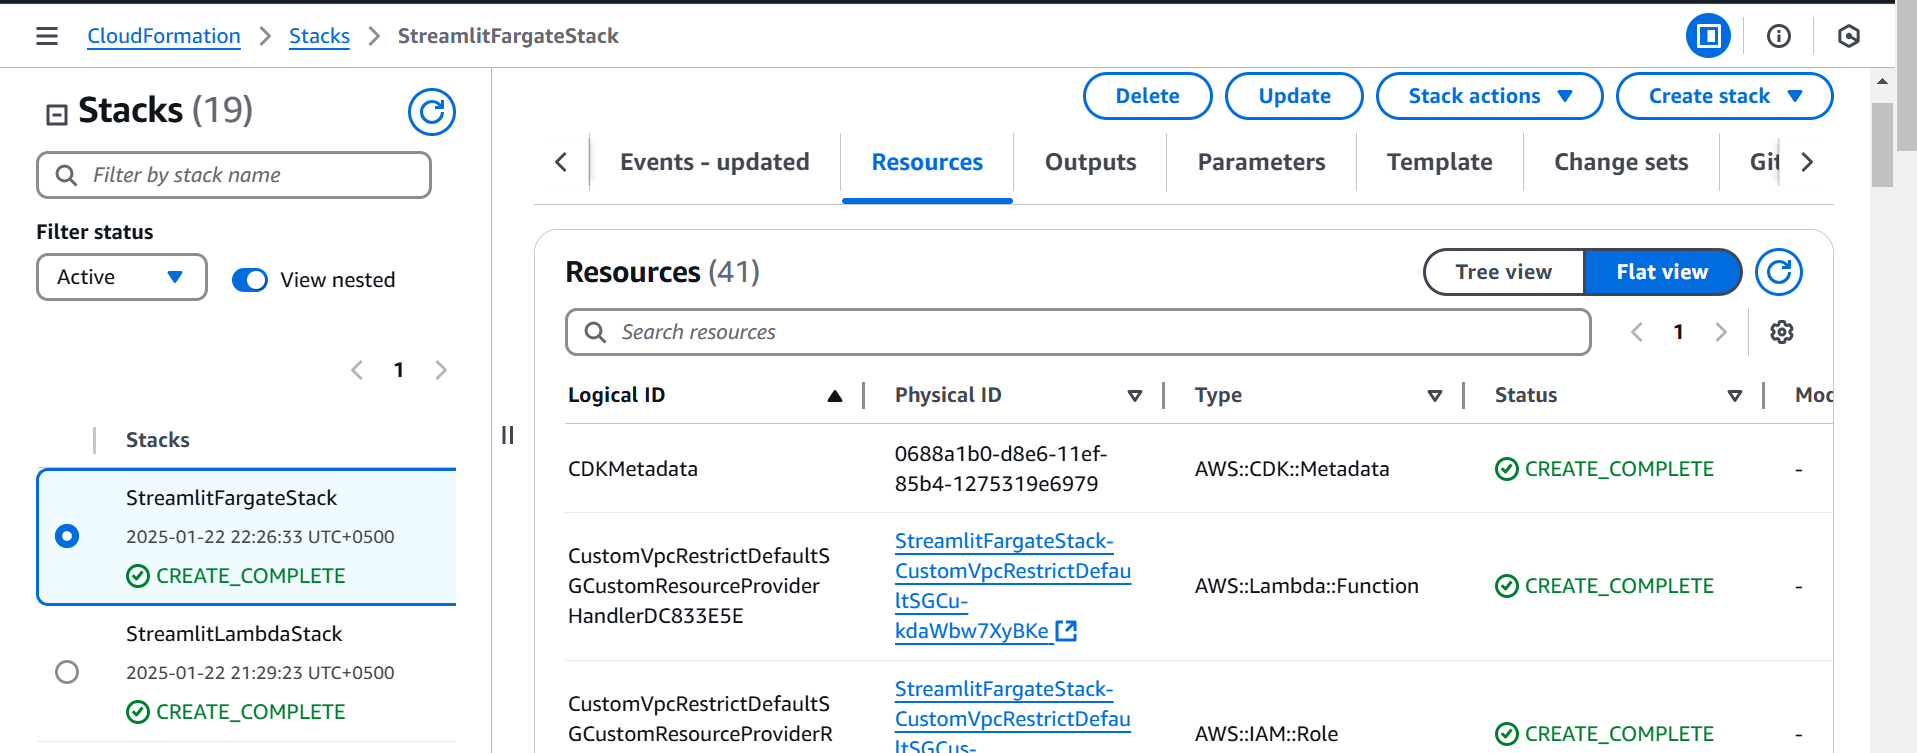
As you can see from the image, the code has created 41 resources, including VPC, subnets, route tables, security groups, Elastic IPs, NAT Gateways, Internet Gateways, and IAM roles. This is a complex stack that was created with a very small piece of code.
After deploying the stack using CDK, I was able to access my Streamlit application through a public URL. And this time the WebSockets were working perfectly!

As you can see, the app is working as expected, the connection has been established and the “Hello From Streamlit” message is shown on the page. This was my final and successful approach in deploying the Streamlit application.
If you want more control and flexibility, you may built the entire stack on your own without relying on the aws_ecs_patterns module. If you want that, check out this post from the AWS Blog: Build and deploy a UI for your generative AI applications with AWS and Python. The GitHub repo associated with this post builds the complete stack using individual components.
While the custom Fargate solution provides the control and transparency I was looking for, it’s important to consider the cost implications. Let’s compare it with the simplicity and pricing of Lightsail to see how they stack up.
Lightsail offers a very straightforward and transparent pricing structure. For my initial Streamlit deployment, I used the container service with the Nano option, which has a fixed cost of 7 USD per month. You can see its pricing structure in the screenshot below.
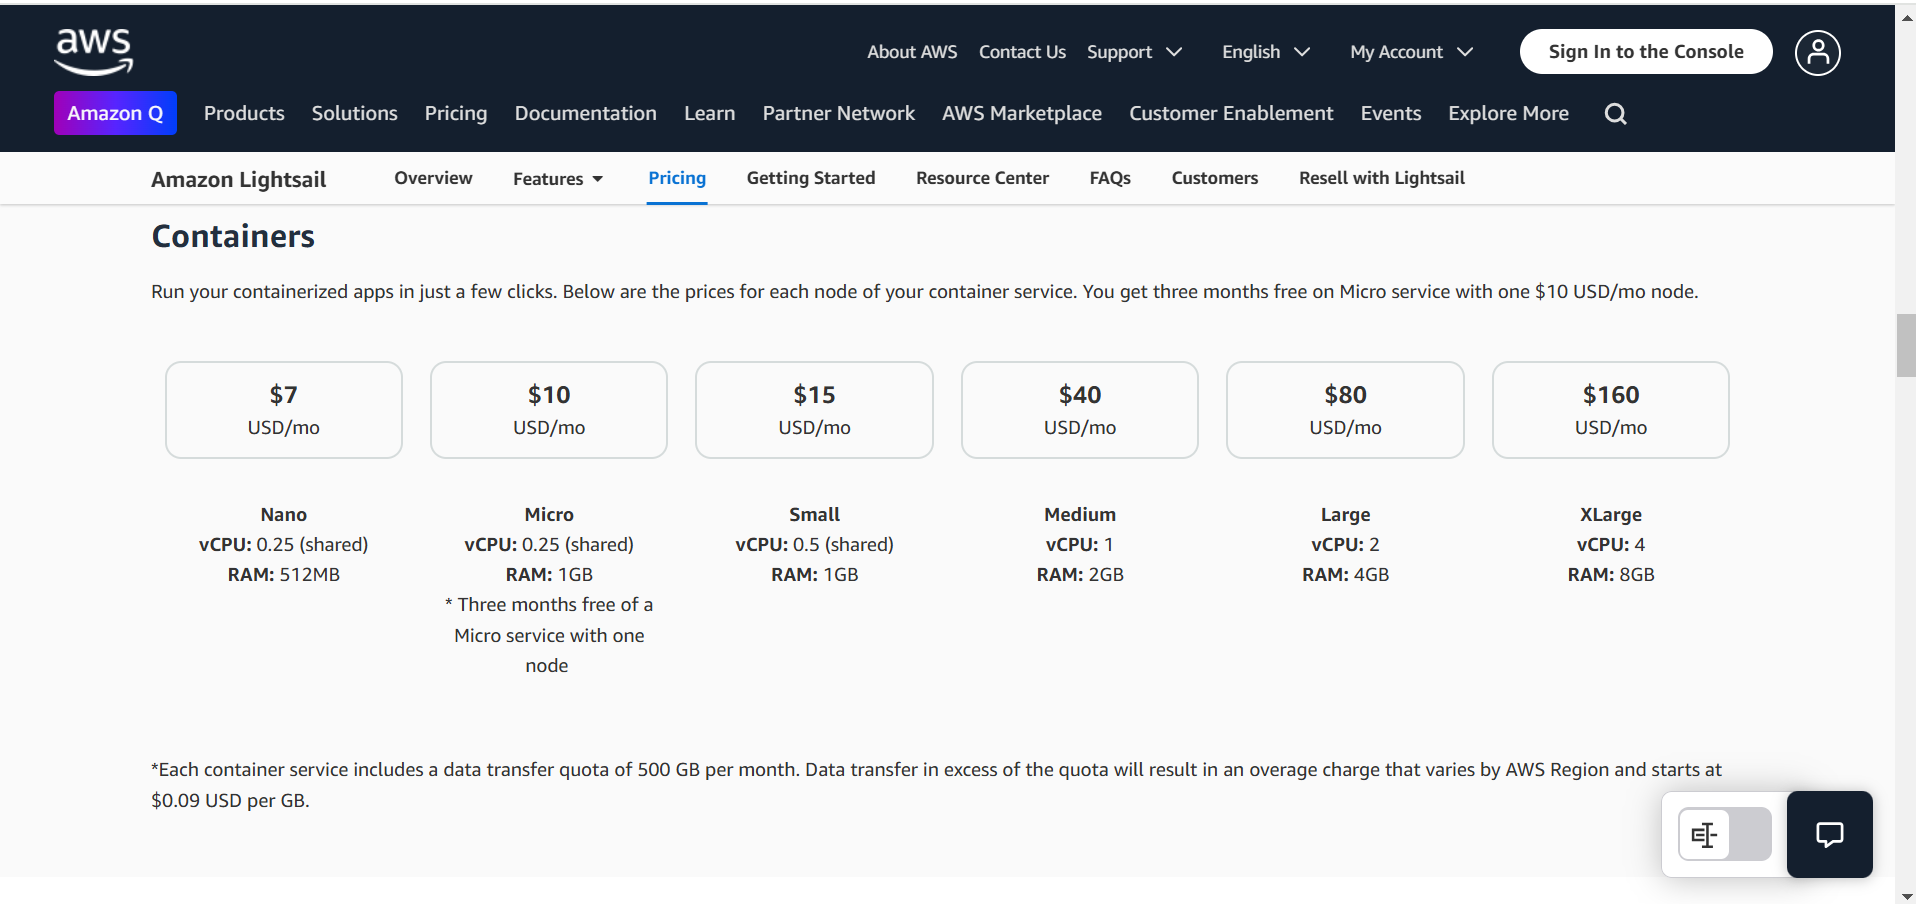
This makes it a very appealing choice for quick prototypes and projects that need a budget-friendly setup.
Now let’s take a look at the costs associated with the custom Fargate solution. Although Fargate itself is relatively inexpensive, the overall cost can become significantly higher due to other resources like NAT Gateways, Load Balancers, and Elastic IPs that get created along with it. In my setup, the Fargate cost was almost negligible, less than 1 USD. The rest of the cost was distributed in these other services.
The most expensive component in this solution is the NAT Gateways. Since my setup involved deploying the app across two availability zones (aws_ecs_patterns enforces high availability), the solution also created two NAT gateways, one for each AZ. The minimum cost of each NAT Gateway is around 32 USD per month, totaling around 64 USD per month for this setup.
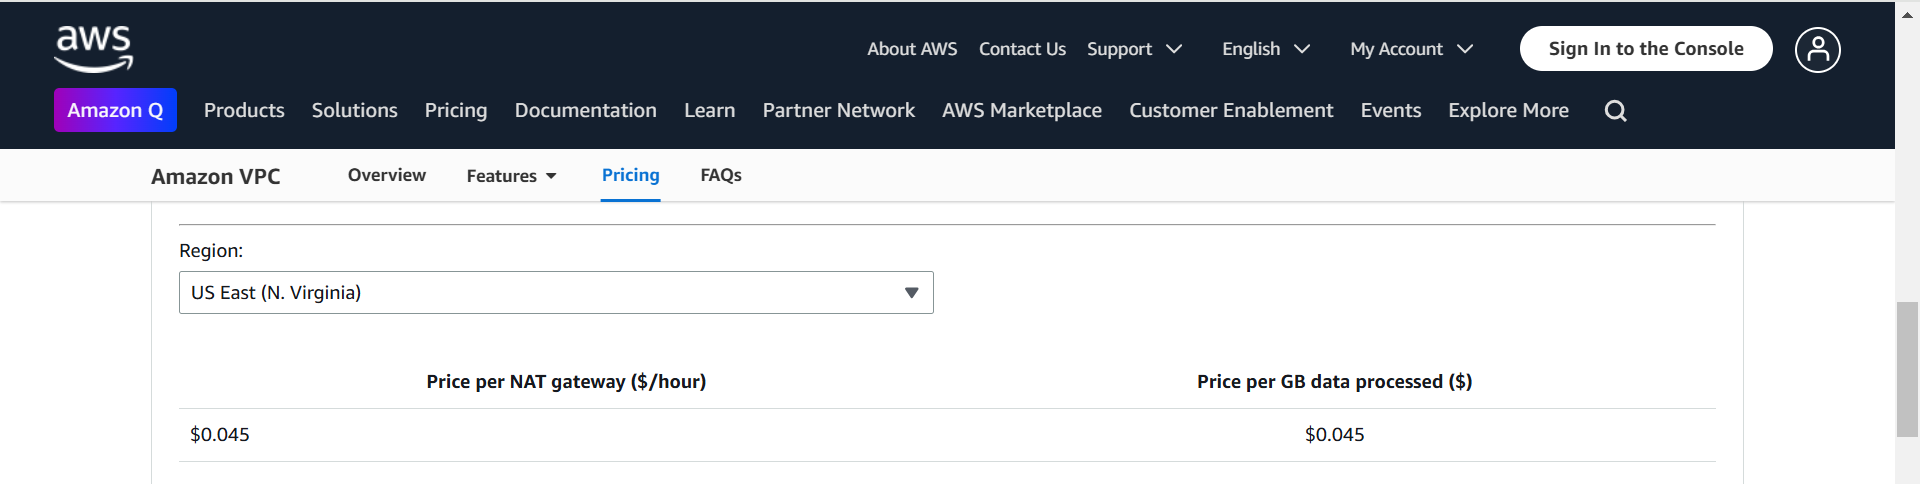
As you can see from the image, NAT Gateway charges by hour, and it costs $0.045 per hour. If we assume a minimum usage of 30 days a month, it amounts to $32 per month for a single NAT gateway. This is 4 times more expensive than the entire cost of the Lightsail container service.
Another significant cost factor is the Application Load Balancer (ALB). With minimum usage, it roughly costs 16 USD per month, which also charges hourly.
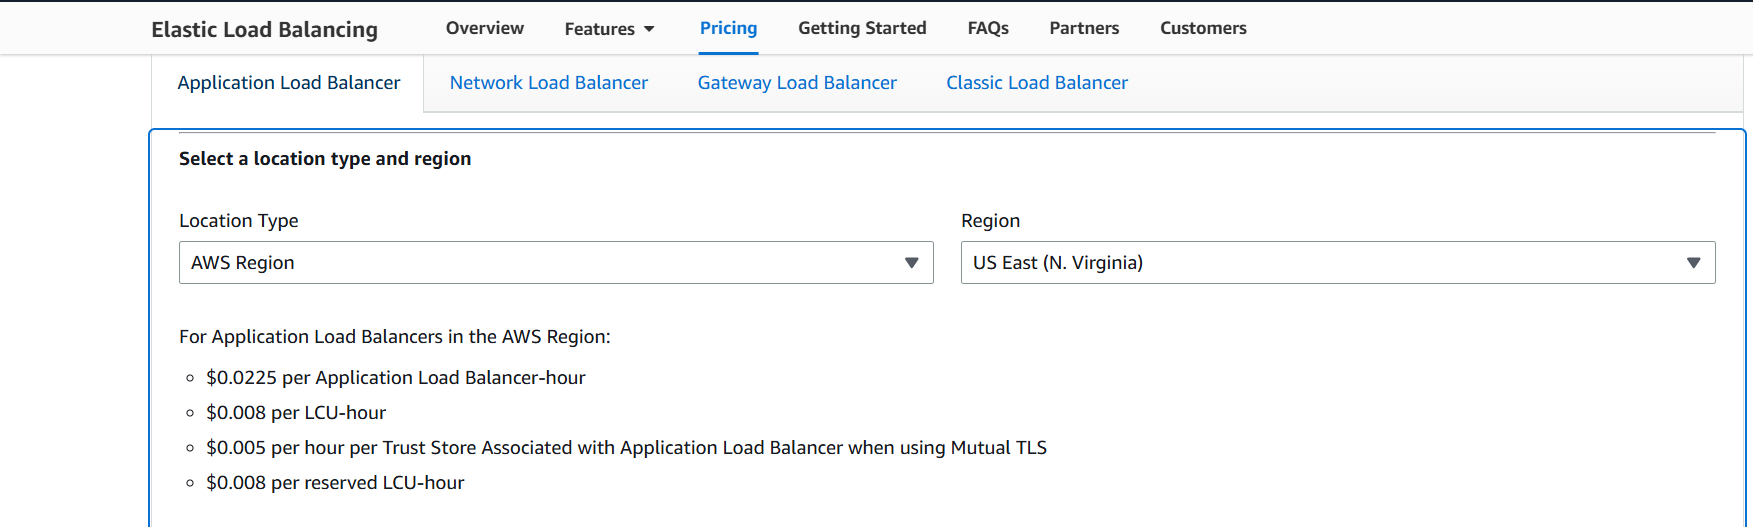
Looking at the image, it can be seen that the cost of the ALB is $0.0225 per ALB-hour. For minimum usage it roughly translates to around $16 USD a month.
Lastly, two Elastic IPs (EIPs) are created by the stack (one for each NAT gateway). The cost for these two EIPs is around 7.30 USD per month.
When you sum it up, while the actual cost of running the Fargate container itself is barely around 1 USD per month, the cost of NAT gateways, Load Balancer, and EIPs adds up significantly. For this simple setup, I estimate that the cost of this custom Fargate solution would easily amount to around 90 USD per month. This is much higher than the 7 USD per month that I estimated with the Lightsail container service. It’s important to note that these costs might vary based on usage, but even with minimal activity, the custom Fargate solution will remain significantly more expensive than the Lightsail option.
While the custom Fargate setup does provide more control and transparency, the cost implications are something that you should keep in mind for running your prototypes.
My journey to deploy a Streamlit application on AWS was filled with unexpected challenges, and valuable learning moments. I started with a simple assumption but quickly learned the critical role of WebSockets for Streamlit applications, and the limitations of AWS Lambda and App Runner, which only support HTTP requests. Though AWS Lightsail provided a surprisingly simple solution for deploying the app, I decided to build my own solution with AWS CDK and Fargate for more control.
This journey highlighted the importance of understanding your application requirements, and the costs associated with them. While a custom Fargate deployment provides the most control, it also came with hidden costs that made it far more expensive than the simpler Lightsail setup. The most important takeaway for me is that there is not a one size fits all solution, and each deployment strategy comes with its own limitations, and it is critical to understand what we are doing.
Ultimately, the right approach depends on your specific needs. I hope that by sharing my experiences, you can avoid some of the pitfalls I encountered. Thank you for joining me on this journey!