Show the code
python==3.12.8
fastapi==0.115.6
sse_starlette==2.2.1
When working with LLMs, you quickly realize that getting a response all at once doesn’t always cut it. For a better user experience, especially with long outputs, streaming the response is the way to go. But standard REST APIs aren’t built for this – they hold the client hostage until the entire response is ready. I’ve been exploring how to overcome this with FastAPI, and in this post, I’ll walk you through creating streaming APIs using StreamingResponse, Server-Sent Events (SSE), and WebSockets. I’ll use a simple dummy LLM to illustrate the concepts, and you can find all the code examples in the linked GitHub repository.
python==3.12.8
fastapi==0.115.6
sse_starlette==2.2.1All the code examples used in this post can be found on the GitHub repo 2025-01-19-streaming-responses-fastapi
As we dive into implementing streaming APIs, it’s crucial to have a way to mimic how an LLM would generate text. Rather than connecting to a real model for every example, we’ll use a simple, controlled simulation. This allows us to focus on the streaming mechanisms without getting bogged down in the complexities of LLM inference.
Our simulation is based on a straightforward asynchronous generator function called event_generator. Here’s the Python code:
# Test messages
MESSAGES = [
    "This is",
    " a large",
    " response",
    " being",
    " streamed",
    " through FastAPI.",
    " Here's the final",
    " chunk!",
]

async def event_generator():
    for message in MESSAGES:
        yield message
        await asyncio.sleep(1)  # Simulate an async delay
As you can see, the event_generator iterates through a list of predefined messages. With each iteration, it yields a message chunk and then pauses for 1 second using asyncio.sleep(1). This pause mimics the time it might take for an LLM to generate the next portion of a response. This approach makes the simulation both easy to understand and also representative of the nature of LLM output. We’ll use this event_generator function across all the streaming examples in this post.
FastAPI’sStreamingResponse is a powerful tool for handling situations where you need to send large or continuous data to a client. Unlike traditional REST API responses, which require the server to generate the entire response before sending, StreamingResponse allows the server to transmit data in chunks. This is especially useful for use cases such as streaming audio/video, large file downloads, or, as in our case, delivering output from an LLM model.
REST API: In a typical REST scenario, the entire response body is generated on the server and then sent to the client as a single unit. This works fine for smaller datasets, but it can be inefficient when dealing with large amounts of data. The client has to wait until the whole response is built before it can begin processing.
StreamingResponse: With StreamingResponse, data is transmitted in a series of chunks over a single HTTP connection. As soon as the first chunk is ready, it’s sent to the client. This allows the client to begin processing data while the server is still generating the rest of the response. This incremental delivery significantly enhances the user experience, particularly when dealing with long processing tasks like those often found in LLM interactions.
Content-Length: In a traditional REST API response, the Content-Length header specifies the total size of the response in bytes. However, with StreamingResponse, the total size of the data is not always known upfront. As such the Content-Length header might be absent, or more commonly the header Transfer-Encoding: chunked will be used instead.
Transfer-Encoding: chunked: This HTTP header indicates that the response body is being sent in chunks. Each chunk is prefaced by its size, allowing the client to process data as it arrives without knowing the total size of the response beforehand.
The client recognizes that it is receiving a streamed response when it encounters the Transfer-Encoding: chunked header. Each chunk is prefaced by its size, and the client waits for the next chunk. This process continues until the stream is closed, indicating that there’s no more data to receive.
The server signals the end of the stream in one of the following ways:
Empty Chunk: The server sends a final chunk that has a size of 0. This indicates that there is no more data to send.
Connection Closure: If the stream ends naturally (for example, because the generator function has exhausted), FastAPI will automatically close the connection. In essence, the server sends a TCP “FIN” packet to the client signaling the end of transmission.
In the following example, we’ll see how we can use FastAPI’s StreamingResponse along with our simulated LLM to demonstrate how to construct a streaming API.
Now, let’s solidify our understanding with a concrete example using FastAPI’s StreamingResponse. On the server side, our endpoint will use the event_generator we defined earlier to stream data:
app_stream_response.py
from fastapi import FastAPI
from fastapi.responses import StreamingResponse
import asyncio

# Test messages (same as before)
MESSAGES = [
    "This is",
    " a large",
    " response",
    " being",
    " streamed",
    " through FastAPI.",
    " Here's the final",
    " chunk!",
]

async def event_generator():
    for message in MESSAGES:
        yield message
        await asyncio.sleep(1)  # Simulate an async delay

app = FastAPI()

@app.get("/stream")
async def stream_response():
    return StreamingResponse(
        event_generator(),
        media_type="text/plain",)
In this code, the /stream endpoint utilizes StreamingResponse. We’re passing in the output of the event_generator, which will be streamed as text/plain. The key here is that the data isn’t collected into a single string first; instead, it is yielded piece-by-piece, and StreamingResponse handles the chunking and transmission.
On the client side, fetching this stream requires a slightly different approach than traditional REST calls. Instead of waiting for a single, complete JSON response, we read from the stream as it becomes available. Here is the JavaScript code:
stream.html
async function streamResponse() {
   try {
      const response = await fetch('/stream');
      const reader = response.body.getReader();
      const decoder = new TextDecoder();

      while (true) {
         const { value, done } = await reader.read();
         if (done) break;

          const text = decoder.decode(value);
          const container = document.getElementById('response-container');
          container.innerText += text;
      }
  } catch (error) {
      console.error('Streaming error:', error);
  }
}

// Start streaming when page loads
streamResponse();ReadableStreamReader from the response body. The ReadableStream allows us to process incoming data in chunks as they are received, rather than having to wait for the entire response to be downloaded.Uint8Array (binary data) containing the latest chunk of data.TextDecoder, making it usable for display or further processing.response-container. This provides visible feedback on the incoming data.In contrast to this streaming approach, a typical REST API call looks like this:
const response = await fetch('/api/data');  // Make the REST API request
const data = await response.json(); // Parse the JSON response body
The difference is stark. In a REST API call, we wait for the entire response before processing. While with StreamingResponse, we handle each chunk of data as it becomes available. This allows us to display output to the user almost instantly rather than after a long wait.
To truly understand what’s happening under the hood with StreamingResponse, let’s take a look at the actual HTTP requests and responses using network inspection tools. We’ll use Chrome DevTools and Wireshark to examine the data being transmitted between the client and the server.
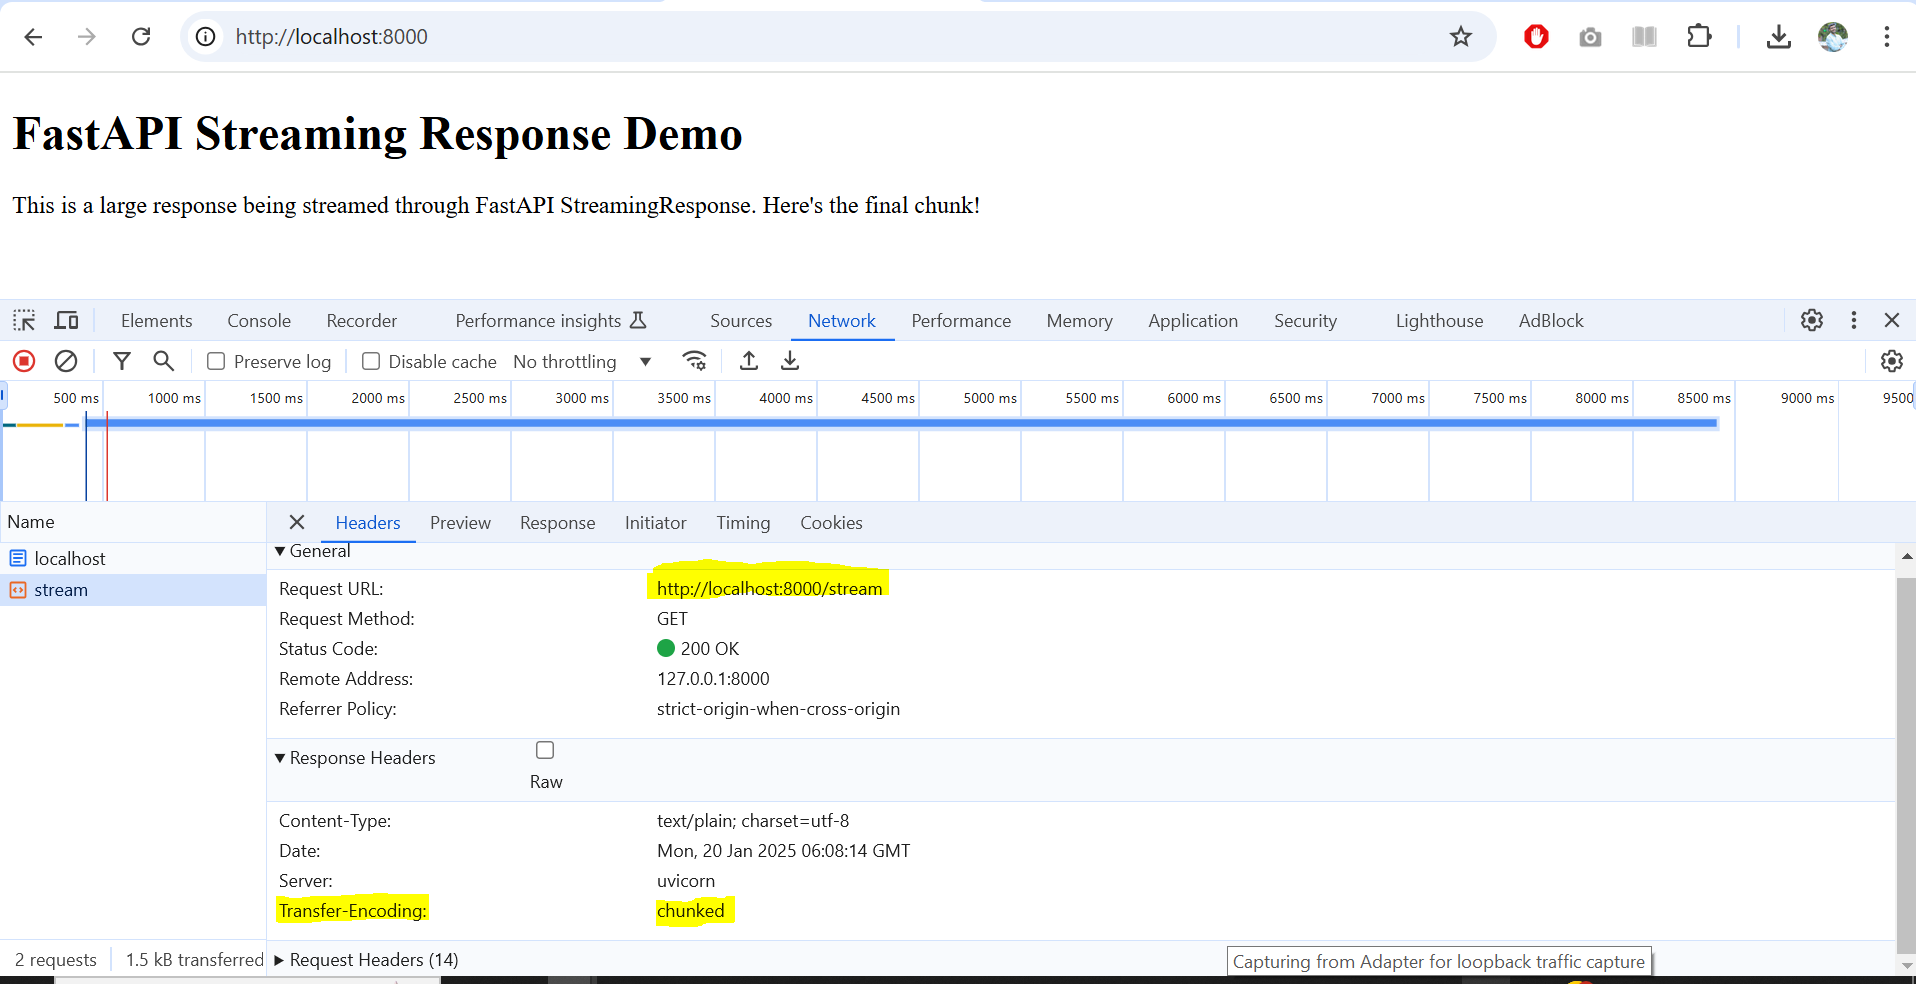
The first screenshot is from Chrome’s DevTools, specifically the “Network” tab. We can see the request made to the /stream endpoint. The key thing to notice in the response headers is the Transfer-Encoding: chunked header, highlighted in yellow. This confirms that the server is sending a chunked response, which is essential for streaming. The Content-Type is also set to text/plain, as specified in our server-side code.
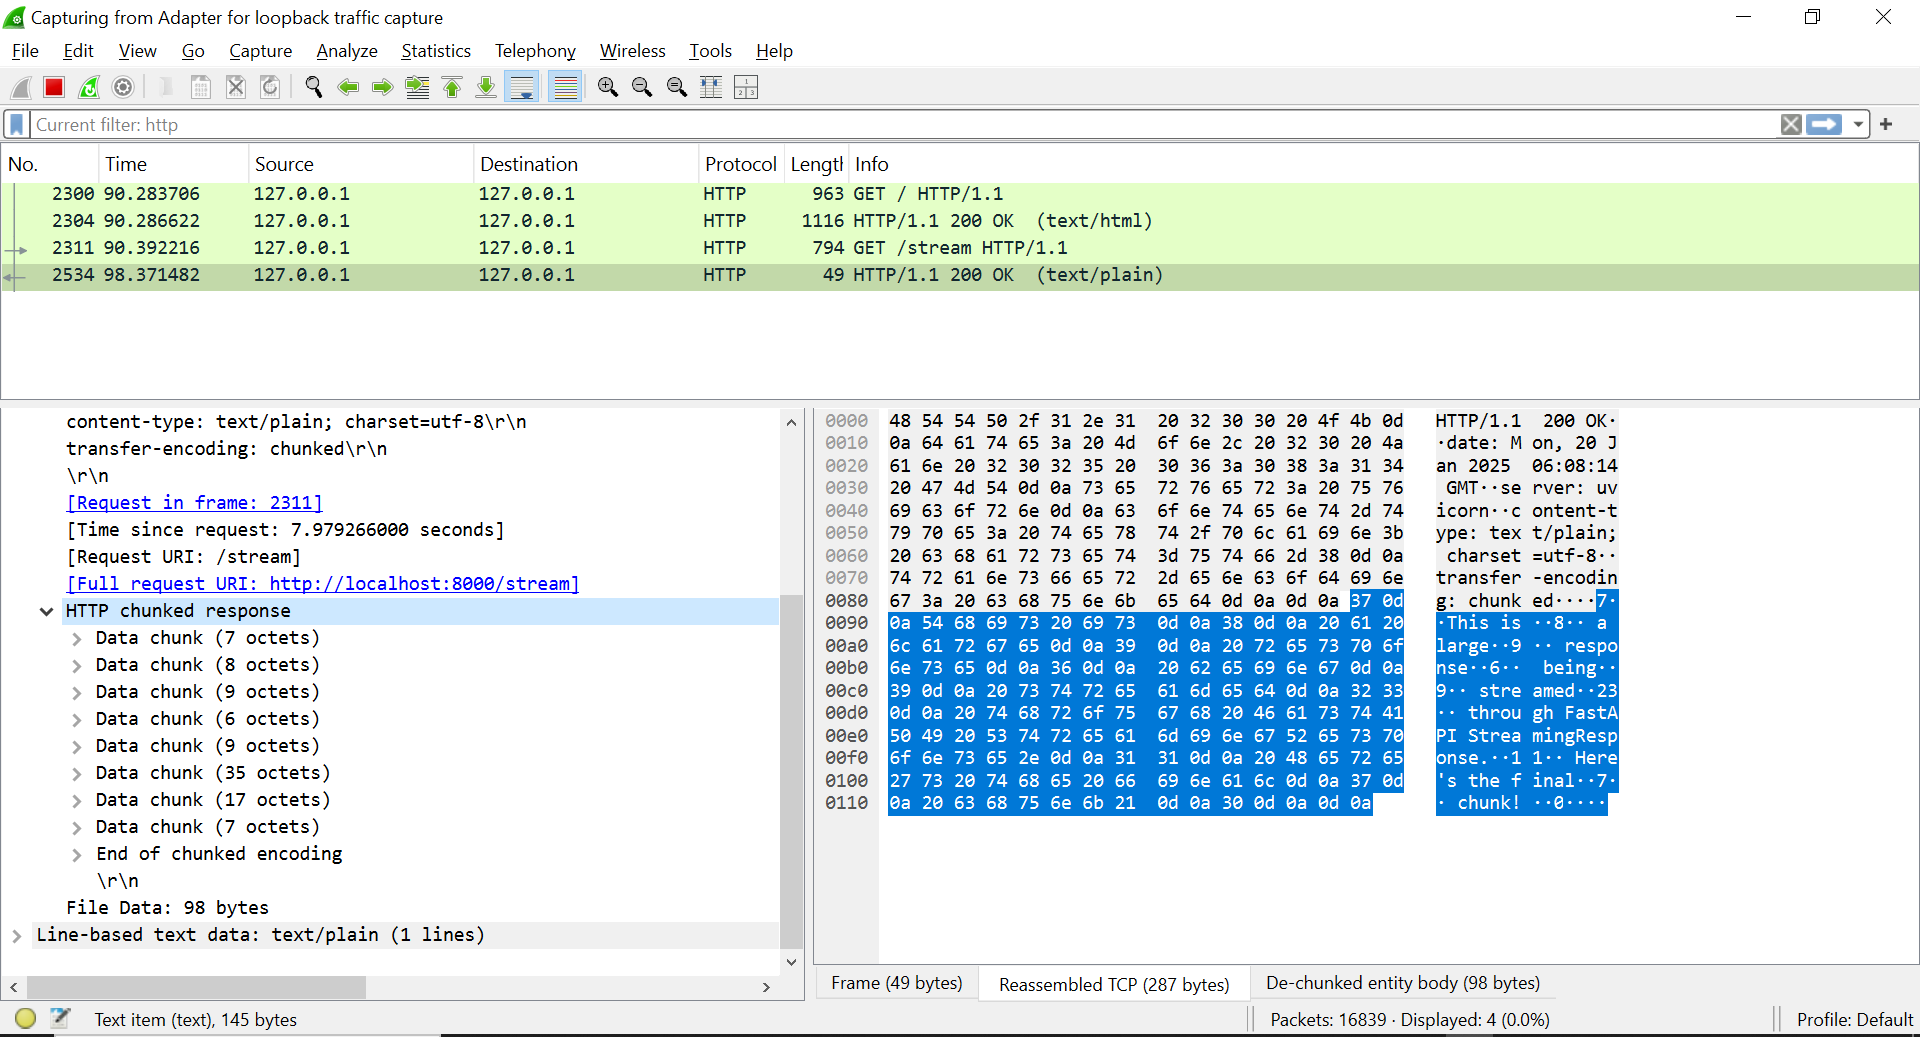
The second screenshot comes from Wireshark, a powerful network protocol analyzer. This tool allows us to inspect the raw packets being transmitted over the network. Here, we can see that multiple HTTP “chunked” responses are being sent from the server to the client as part of a single HTTP connection. This provides a visual confirmation that the server is indeed streaming data in chunks.
Sixth Data Chunk:
We’ve opened the sixth data chunk in Wireshark, where we see the chunk has a size of 35 octets. This chunk corresponds to the text ” through FastAPI StreamingResponse.”.
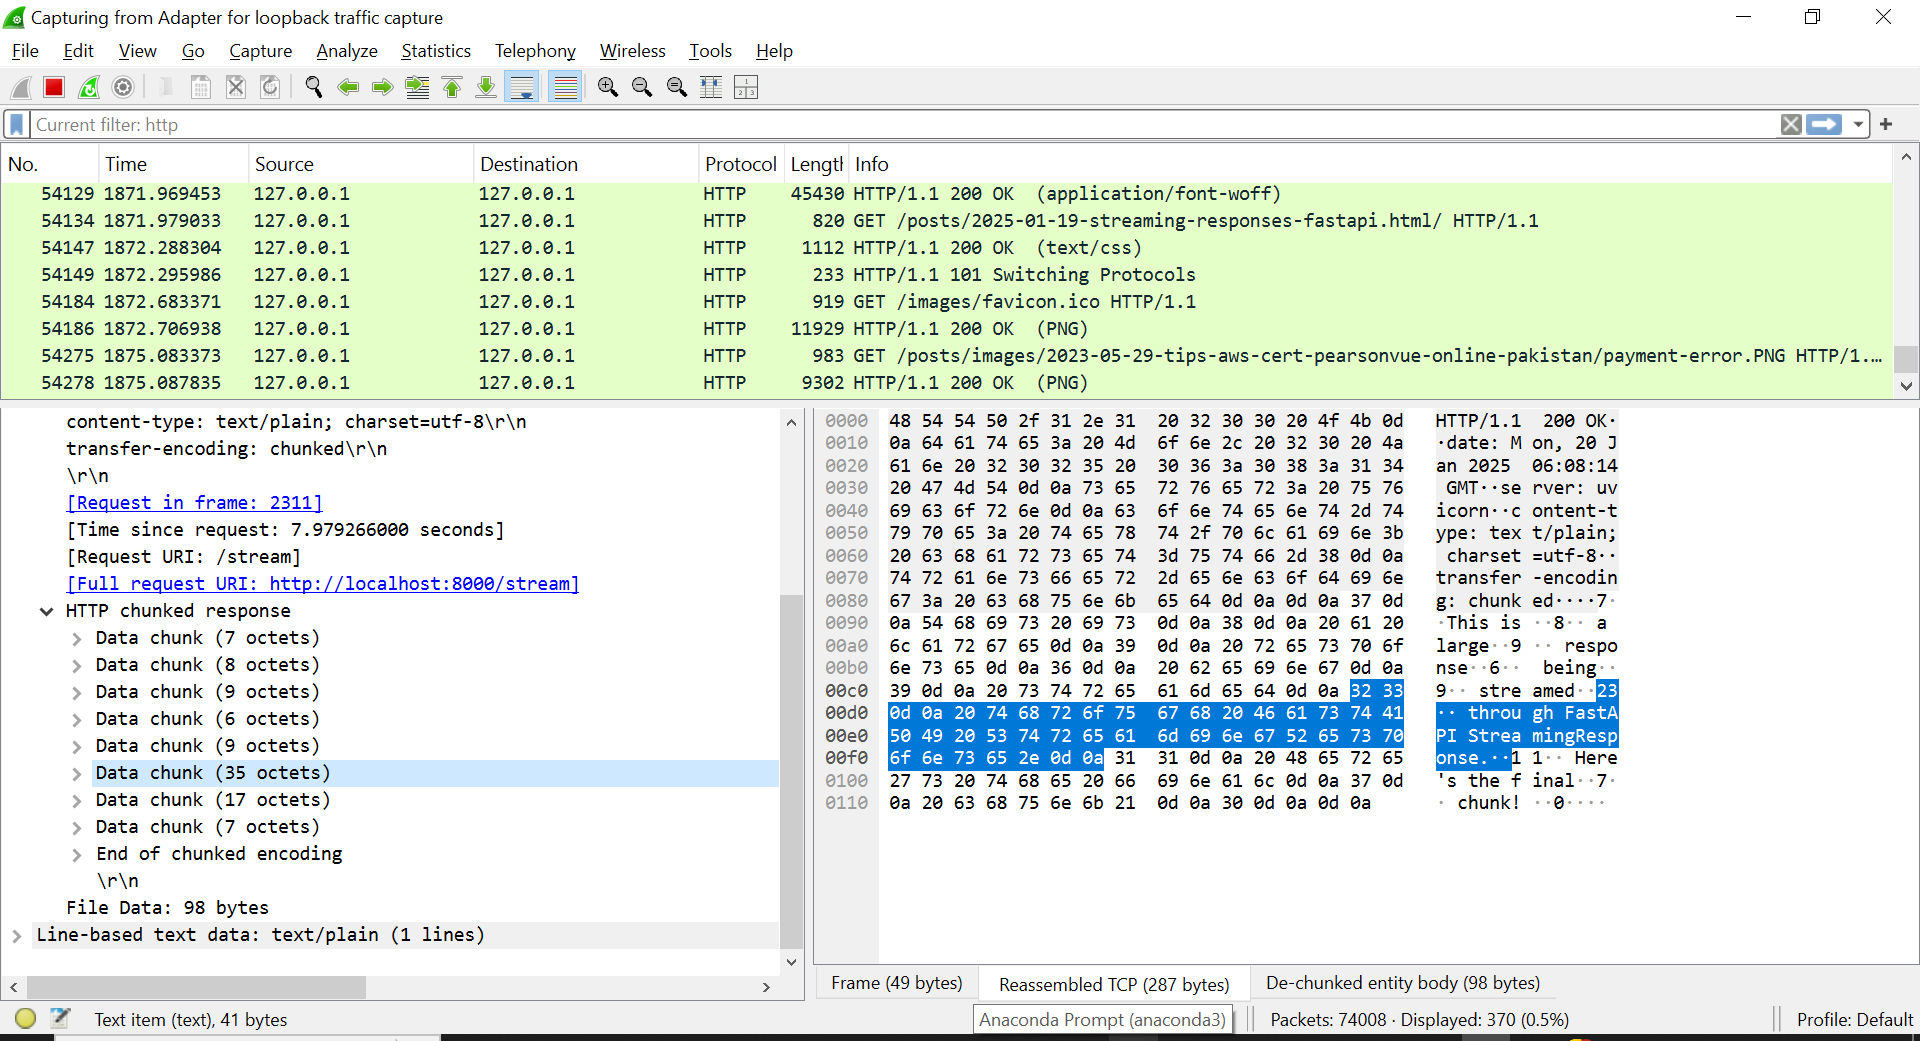
Seventh Data Chunk:
Here we have the seventh data chunk, indicated by a size of 17 octets. This maps to the message ” Here’s the final”.
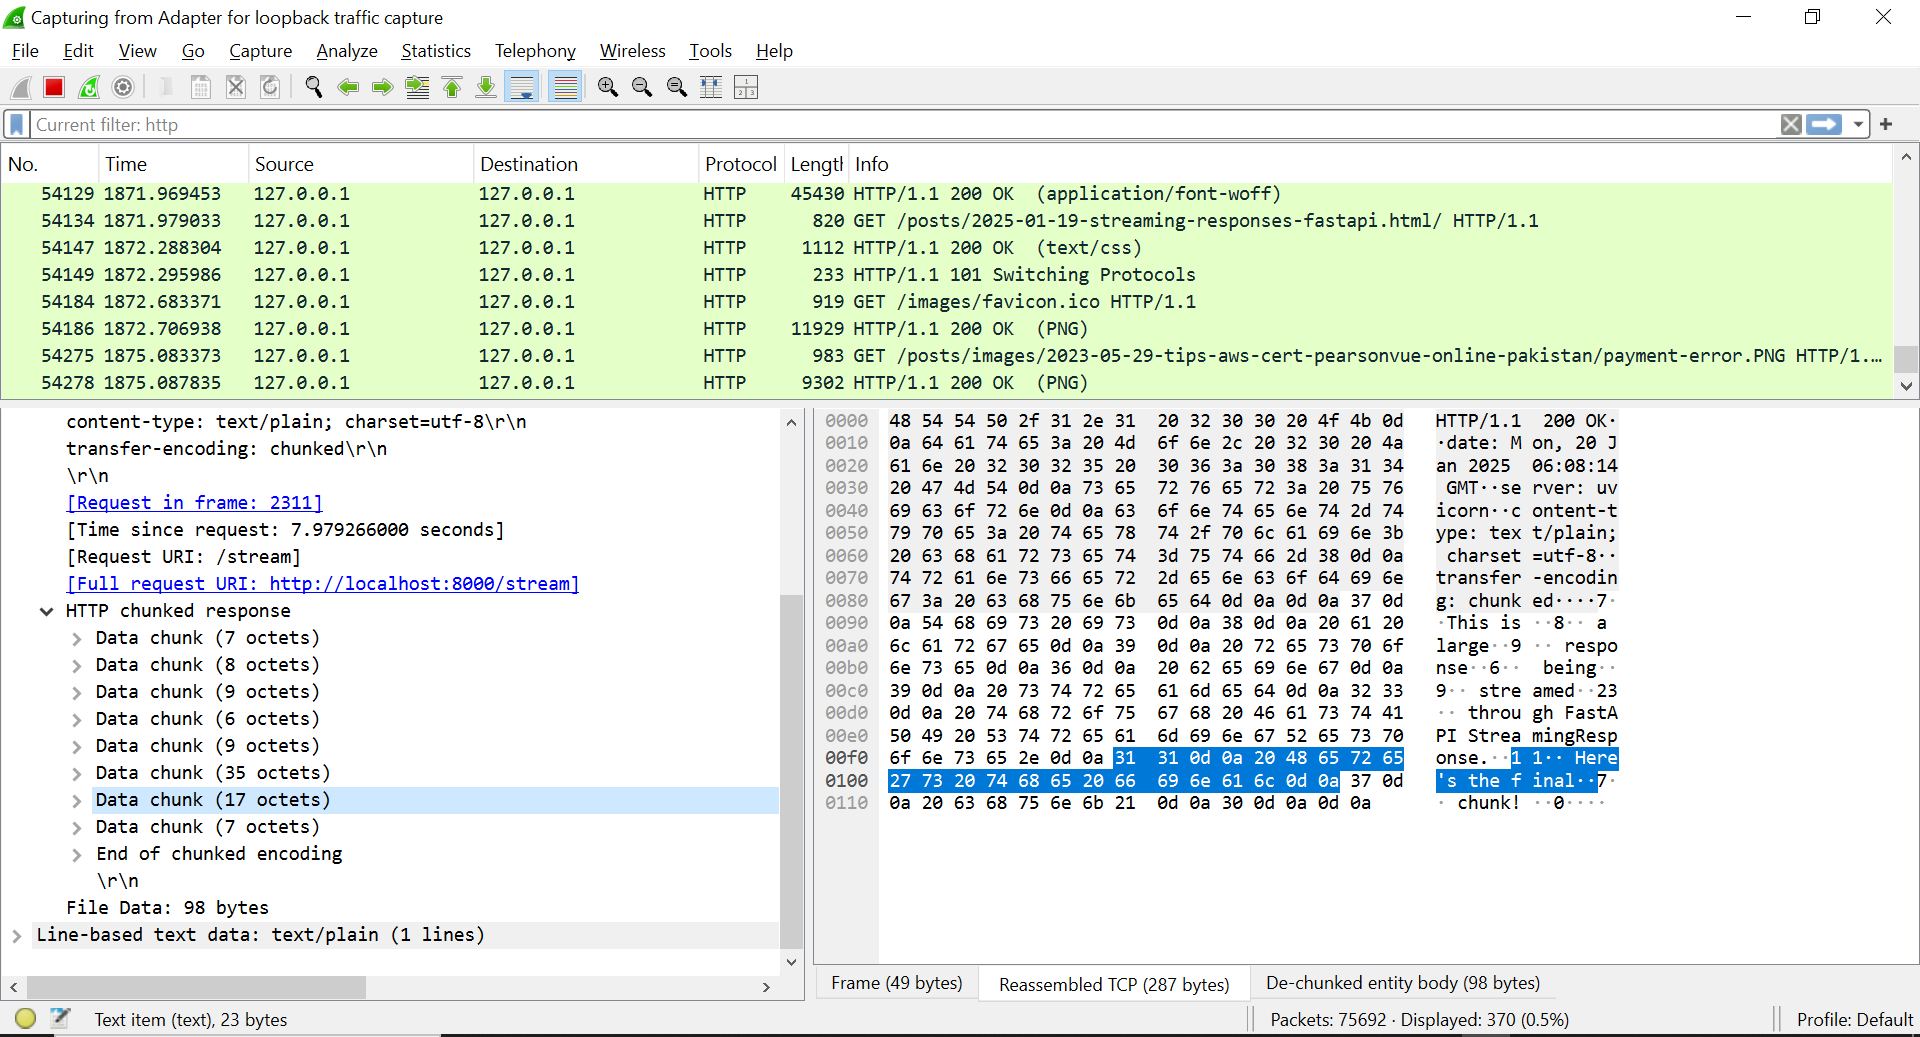
Eighth Data Chunk:
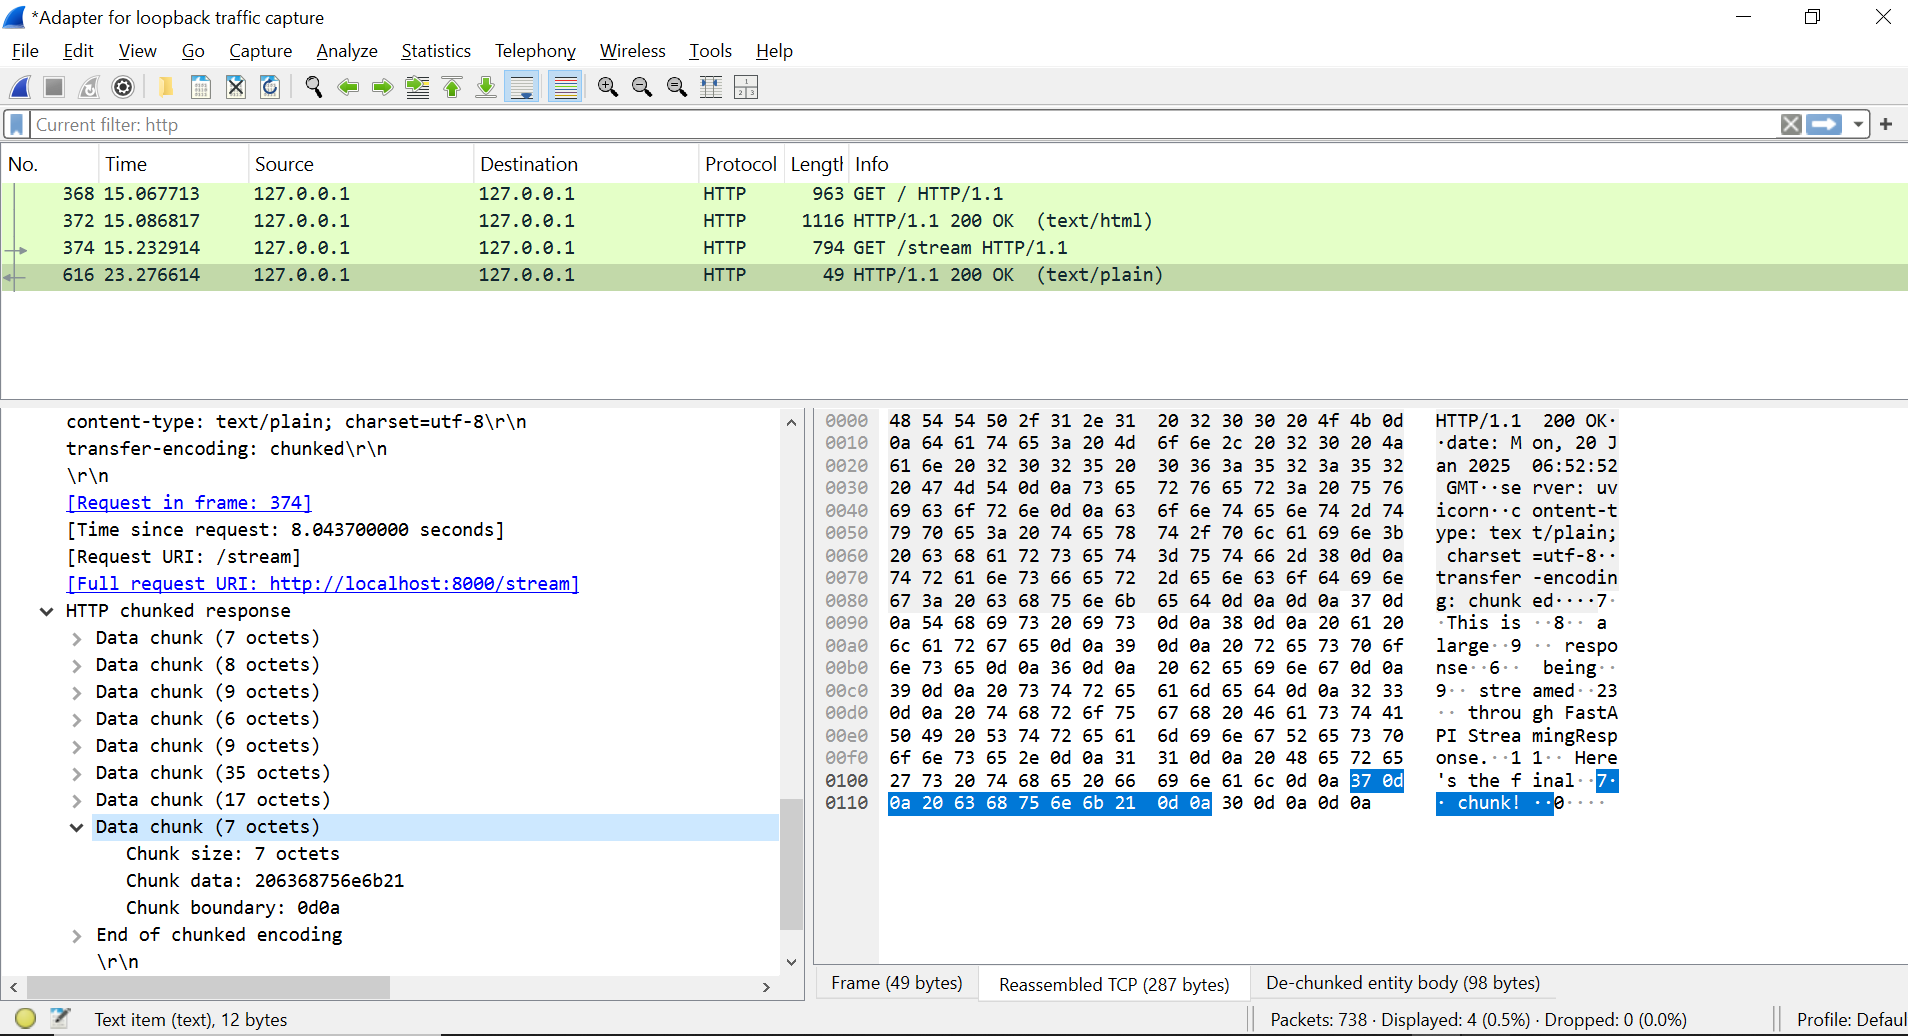
In this screenshot we opened the eighth data chunk. Here the chunk size is 7 octets and it corresponds to the last message ” chunk!“.
Last Data Chunk:
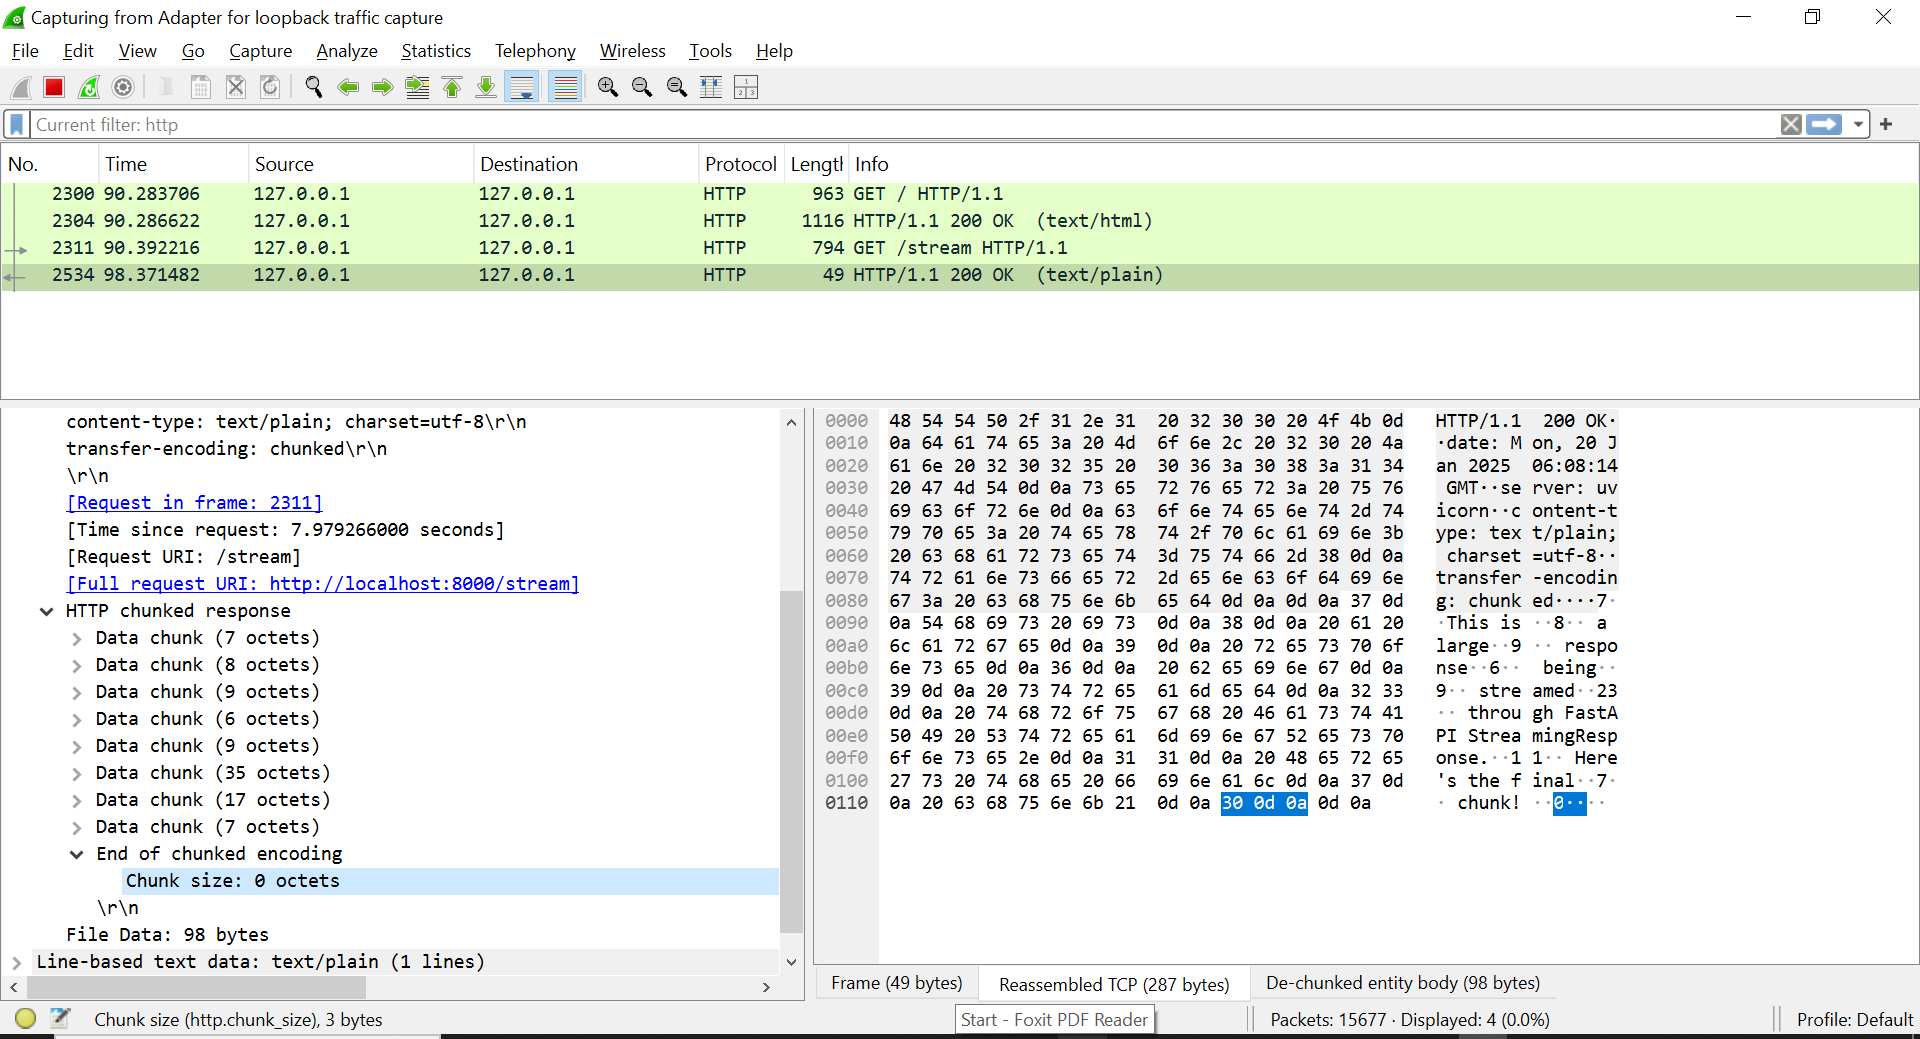
Finally, we can see the last chunk being sent. It has a size of 0 octets. This zero-size chunk tells the client that the server has finished sending the stream, and it can close the connection.
Server-Sent Events (SSE) are another powerful mechanism for pushing data from the server to the client in a stream. While similar in purpose to StreamingResponse, SSE operates at a higher level, utilizing a structured, event-based approach. This method is particularly well-suited for scenarios where the server needs to continuously send updates to the client, such as live notifications or updates to a real-time dashboard.
Unidirectional: SSE is a one-way communication channel. The server pushes data to the client, but the client cannot send data back to the server over the same connection. (For bidirectional communication, we would need to use WebSockets, which we’ll discuss later).
Text-Based: SSE is a text-based protocol. Data is formatted as simple text events, which are easy to parse on the client side.
Automatic Reconnection: If the connection between the server and client is interrupted, the client will automatically try to reconnect to the server after a short delay. This is a key benefit of using SSE because it makes sure your connection is always live.
Here’s how we can implement SSE with FastAPI, using our existing event_generator:
app_ess.py
from fastapi import FastAPI
from sse_starlette.sse import EventSourceResponse
import asyncio

# Test messages (same as before)
MESSAGES = [
    "This is",
    " a large",
    " response",
    " being",
    " streamed",
    " through FastAPI SSE.",
    " Here's the final",
    " chunk!",
]

async def event_generator():
    for message in MESSAGES:
        yield {"data": message}
        await asyncio.sleep(1)  # Simulate an async delay

app = FastAPI()

@app.get("/stream")
async def stream_response():
    return EventSourceResponse(event_generator())
As you can see, it’s incredibly straightforward. Instead of StreamingResponse, we use EventSourceResponse from the sse-starlette package (which you’ll need to install). EventSourceResponse takes the asynchronous generator (which produces a dictionary) and formats it as SSE messages that can be consumed by the browser. Note that in order to send raw text we have to format the yield as {"data": "your_text"}
On the client side, connecting to an SSE stream is also remarkably simple:
event.data to an HTML element with the ID response-container.Structure: StreamingResponse provides raw data that the client must interpret. SSE provides a structured format with an event-driven approach through which you can have multiple event types.
Protocol Overhead: SSE has slightly more protocol overhead than StreamingResponse due to the additional text-based formatting and event structure.
Client-Side Ease: The client-side API for SSE is cleaner since the event handling is baked in (EventSource API).
Use Cases: StreamingResponse might be better if you are trying to stream very large files because it has less overhead. SSE shines in cases where the messages are structured, which allows clients to act on different event types.
To gain an even more detailed understanding of Server-Sent Events, let’s refer to the official documentation. The Mozilla Developer Network (MDN) page on Using server-sent events provides a comprehensive overview of the SSE specification and its various features.
In particular, the MDN documentation highlights that SSE messages can include various fields, not just the data field we used in our initial example. These fields allow for richer event structures, enabling the client to handle different kinds of events or provide additional context. Here’s a breakdown of the key fields as defined by the SSE specification:
These additional fields allow you to build highly structured and robust applications. The server can now send messages such as:
id: 12345
event: user-logged-in
retry: 10000
data: John Doe
data: User ID : 123

id: 12346
event: message
data: hello world
In the above message stream we are using id, event, retry and multiple data fields. You can also format the message with data in one line, like the last message example.
By understanding these additional message fields, you can design more sophisticated real-time applications leveraging the flexibility of Server-Sent Events.
To fully grasp how Server-Sent Events operate, let’s examine the HTTP requests and responses using network inspection tools. Just as with StreamingResponse, visualizing the data flow helps clarify what’s happening behind the scenes. We’ll again use Chrome DevTools and Wireshark to see the structure and details of the transmitted data.
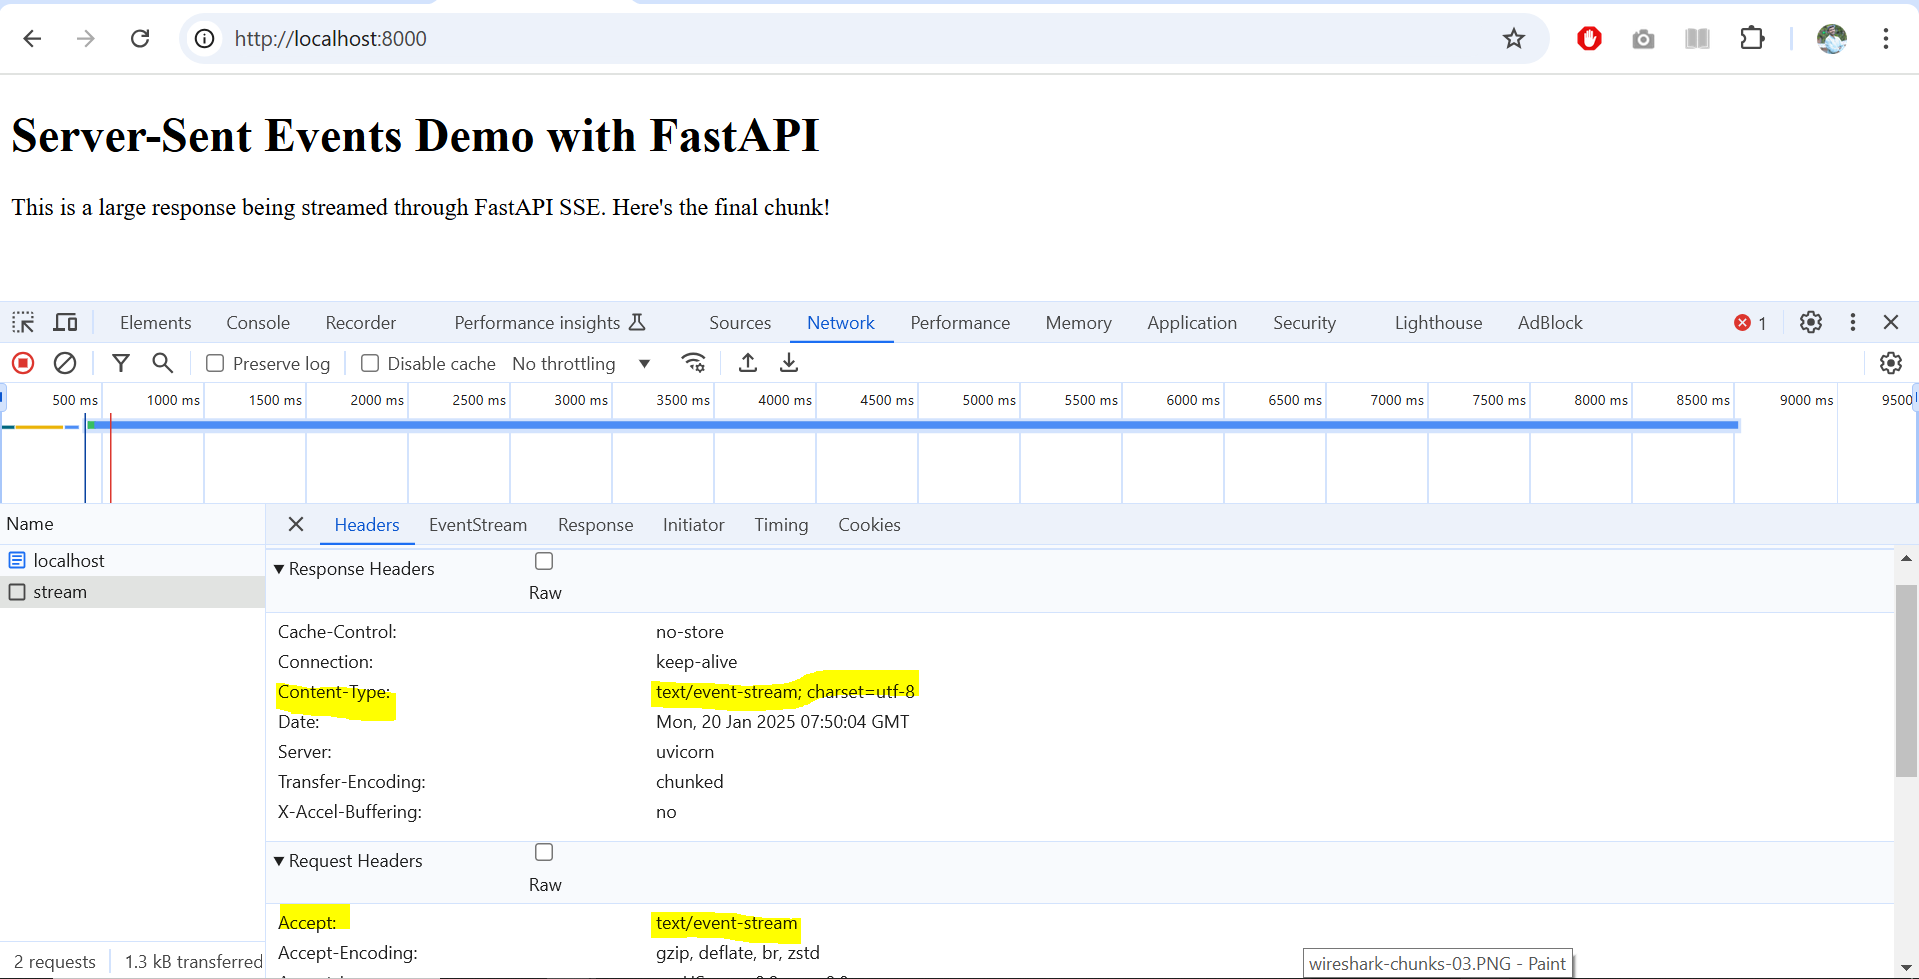
The first screenshot shows the “Network” tab in Chrome DevTools for our SSE endpoint. Here, you can see the Content-Type header is set to text/event-stream, which is the critical header indicating that we are dealing with an SSE stream. This is different from the text/plain we saw when using the StreamingResponse. The Transfer-Encoding is also set to chunked which signals that the content is being sent in parts.
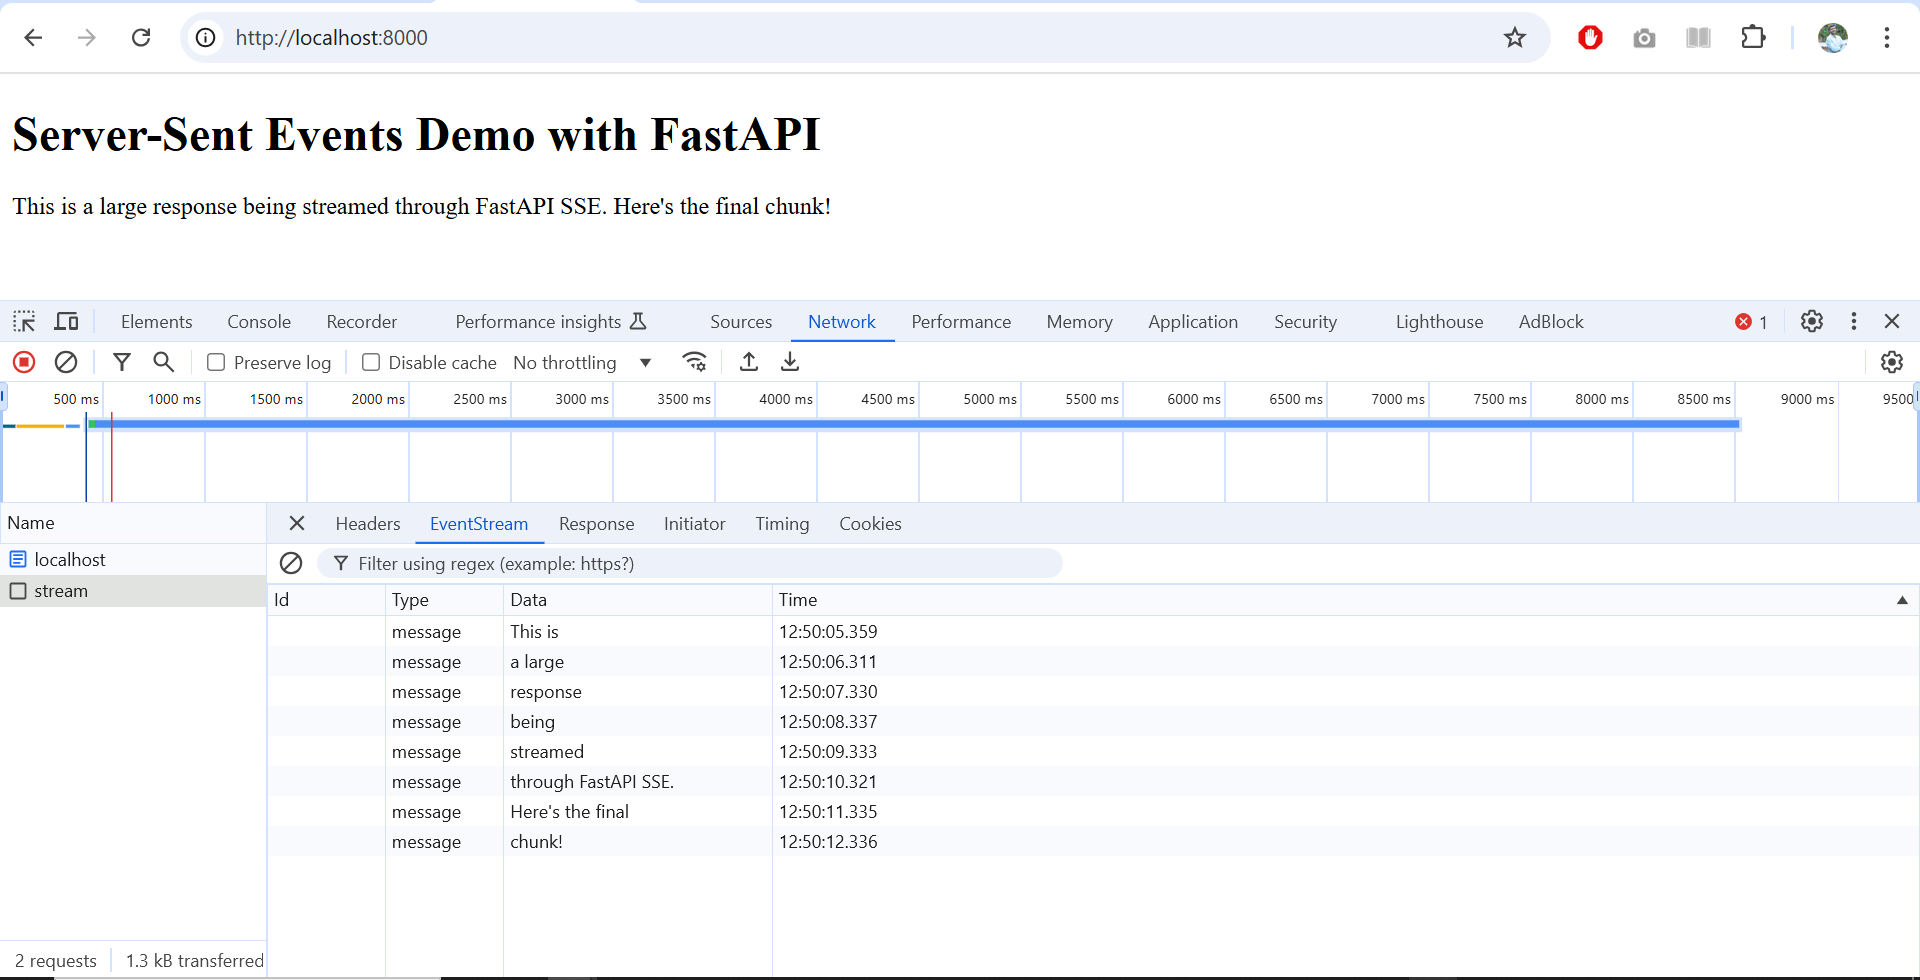
One of the nice things about Chrome is that when it receives text/event-stream it provides a separate “EventStream” tab to display the events in a more readable format. This view helps in tracing the exact sequence of events sent from the server. Each event includes a timestamp and message data, making debugging straightforward. Here we can also see that each of the messages has a message type of message.
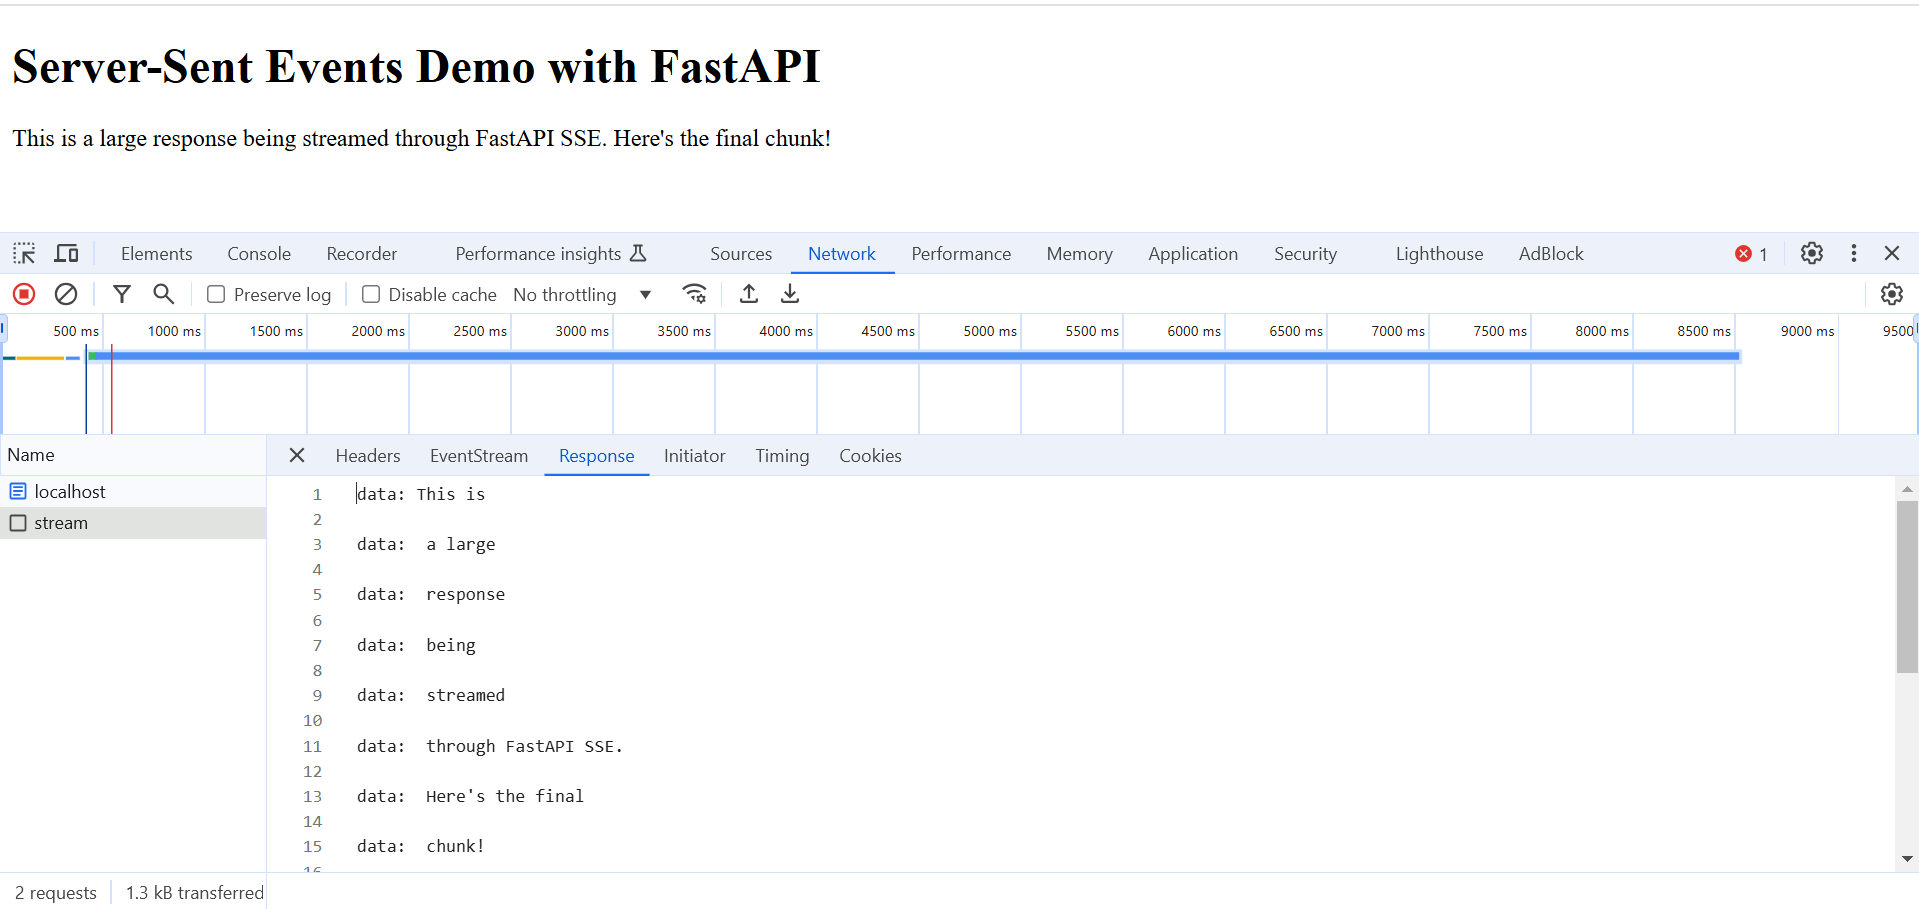
In this view we can inspect the raw HTTP response that was received from the server. In this view each of the messages that we received are in a separate line. Each of these lines have the prefix of data.
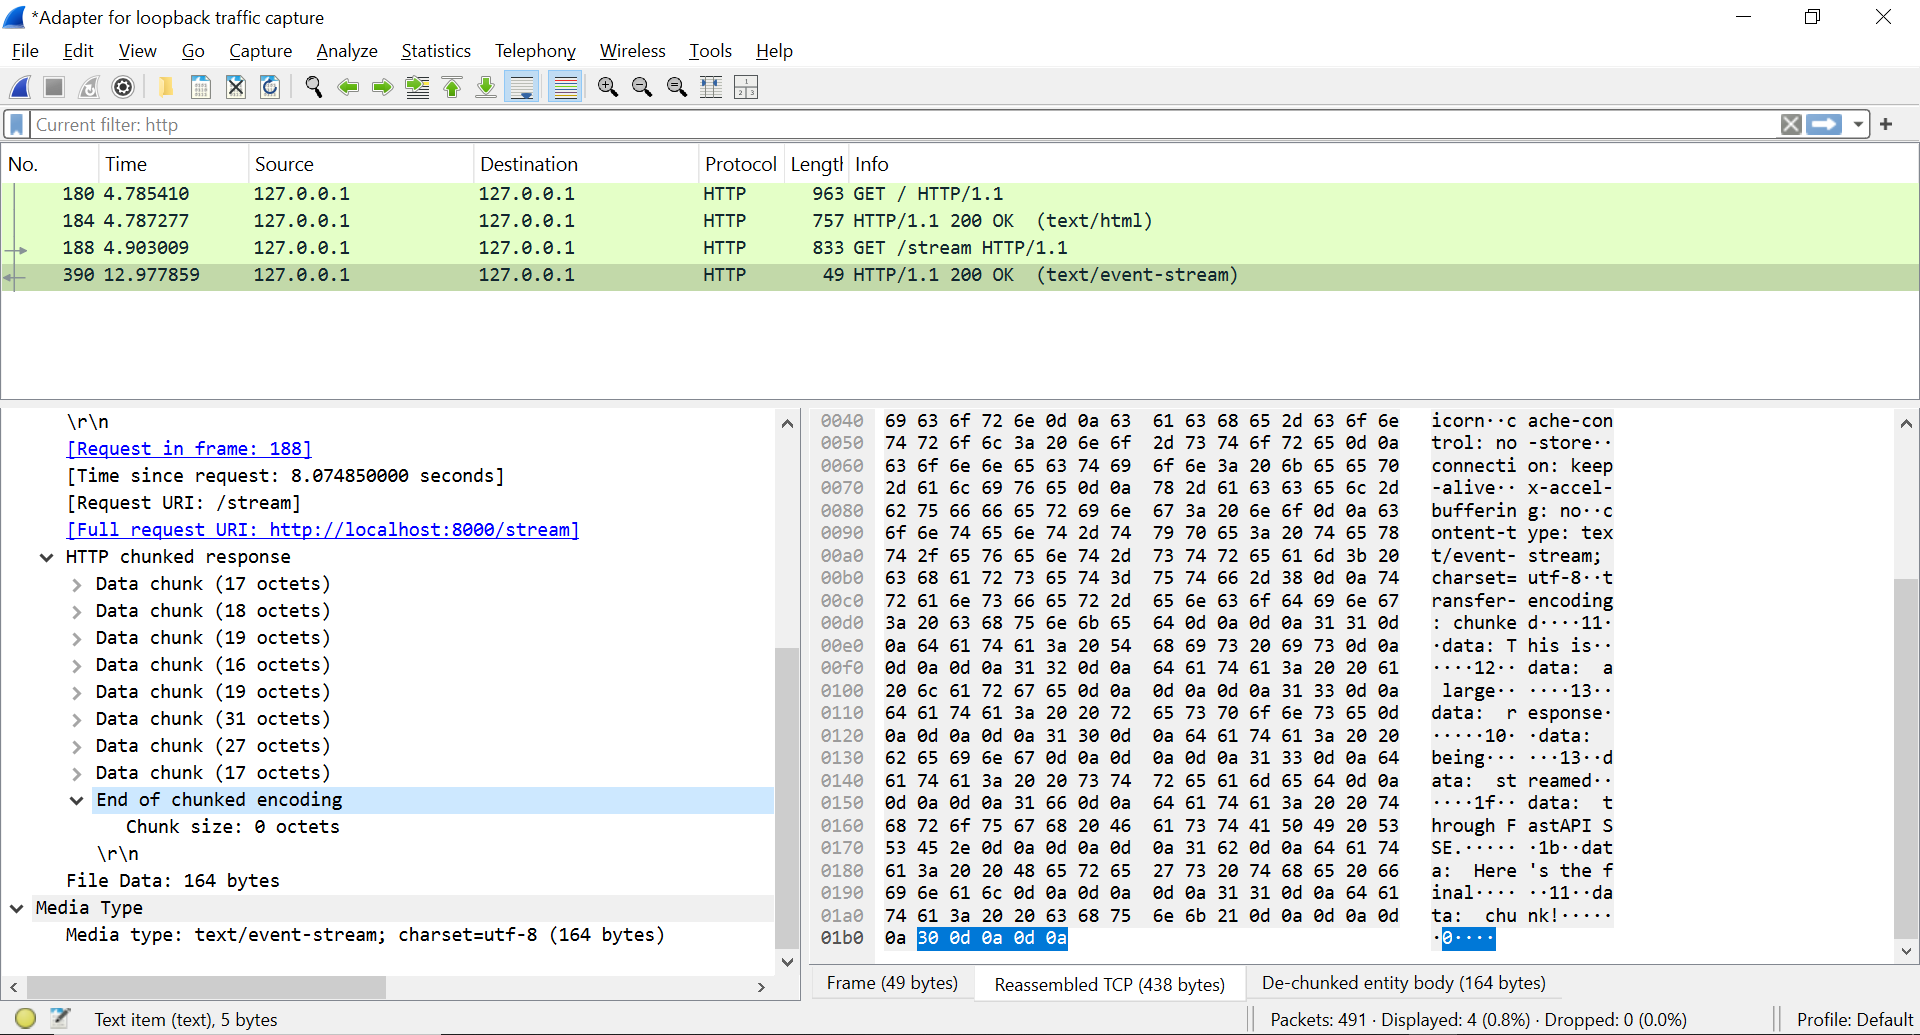
This Wireshark screenshot shows the raw packets for the SSE stream. We see the familiar chunked transfer encoding. Notice that, like StreamingResponse, SSE also sends data in chunks. The final chunk of size 0 signals the end of the stream, and all the messages from the server have been received.
While StreamingResponse and Server-Sent Events (SSE) are great for sending data from the server to the client, they don’t offer a way for the client to send data back to the server. This is where WebSockets come in. WebSockets provide a persistent, full-duplex communication channel that allows both the server and the client to send and receive data simultaneously over a single TCP connection. This makes WebSockets ideal for real-time applications like chat, live collaboration, and interactive gaming.
Bidirectional: Unlike SSE, WebSockets enable two-way communication. Both client and server can send messages to each other at any time.
Full-Duplex: Communication can occur in both directions simultaneously, unlike half-duplex or simplex communication methods.
Persistent Connection: A WebSocket connection remains open until either the client or server explicitly closes it. This persistent connection eliminates the need for repeated connection establishment, making real-time interaction more efficient.
Low Overhead: WebSockets provide a lighter-weight communication mechanism compared to repeatedly creating HTTP requests.
Here’s how to implement a WebSocket endpoint with FastAPI:
app_websocket.py
from fastapi import FastAPI, WebSocket
import asyncio

# Test messages (same as before)
MESSAGES = [
    "This is",
    " a large",
    " response",
    " being",
    " streamed",
    " through FastAPI WebSocket.",
    " Here's the final",
    " chunk!",
]

app = FastAPI()

@app.websocket("/ws")
async def websocket_endpoint(websocket: WebSocket):
    await websocket.accept()
    try:
        # Send initial messages
        for message in MESSAGES:
            await websocket.send_text(message)
            await asyncio.sleep(1)

        # Keep connection alive and handle incoming messages
        while True:
            try:
                data = await asyncio.wait_for(
                    websocket.receive_text(), timeout=60  # 60 second timeout
                )
                await websocket.send_text(f"Response: {data}")
            except asyncio.TimeoutError:
                await websocket.close()
                break

    except Exception as e:
        print(f"Error: {e}")
    finally:
await websocket.close()/ws path.await websocket.send_text(message). The await asyncio.sleep(1) simulates a delay between sending messages.Here’s the corresponding JavaScript code to connect to the WebSocket endpoint and send messages:
wsocket.html
let ws;

function connectWebSocket() {
    // Create WebSocket connection
    ws = new WebSocket(`ws://${window.location.host}/ws`);

    ws.onmessage = function (event) {
        const container = document.getElementById('response-container');
        // Add new line for better readability
        container.innerHTML += event.data + '<br>';
        // Auto scroll to bottom
        container.scrollTop = container.scrollHeight;
    };

    ws.onclose = function (event) {
        console.log('WebSocket connection closed:', event);
        // Optionally show connection status to user
        const container = document.getElementById('response-container');
        container.innerHTML += '<br>Connection closed<br>';
    };

    ws.onerror = function (error) {
        console.error('WebSocket error:', error);
        // Optionally show error to user
        const container = document.getElementById('response-container');
        container.innerHTML += '<br>Error occurred<br>';
    };

    ws.onopen = function (event) {
        console.log('WebSocket connection established');
        // Optionally show connection status to user
        const container = document.getElementById('response-container');
        container.innerHTML += 'Connected to server<br>';
    };
}

function sendMessage() {
    const input = document.getElementById('messageInput');
    if (input.value && ws.readyState === WebSocket.OPEN) {
        ws.send(input.value);
        // Optionally show sent message
        const container = document.getElementById('response-container');
        container.innerHTML += `Sent: ${input.value}<br>`;
        input.value = '';
    }
}

// Add event listener for Enter key
document.getElementById('messageInput').addEventListener('keypress', function (e) {
    if (e.key === 'Enter') {
        sendMessage();
    }
});

// Connect when page loads
connectWebSocket();To deepen your understanding of WebSockets and explore their full capabilities, consult Mozilla Developer Network (MDN) page on the WebSocket API which provides a comprehensive and detailed reference for all aspects of the WebSocket interface.
To understand the real-time communication capabilities of WebSockets, let’s examine how connections are established and messages are exchanged. We’ll use Chrome DevTools and Wireshark to visualize these interactions, gaining insights into the underlying protocol.
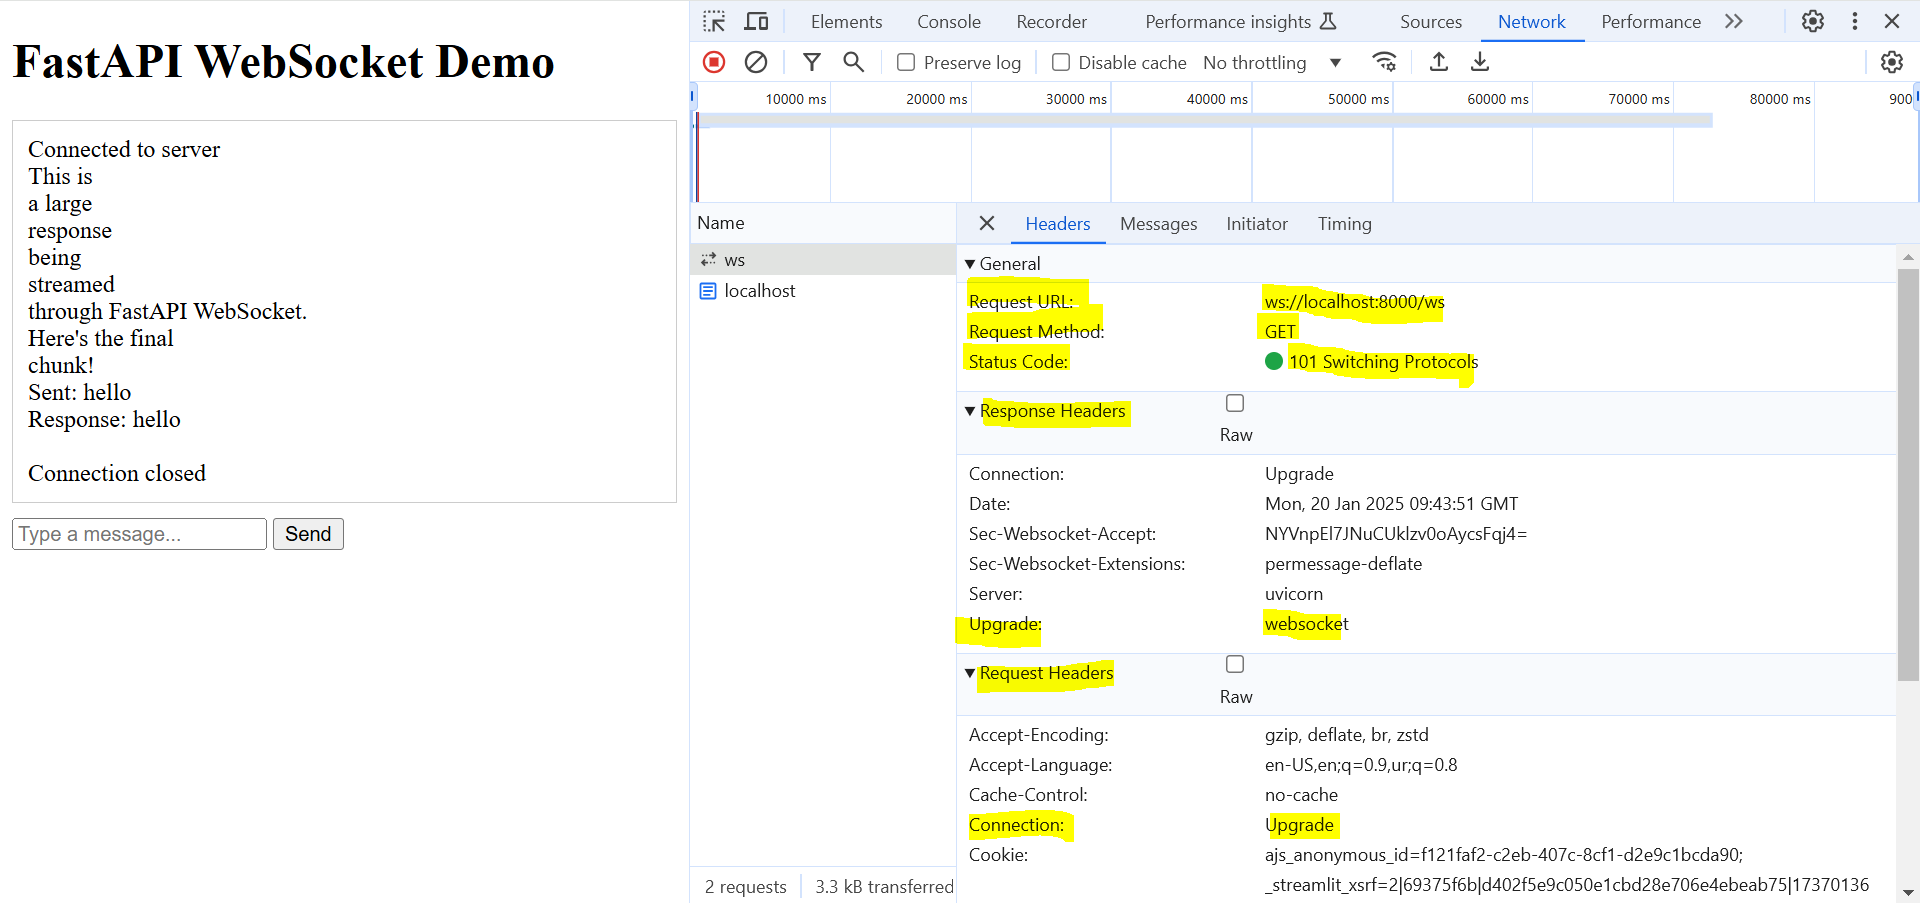
The first two screenshots are from the “Network” tab in Chrome DevTools. They display the initial HTTP GET request made to the /ws endpoint. Observe the following key aspects:
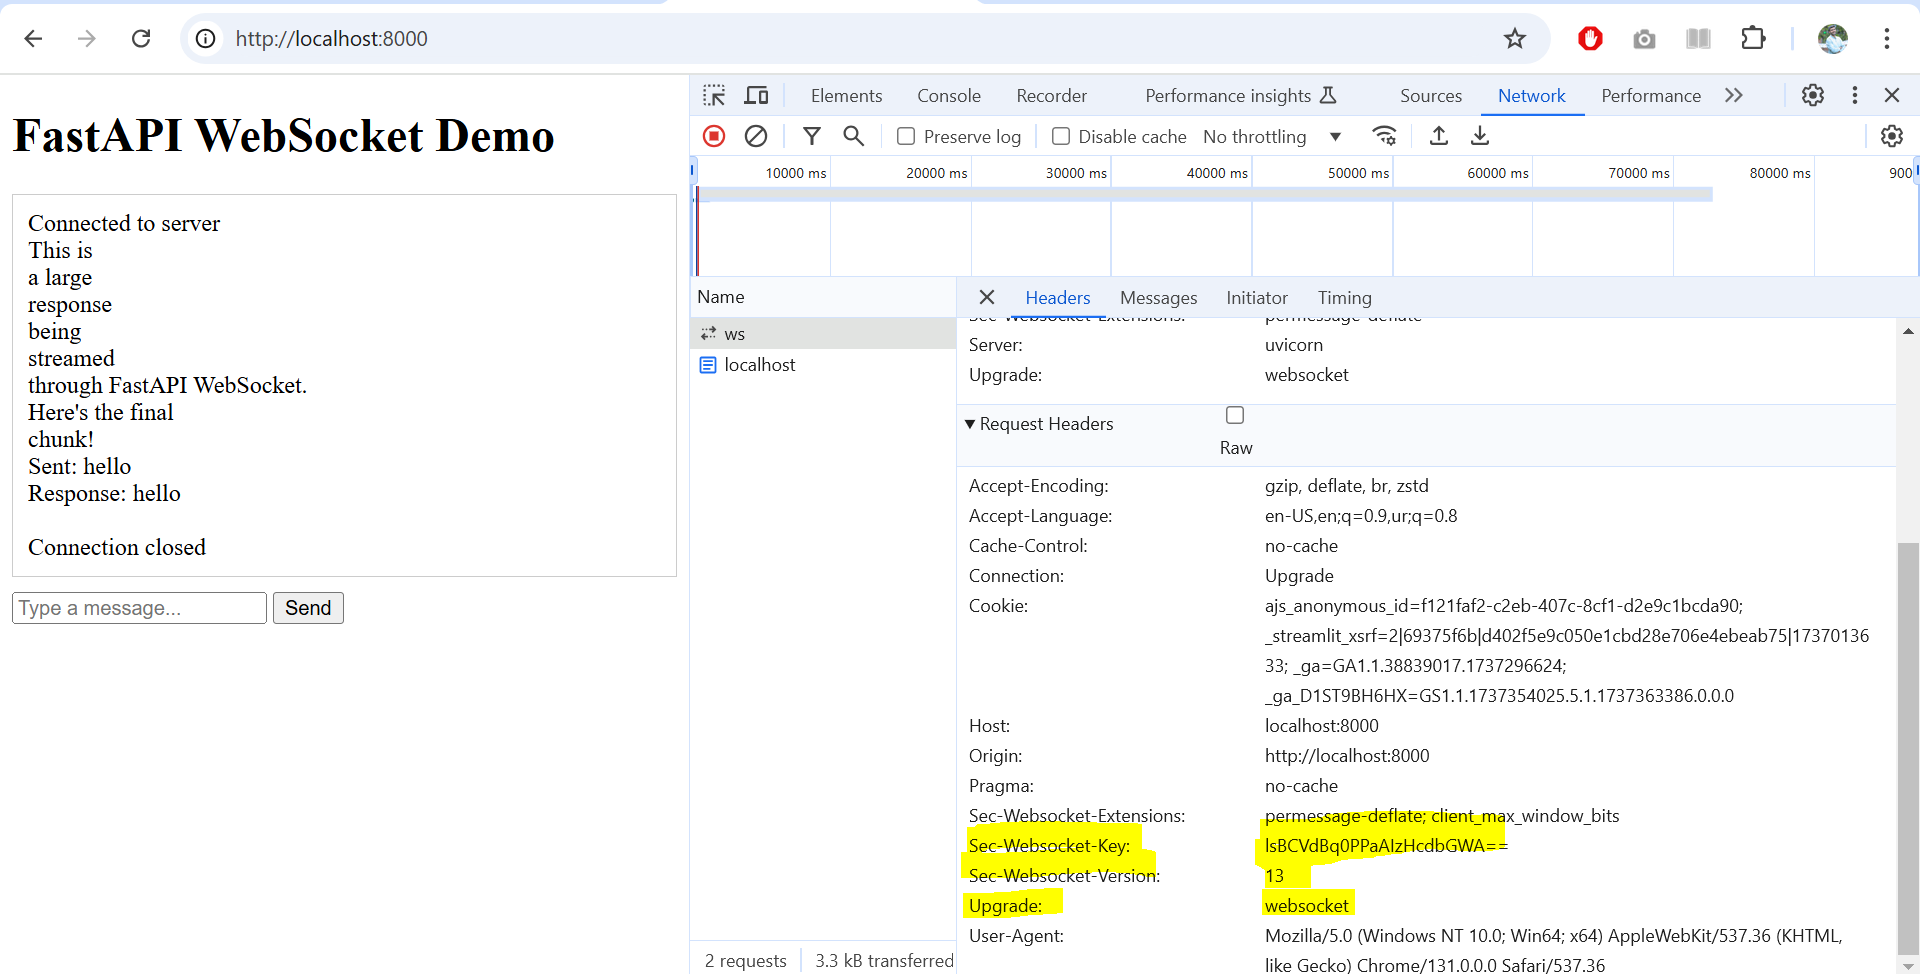
/ws endpoint.Upgrade: websocket and Connection: Upgrade headers, which instructs the server to switch to the websocket protocol.Sec-WebSocket-Key (a random key for security) and Sec-WebSocket-Version (indicating the WebSocket protocol version) headers.Sec-WebSocket-Accept, which is derived from the Sec-WebSocket-Key. This confirms that the server has acknowledged the handshake.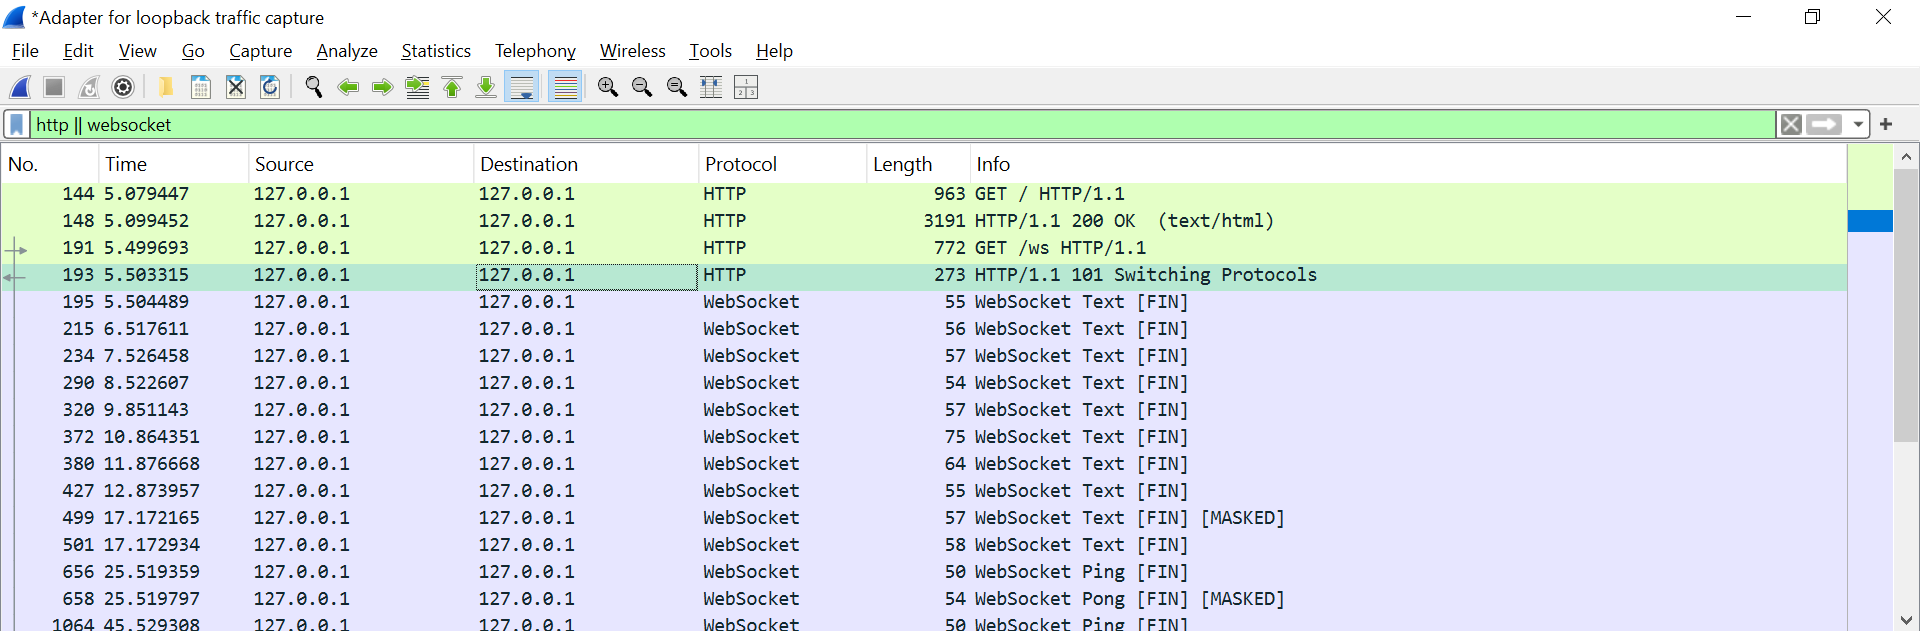
This Wireshark screenshot shows the raw packets of the initial handshake. Like Chrome, Wireshark also shows that the connection begins with an HTTP request where client requests to switch to the Websocket Protocol. The Server also responds with the status code 101 switching protocols.
First Message: 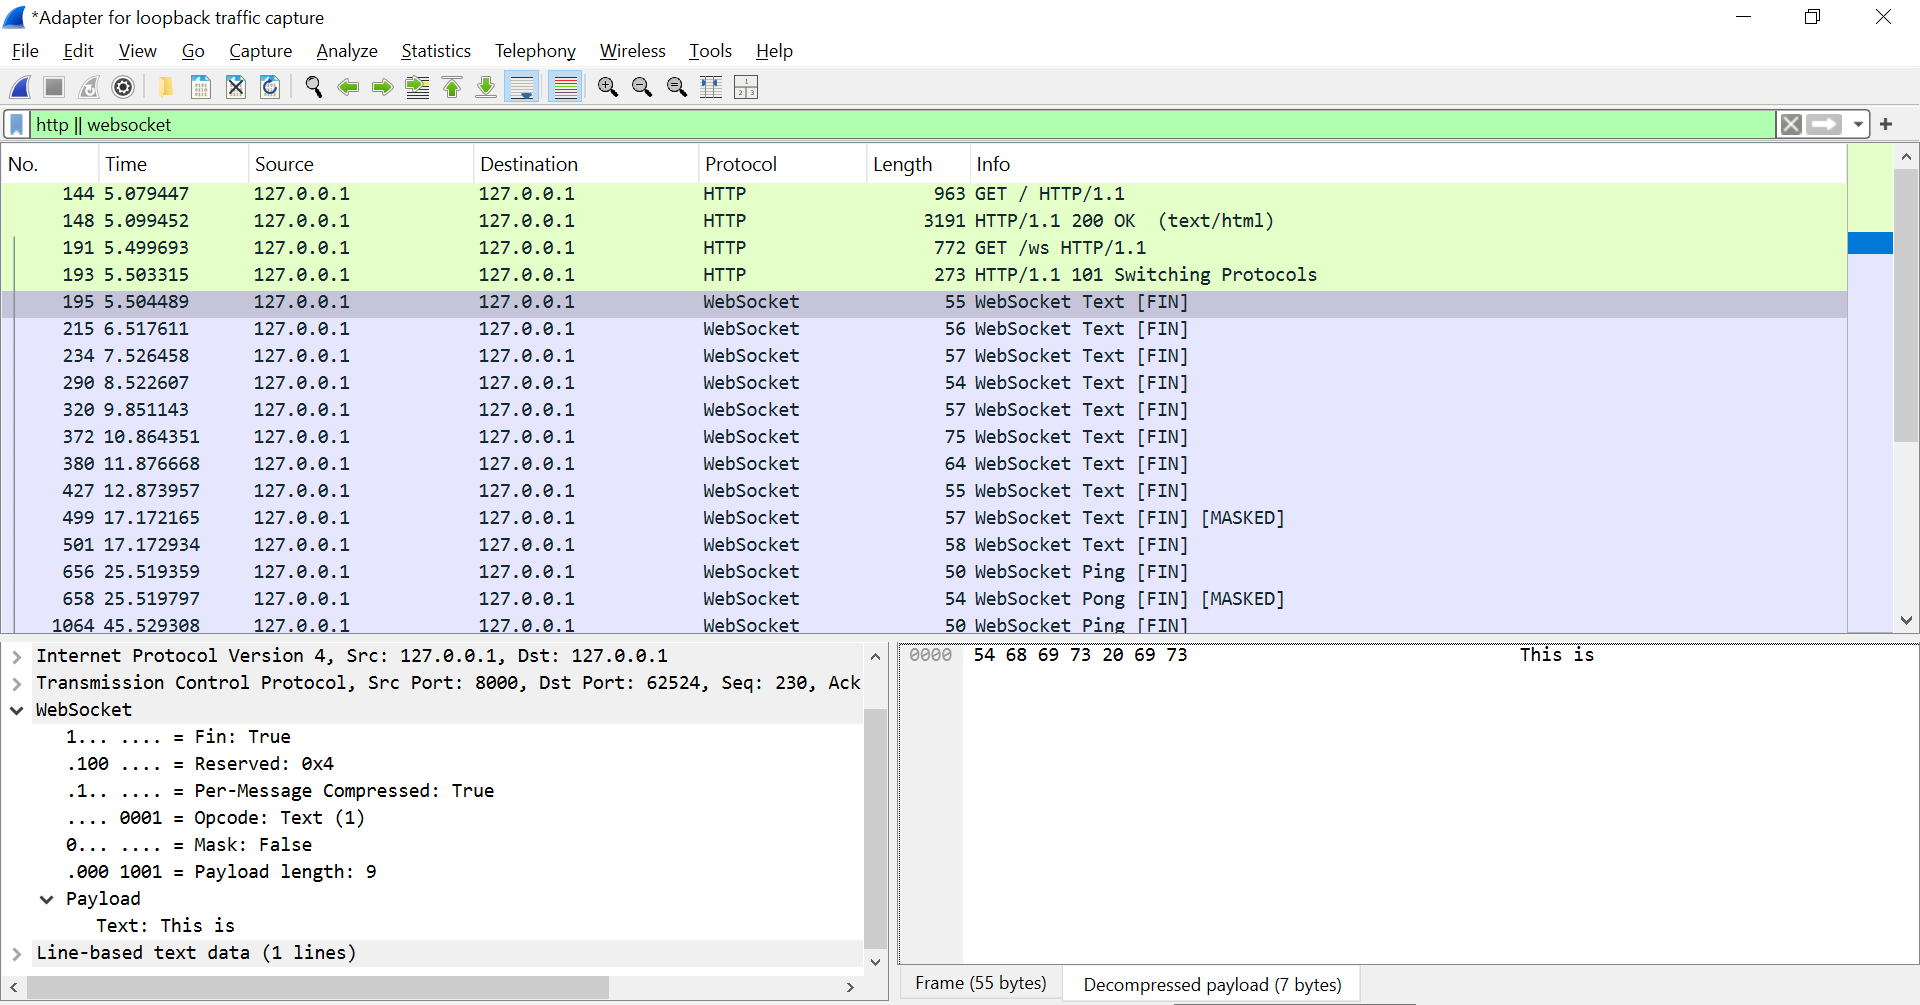
This image shows the first message sent from the server after WebSocket connection. We can see that the server sends “This is” as the first message. The text payload is also displayed in the lower section of the image.
Second Message: 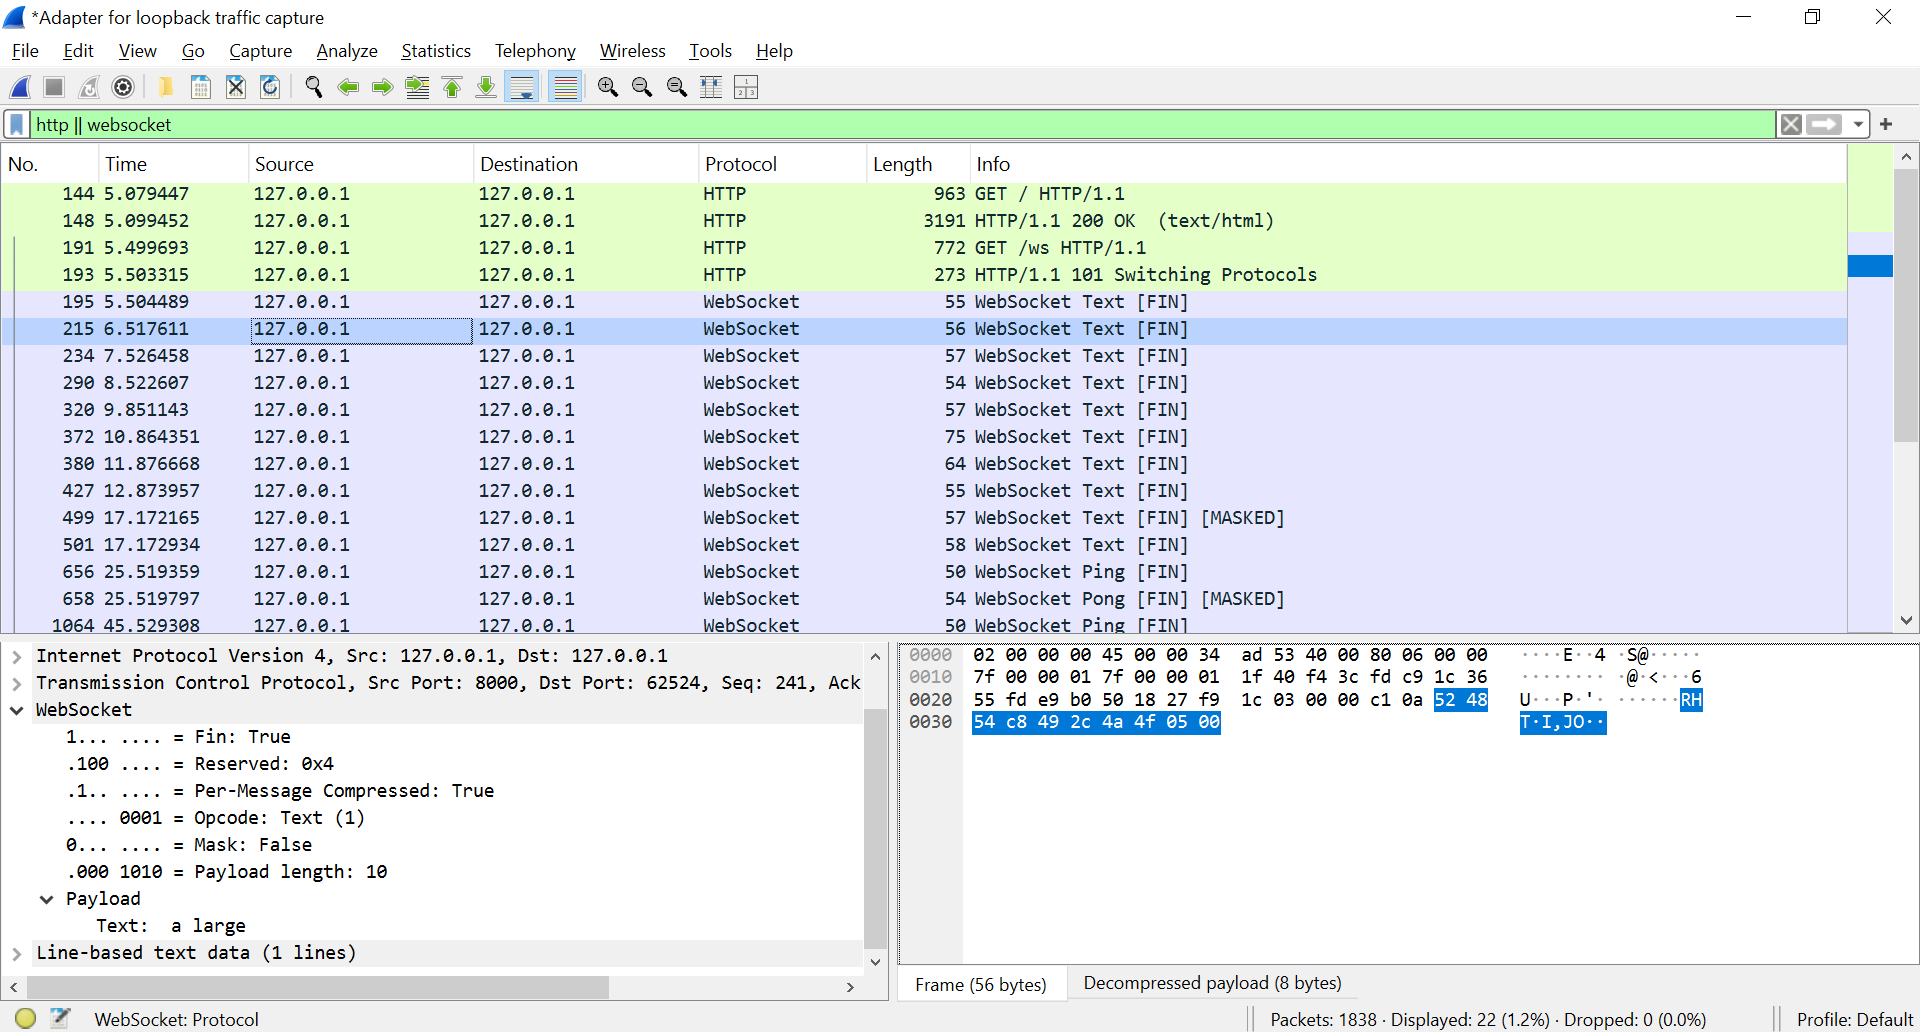
This image displays the server’s second message to the client which is “a large”.
Seventh Message: 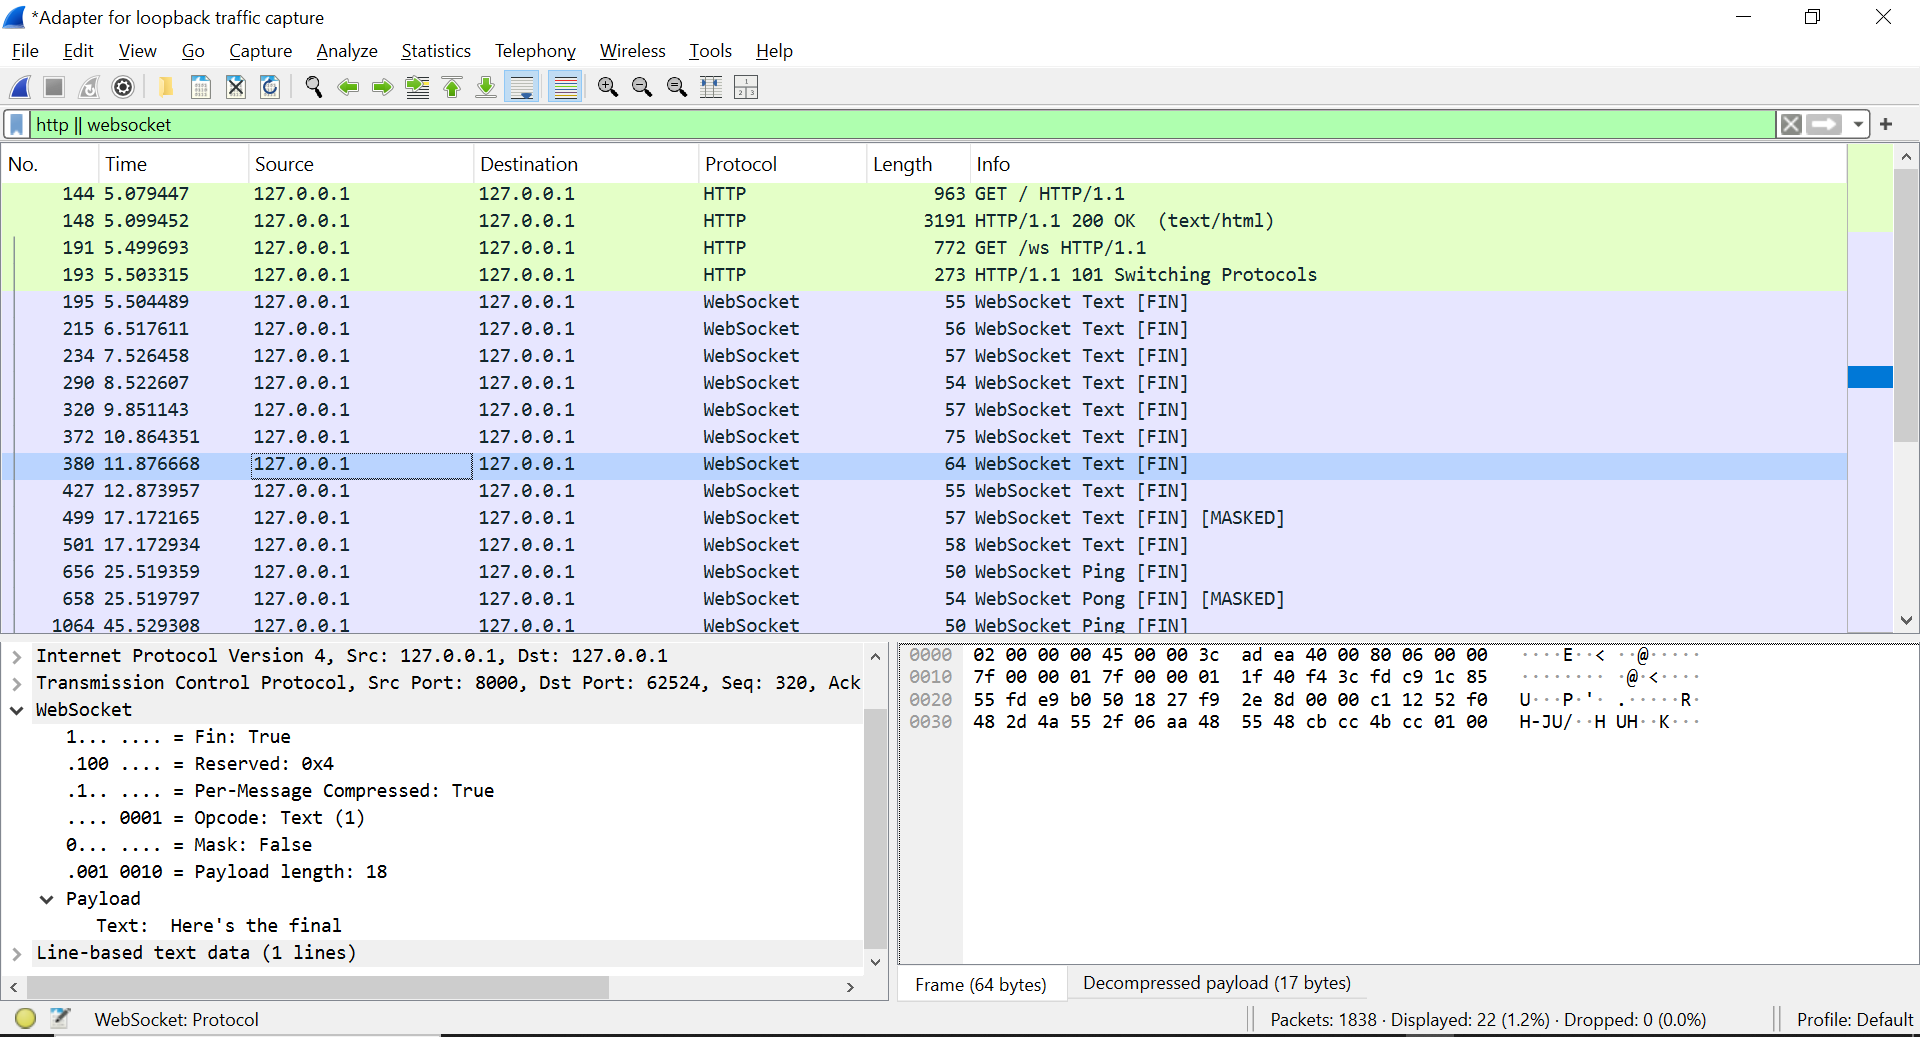
This image shows the server’s message “Here’s the final”.
Eighth Message: 
This image shows the last message from the server “chunk!”.
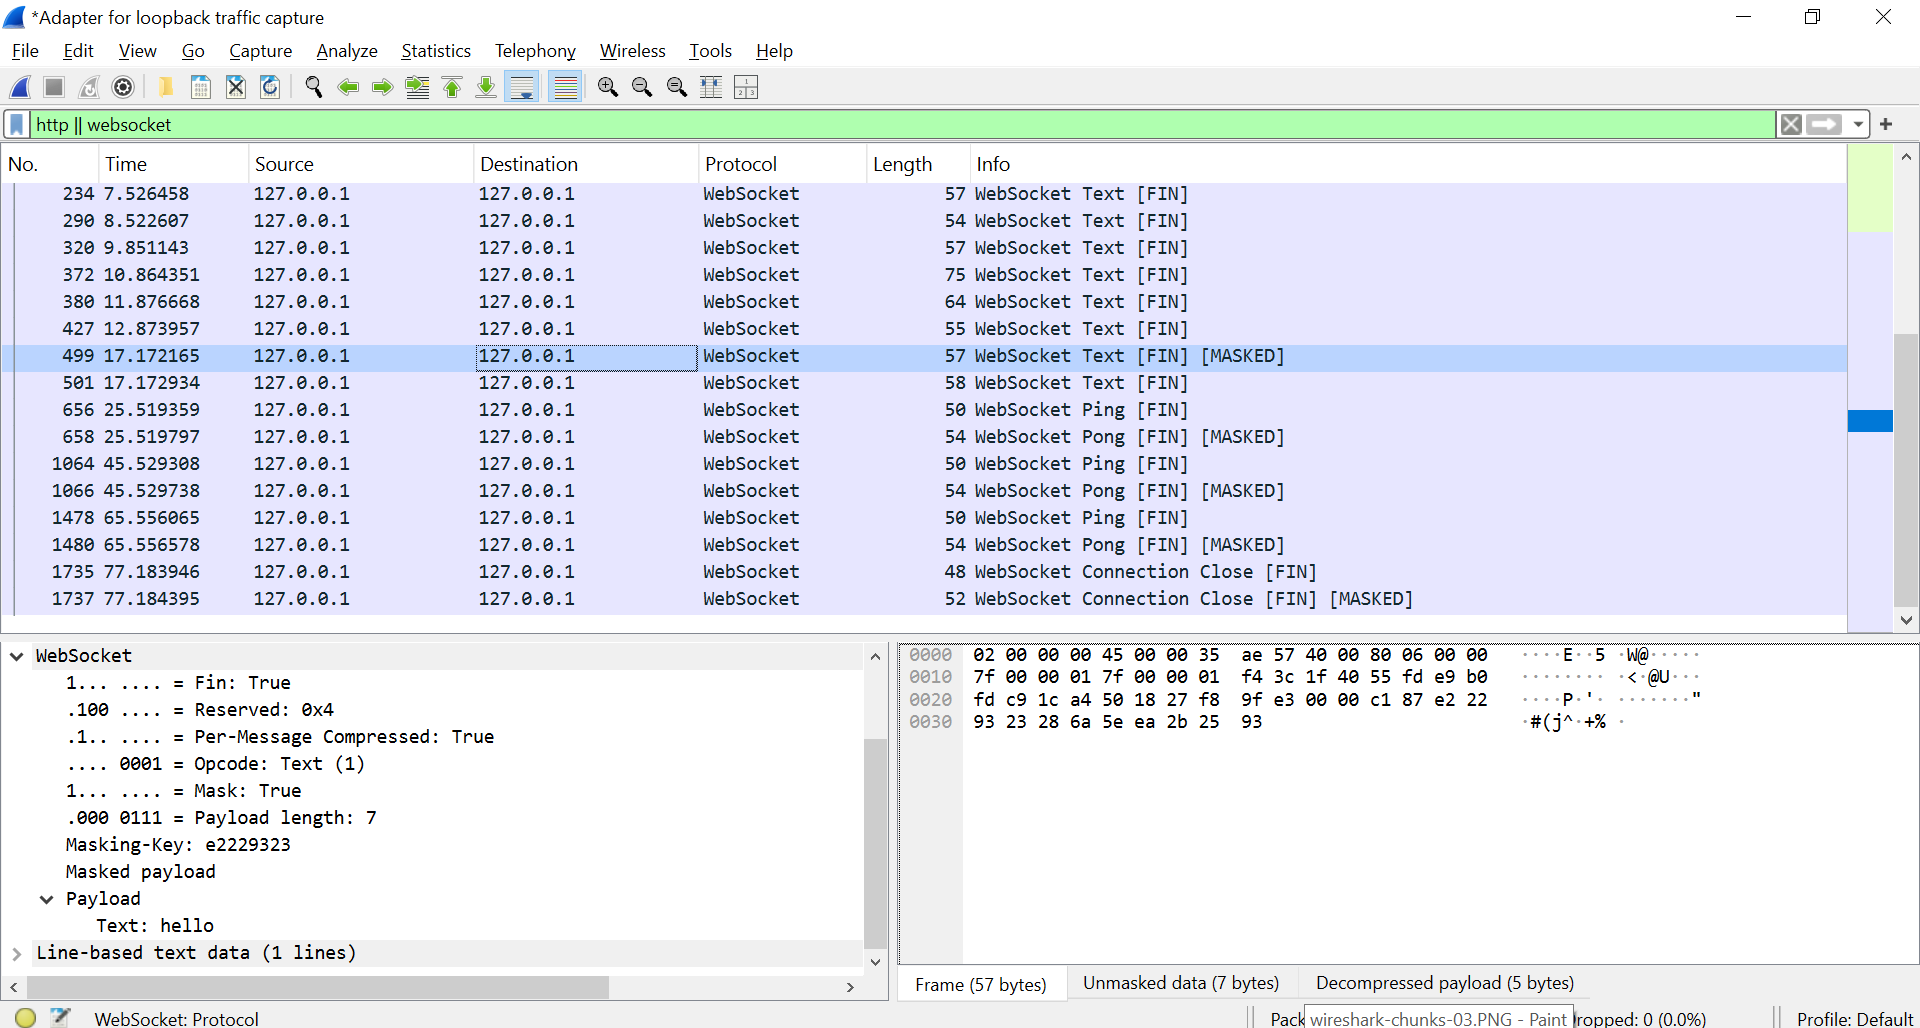
This Wireshark screenshot illustrates bidirectional communication. The server echoed “hello” as a response to the client sending a message. The message that is send by client is also shown. Note that Wireshark marks client sent message with [MASKED], which is part of the websocket protocol to prevent proxy attacks.
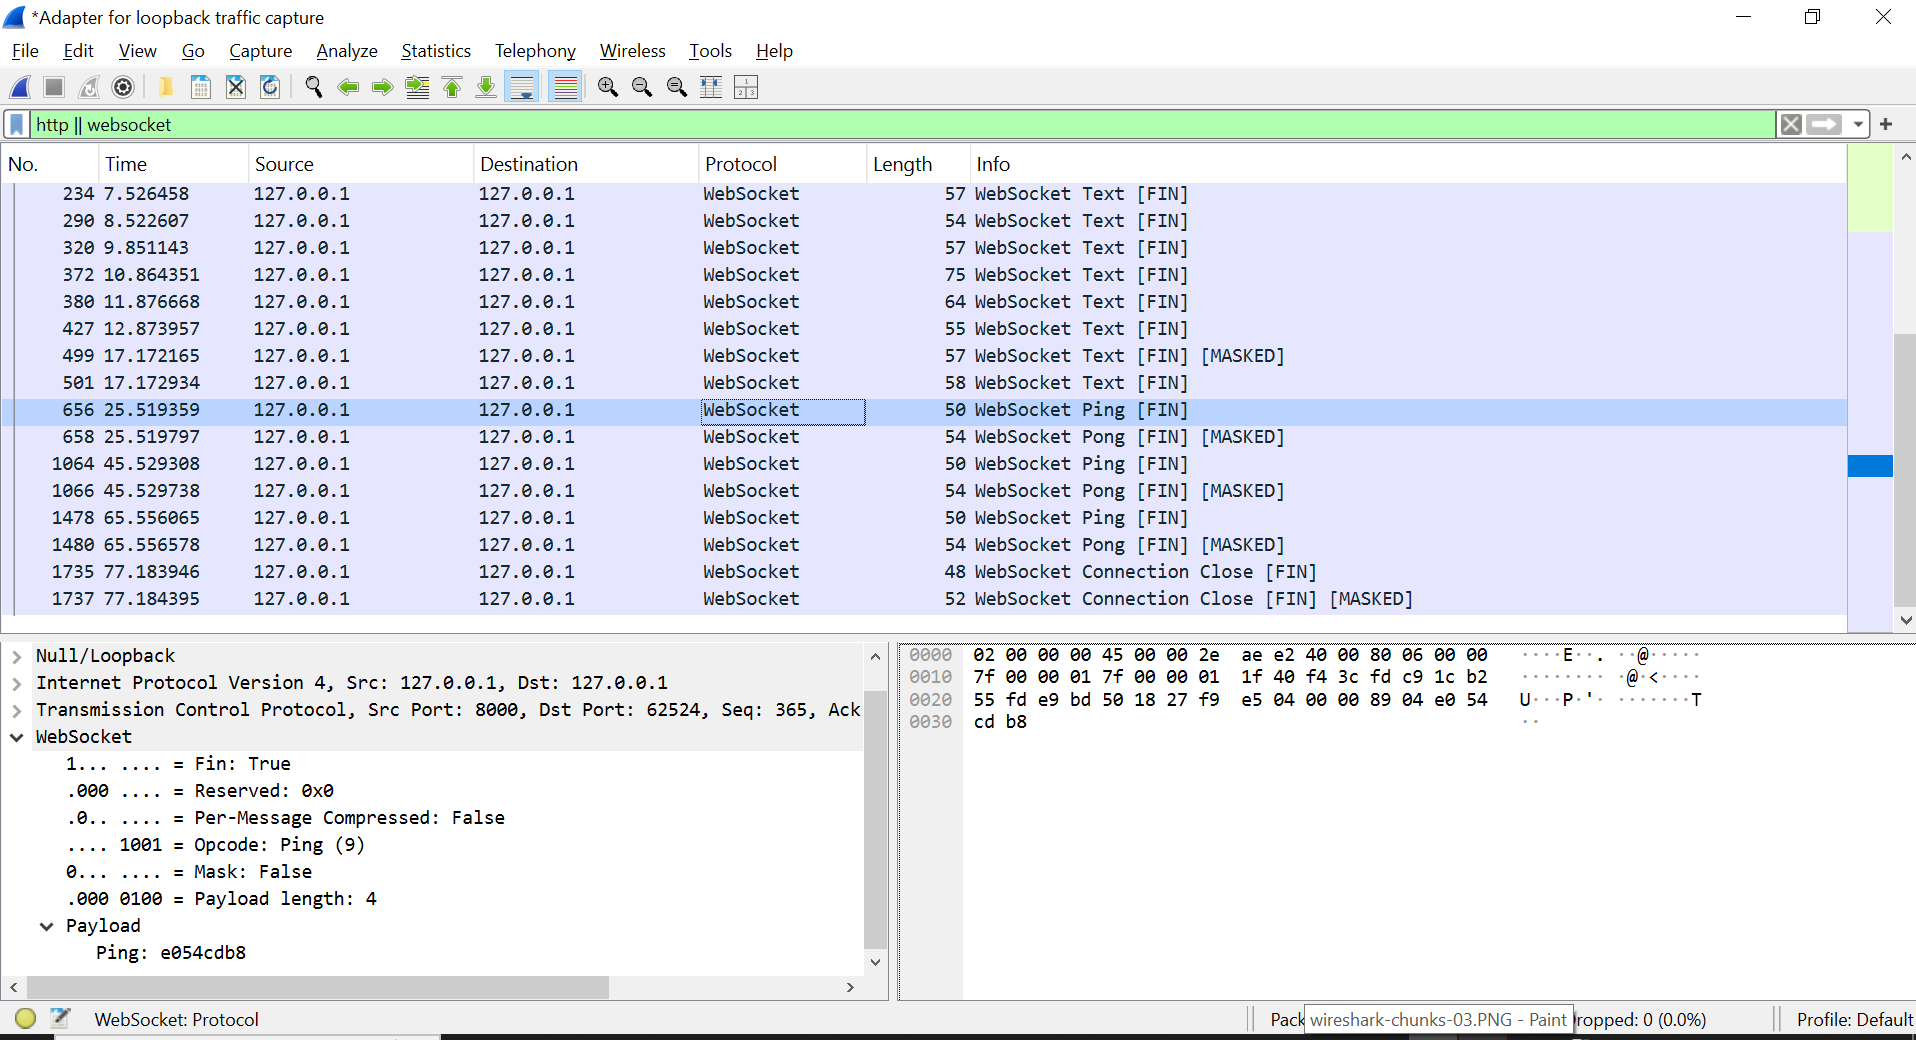
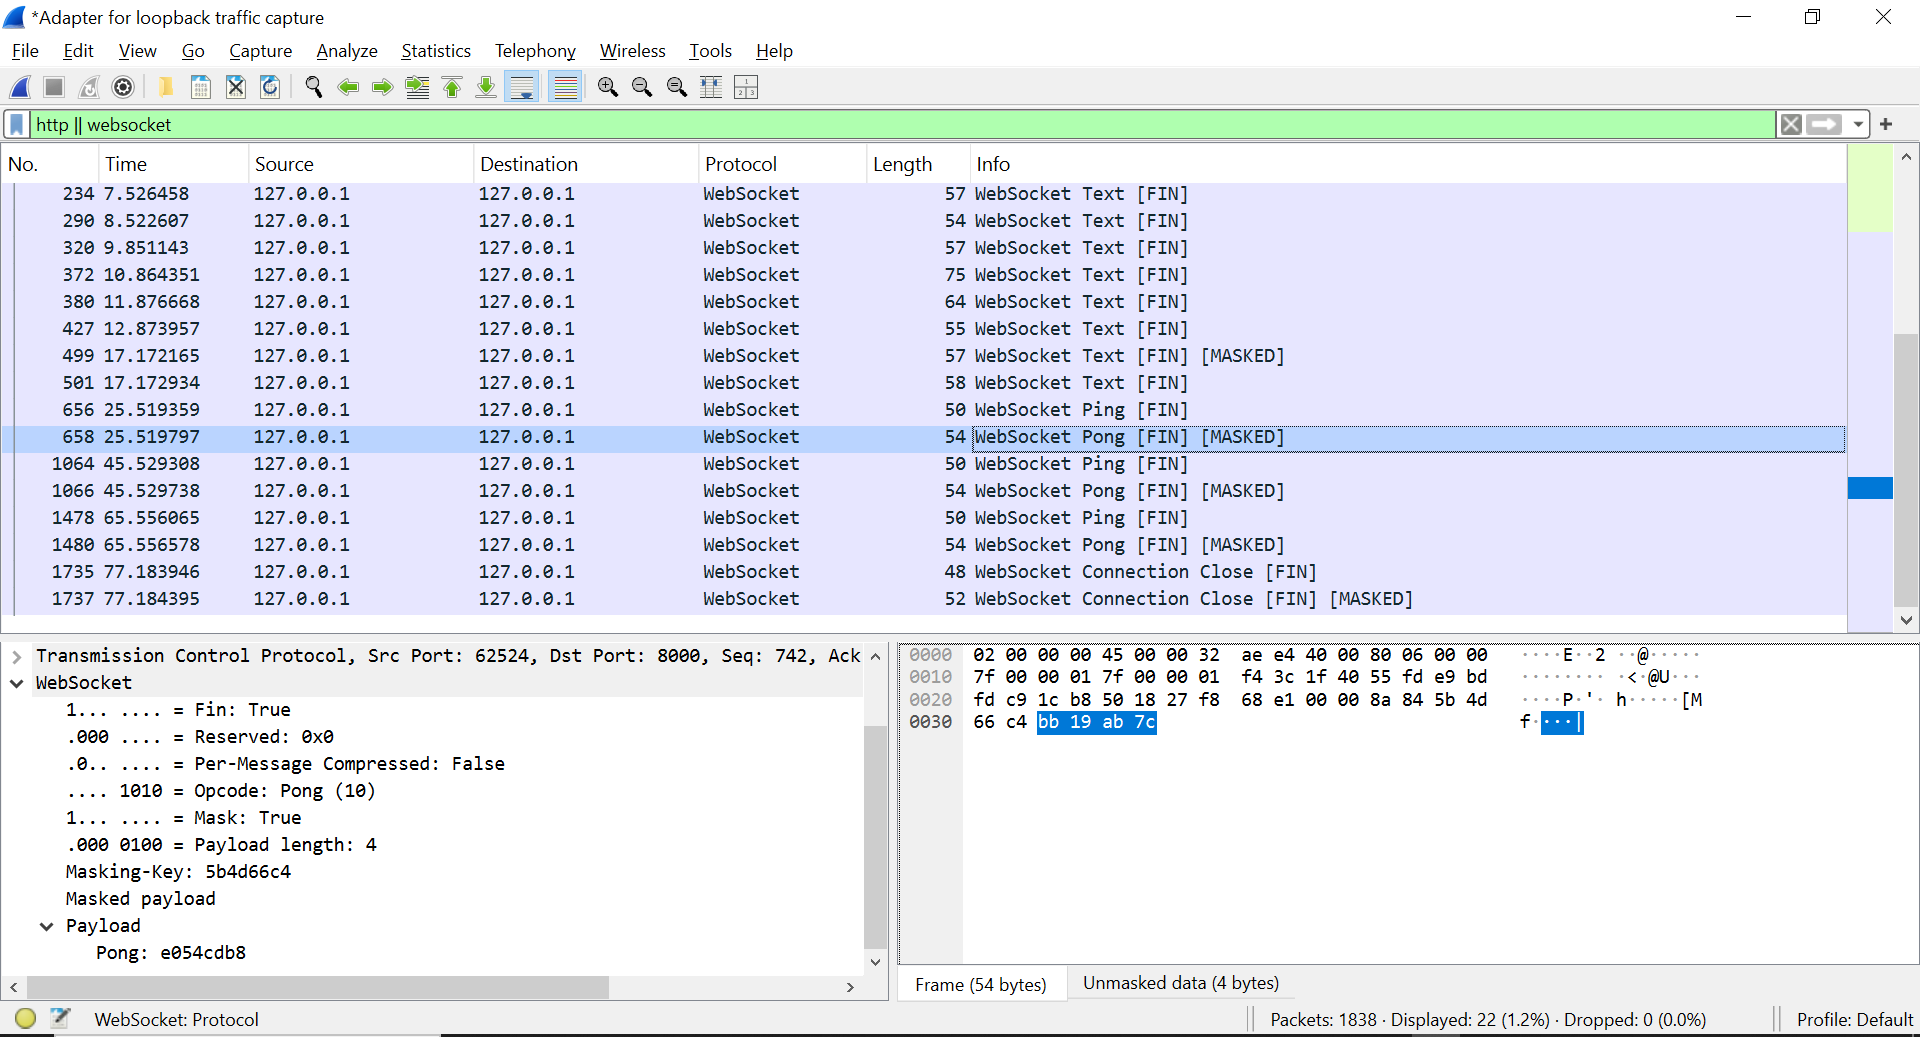
The last set of images showcase some of the features of websocket protocol. We can see that the server is sending ping messages to the client and the client is responding back with the pong message. These messages keep the connection alive and also help in detecting connection issues. In the end the server also sends the [FIN] which closes the connection and the client acknowledges it by also sending a [FIN] message.
This post explored three streaming techniques in FastAPI: StreamingResponse, Server-Sent Events (SSE), and WebSockets. We saw that StreamingResponse is excellent for sending large data chunks, SSE is ideal for server-pushed updates, and WebSockets enable bidirectional, real-time interaction. We covered implementation with code examples and visualized communication using network tools. Understanding these methods lets you build more responsive and efficient applications.
Thank you for taking the time to delve into the world of streaming with FastAPI. I hope you found this guide insightful and that it equips you to build even more powerful applications. Feel free to leave your questions or comments below, and happy coding!